Lab 1: Getting Started
Lab updates / common fixes
Warning
We've fixed an issue where MAVEN_OPTS environment variables couldn't be configured when using the Maven wrapper. Previously, the wrapper would overwrite any custom MAVEN_OPTS values, which prevented you from defining custom settings like the Maven repository location for GitLab CI caching.
What changed:
- Project-wide JVM options have been moved to .mvn/jvm.config (the standard location)
- You can now set MAVEN_OPTS in your environment or CI configuration, and it will be respected
- Example for GitLab CI: Set MAVEN_OPTS: "-Dmaven.repo.local=.m2/repository" to enable dependency caching
Pull the latest changes to get this fix.
Introduction
The objective of this first Lab session is to get you started working on the DevOps project by configuring an initial CI/CD pipeline. This pipeline will automate the build process of your Faction Logic service and generate a Docker image for it. Additionally, it will also automate the execution of a game session, allowing you to test your Faction Logic implementation on our Gitlab server infrastructure.
Prerequisites: JDK, Git, Docker, IDE
Make sure you have installed all the necessary tools on your local machine before starting this Lab session. You must have gone through both the Development environment documentation and the Docker Tutorial to be able to complete this Lab.
Context
It is important to keep in mind how the DevOps game is organised from a technological perspective as it will help you to provide context for the steps you will take in the different stages of this lab session.
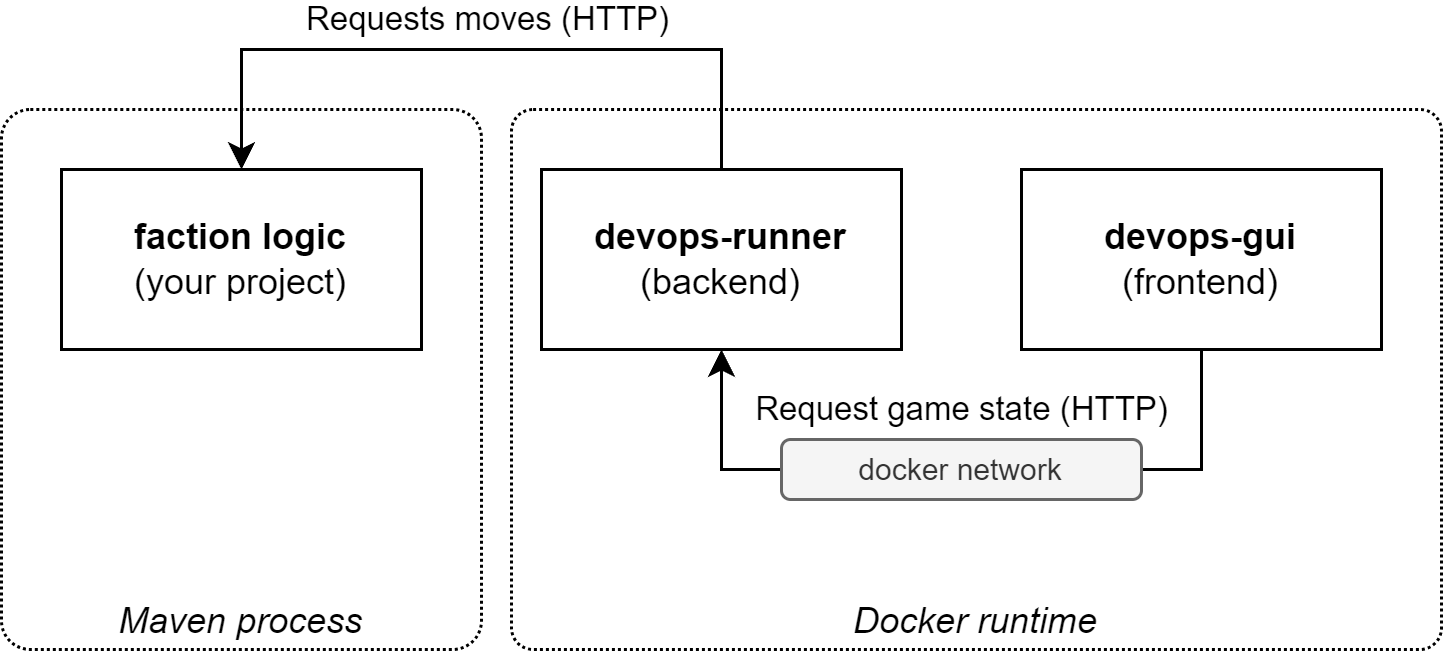
The execution of a game instance relies on three individual components, all communicating with each other, but running in a different process:
- The backend: this is the service that runs the backend logic for executing a game. It keeps the game state in memory, calculates all the moves for each turn by calling the faction logic for each faction and provides an API that can be used by the GUI to render the current game in the browser. Initially, this role is implemented by the
devops-runner, a lightweight version of the backend intended for development and testing purposes, which you will run using Docker (on port 8090 by default). - The frontend: this service is the graphical component of the game, called
devops-gui, also running on Docker (on port 8000 by default). The GUI is implemented as a Web application that periodically renders the game world, based on the state that can be retrieved using the backend (devops-runner) API. If no game is running at the moment, an empty view will be shown. - Your faction-logic service: an HTTP-based service that is called from the backend (
devops-runner). Each time thedevops-runnerrequires input for Base or Unit moves for your faction, an HTTP request is sent to this service, which then responds with the details for the chosen move (based on your implementation of theFactionLogicinterface). A new game will automatically start when your faction-logic service comes online. For this lab-session the faction-logic will be executed using Maven and the steps for how to do this are explained in the walk-through (the section on Running the code - Quarkus Dev mode).
The following diagram visualizes these components and their interactions (running on your local machine):
Walk-through
Tip
General advice: when you're following along with the Lab assignments and stumble upon an issue, read ahead in the documentation. Often the answer to your problem is only a paragraph away.
Warning
We assume you have already forked the repository and cloned it to your local machine. If you haven't done this yet, please go back to the Developer environment documentation and follow the instructions there.
There might be some updates to the source repository of your forked project. To make sure you have the latest version of the project, you can pull the changes from the original repository to your forked repository.
When you view your repository on GitLab, you will see a message at the top of the page if there are new changes in the original repository. You can click on the "Update fork" button to pull these changes into your forked repository.

If you have made changes to your forked repository, you will have to resolve any conflicts that arise from the merge. If you are not comfortable with this, you can also delete your forked repository and fork the original repository again.
If you want to pull the changes yourself through git commands you need to add the original repository as a remote to your local repository, then pull from it:
git remote add upstream https://gitlab.stud.atlantis.ugent.be/devops-public/devops-project.git
git fetch upstream

# then: (like "git pull" which is fetch + merge)
$ git merge upstream/main main

# or, better, replay your local work on top of the fetched branch
# like a "git pull --rebase"
$ git rebase upstream/main
Build the code using Maven
What is Maven?
Apache Maven is a build automation tool for Java projects. It is based around a metadata file (pom.xml), located at the root of the project, that describes the project dependencies and how the project is built and packaged.
Using a plugin based architecture, Maven builds can be extended in a wide variety of ways, from integrating testing to automatically building and publishing artifacts such as container images.
A popular alternative for Maven is Gradle.
Maven project structure
For a basic introduction to Maven, we refer to the following tutorial: https://www.baeldung.com/maven. Please take some time to go through it, as it explains the basic project model (for single and multi-module projects), how dependencies are declared, what the Maven lifecycle phases are, etc. In what follows we assume you have gone through this tutorial.
The project you have forked from our repository is built on top of Quarkus, a Java-based framework for the development of Kubernetes-native applications. Quarkus leverages the highly-performant Vert.x async I/O toolkit and expands it with framework components for dependency injection, configuration management, life-cycle management, etc. It also has a large ecosystem of integrations with 3rd party technologies such as Kafka, MongoDB, PostgreSQL, Keycloak, Redis, etc. Quarkus is actively being used at IDLab to develop micro-service based applications that can operate at scale. Our scalable data broker Obelisk is an example of such an application.
POM
The pom.xml file in the project root directory holds all the project configuration. If you browse through this file, you will encounter the following elements:
groupIdandartifactIdare the main identifiers for a Maven project (and their combination should be unique).versiondefines the version of the project.propertiesallows you to define configuration variables that can be reused in the rest of the Maven definition (e.g. the Java version that should be used for compiling).- The
dependencyManagementelement allows you to organize platform dependencies. E.g. the Quarkus framework is referenced here as a pom import. By specifying a version or a scope here, you can declare dependencies on individual Quarkus modules in thedependenciessection by just specifying itsgroupIdandartifactId. dependenciesallow you to declare the dependencies for the project. Dependencies hosted on Maven Central (the public central Maven repository) can be automatically downloaded by Maven. When adding dependencies on artifacts hosted on other repositories, you will first need to add arespositoryelement to the POM (defining the host URL and optional credentials for the additional repository).build->pluginsdefines the Maven plugins that will be applied for building the project.profilescan be used to define different build profiles.
Compiling the code
Navigate to your repository folder and enter the following command:
./mvnw compile
Notice the use of ./mvnw or mvnw.cmd instead of plain mvn. The former refers to a Maven wrapper script that comes with the project. This wrapper downloads a project-compatible version of Maven that will only be used within the context of this project. Using Maven wrapper makes it easier for developers to collaborate and prevents you from having to install Maven on your system.
Warning
If you get an error stating permission denied: ./mvnw, you will have to make the file executable first. You can do this by entering the following command:
chmod u+x ./mvnw
At the end of the process you should see output similar to:
[INFO] --- maven-compiler-plugin:3.11.0:compile (default-compile) @ logic-service ---
[INFO] Changes detected - recompiling the module! :input tree
[INFO] Compiling 20 source files with javac [debug release 17] to target\classes
[INFO] ------------------------------------------------------------------------
[INFO] BUILD SUCCESS
[INFO] ------------------------------------------------------------------------
[INFO] Total time:  7.674 s
[INFO] Finished at: 2023-08-18T15:45:45+02:00
[INFO] ------------------------------------------------------------------------
Running the code - Quarkus Dev mode
Notice that the project folder contains a docker-compose.yml file in the root folder. This file describes the service dependencies for locally running a DevOps game (see also Context):
devops-gui: a Web-based application used for visualizing a Game session. More information can be found here.devops-runner: a service that can host a single player version of the Game. Opponents are locally executed versions of a simple Faction Logic implementation (similar to the one you start with). More information (including an overview of the configuration options) can be found here.
To start these services, execute the following command:
docker compose up -d
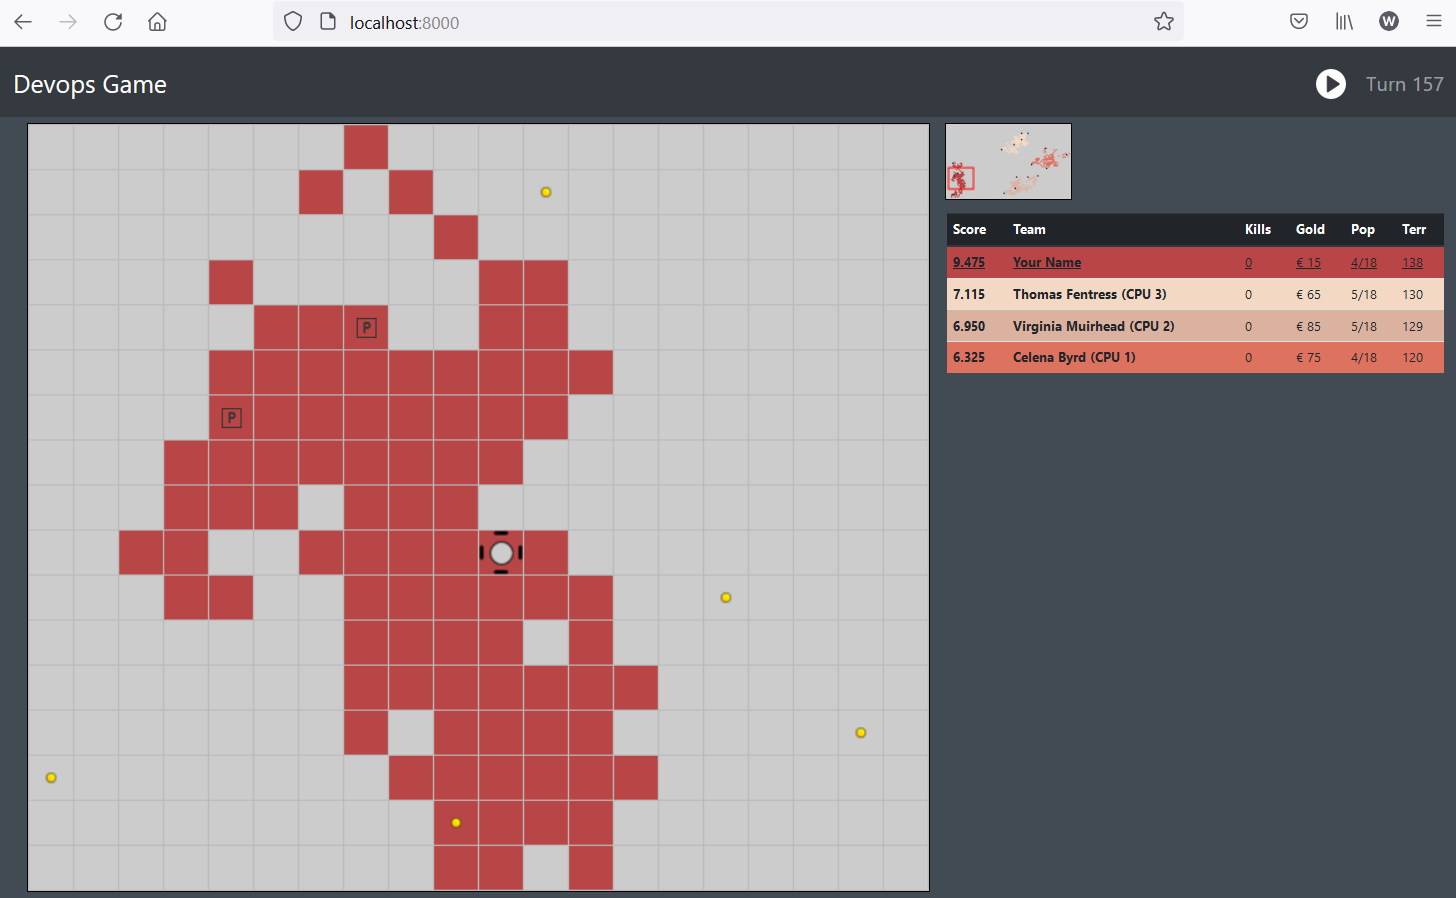
When completed, the game visualization should be running at http://localhost:8000. The devops-runner is configured to wait until a player joins the game, so for now you will see an empty screen.
You can join the game by re-configuring the devops-runner service and then launching your own logic-service (HTTP binding of your Faction Logic implementation).
devops-runner:
  image: gitlab.stud.atlantis.ugent.be:5050/utils/docker/devops-runner:latest
  ports:
    - 8090:8090
  environment:
    - PLAYER_NAME=Your Name
    - LOGIC_URL=http://host.docker.internal:8080
  # Uncomment on Linux:
  # extra_hosts:
  #    - "host.docker.internal:host-gateway"
Modify the devops-runner part of the docker-compose file by changing the PLAYER_NAME appropriately. Then issue the command docker compose up -d in the terminal to restart the devops-runner. When issuing docker compose up on an already running compose file, only the changed/affected services get restarted.
Notice the LOGIC_URL environment variable, this points to the URL where the logic-service is hosted. The devops-runner knows which HTTP endpoints to call for retrieving the moves for each turn. With the default configuration, the devops-runner will periodically check if the logic-service is available at the provided URL and only start the game if a connection can be made!
Next, start your logic-service using the following command:
./mvnw compile quarkus:dev
If you visit the visualization page again (or refresh), you will see your Faction showing up on the World map.
The above command has started our code in something called Dev Mode. This mode is intended for development and testing purposes. It will automatically recompile the code when changes are detected and restart the application. It also provides a development console at http://localhost:8080/q/dev-ui/ that can be used to inspect the application state, configuration, perform health checks, etc.
More info on the Dev UI: https://quarkus.io/guides/dev-mode-differences and https://quarkus.io/guides/dev-ui
Troubleshooting
When you can't get the game running, these are the things you can check:
Is your logic-service running? Quarkus automatically hosts a development console when running in development mode, that should be reachable at http://localhost:8080/q/dev-ui/ when the logic-service is up and running. If this is not the case, double-check your Maven commands and read the output logs!
Is the devops-runner running? You can quickly check if the devops-runner server has started by visiting http://localhost:8090/ping (it should respond with pong). If this is not the case, you can try restarting the docker compose setup: docker compose up -d and/or docker compose restart.
In some setups, it is possible that instead of localhost you will have to connect to 127.0.0.1, try this if the above ping endpoint does not work.
Has the game started? The devops-runner will only start the game if it can connect to the logic-service at the configured URL. If the game has not started, check the logs of the devops-runner for errors. You can do this by entering the following command:
docker compose logs devops-runner
In this case, IPv6 might be the culprit. We can force our java process to use IPv4 by setting the _JAVA_OPTIONS environment variable:
export _JAVA_OPTIONS="-Djava.net.preferIPv4Stack=true"
./mvnw compile quarkus:dev
If this solved your issue, make sure to add this to your ~/.bashrc or ~/.profile file to make it permanent for your local environment.
Building container images
Google Jib provides a Maven plugin for easily building container images from Java applications without even requiring a Docker daemon. This makes Jib an ideal candidate for integrating container image creation in an automated CI/CD pipeline.
Add the Jib Maven dependency to your project by running the following command (go to the Quarkus container image documentation for detailed information):
./mvnw quarkus:add-extension -Dextensions='container-image-jib'
Additionally specify the base image by adding the following configuration to src/main/resources/application.properties:
quarkus.jib.base-jvm-image=gitlab.stud.atlantis.ugent.be:5050/utils/docker/eclipse-temurin:25-jre
Understanding JDK vs JRE Images
When building container images for Java applications, it's important to understand the difference between JDK (Java Development Kit) and JRE (Java Runtime Environment) images:
- JDK images (e.g.,
eclipse-temurin:25-jdk) contain the full Java Development Kit, including the compiler (javac), debugging tools, and the runtime environment. These images are larger but necessary for building Java applications. - JRE images (e.g.,
eclipse-temurin:25-jre) contain only the Java Runtime Environment needed to run compiled Java applications. These images are significantly smaller and more secure as they exclude unnecessary development tools.
In this configuration, we use the 25-jre image as the base for our runtime container because our application is already compiled. This follows the best practice of keeping production images as small and secure as possible. The build process itself (happening in the CI/CD pipeline) will use the 25-jdk image which includes the necessary tools to compile the code.
To check if everything was setup correctly, you can manually trigger Docker image creation by entering the following command:
./mvnw install -D"quarkus.container-image.build=true"
If you then list local Docker images using docker images you should see the image you just created!
Committing and use of Conventional Commits
Before moving on, commit your changes to the POM files. Either use your Git UI application or the git command from CLI. We provide an example through CLI:
git add .
git commit -m "build: add jib configuration for logic-service"
You'll notice we use a "build" prefix in our commit message, this is an example of a Conventional Commit. Writing good commit messages can sometimes be a challenge, but using some form of convention can be a good place to start.
Info
The Conventional Commits specification is a lightweight convention on top of commit messages. It provides an easy set of rules for creating an explicit commit history; which makes it easier to write automated tools on top of. This convention dovetails with SemVer, by describing the features, fixes, and breaking changes made in commit messages.
This convention is being adapted in the Open Source community more and more since it gives structure to Git history and allows for easy automation of version updates. Based on the commit history, we can devise if an update should be a patch (only fixes), a minor (only features added but no breaking changes) or a major (breaking changes). For now we will use this convention merely for structure and best practice. There are several "standard" prefixes which we will use in this course:
| Prefix | Full name | Description |
|---|---|---|
| feat | Features | A new feature |
| fix | Bug Fixes | A bug fix |
| docs | Documentation | Documentation only changes |
| style | Styles | Changes that do not affect the meaning of the code (white-space, formatting, missing semi-colons, etc) |
| refactor | Code Refactoring | A code change that neither fixes a bug nor adds a feature |
| perf | Performance Improvements | A code change that improves performance |
| test | Tests | Adding missing tests or correcting existing tests |
| build | Builds | Changes that affect the build system or external dependencies (maven) |
| ci | Continuous Integrations | Changes to our CI configuration files and scripts (GitLab CI file) |
| chore | Chores | Other changes that don't modify src or test files |
| revert | Reverts | Reverts a previous commit |
A conventional commit will start with a prefix, then have an optional scope in brackets, followed by a colon, whitespace and a descriptive commit message, for instance: feat: add custom Cleric logic.
From now on, try to commit your changes regularly and logically while using the Conventional Commits specification!
Don't worry about using scopes or signaling breaking changes for now. Just focus on the structural and descriptive aspect of conventional commits.
Setup a CI/CD pipeline
Extensive reference documentation on building CI/CD pipelines using GitLab can be found here: https://docs.gitlab.com/ee/ci/
We will guide you through setting up an initial pipeline for an automated build, but it is your task to then optimize this pipeline and extend it with extra steps: Docker image generation and executing the game.
Automate builds
You can create a pipeline for your repository by adding a file called .gitlab-ci.yml to its root. This file declares the stages of the pipeline and the job(s) that must be executed in each of these stages.
A major benefit of including your CI/CD declaration along with the rest of your code, is that it is also versioned. Imagine maintaining different versions of a software solution (e.g. a Web services with a v1 and v2 API) and going back to fix an issue on an older branch. With the CI/CD pipeline being versioned, you can use different pipelines for different versions without needing to maintain and document how the various versions need to be deployed. The GitLab server will always execute the correct pipeline for each trigger (git push, tag) because which declaration to run is always clear from the context.
Create a .gitlab-ci.yml now and add the following content:
image: gitlab.stud.atlantis.ugent.be:5050/utils/docker/eclipse-temurin:25-jdk

variables:
  MAVEN_CLI_OPTS: "--batch-mode"
  MAVEN_OPTS: "-Dmaven.repo.local=$CI_PROJECT_DIR/.m2/repository"

stages:
  - build

maven-build:
  stage: build
  script:
    - ./mvnw $MAVEN_CLI_OPTS compile
Understand that GitLab heavily relies on containers to execute the jobs for the various stages of the pipeline. The attribute image is used to specify the image that should be used to create these containers. The image we're using comes with JDK 25 pre-installed, which includes all the necessary tools for compiling Java code. It is defined at the top level so it is the default image for all jobs in this file. You can override the image for each individual job if needed.
GitLab goes through the defined pipeline in sequential stages, which are defined using the stages attribute. For now a single stage build has been defined.
Within a stage, multiple jobs can then be executed in parallel. To define a job, add the name of the job as an entry at the root level of the CI/CD definition, such as maven-build in this example. A job entry requires at least a stage attribute, referring to the stage the job should run in, and a script attribute. The latter is a list of commands that should be executed for the job (all commands used here, must be available within the image).
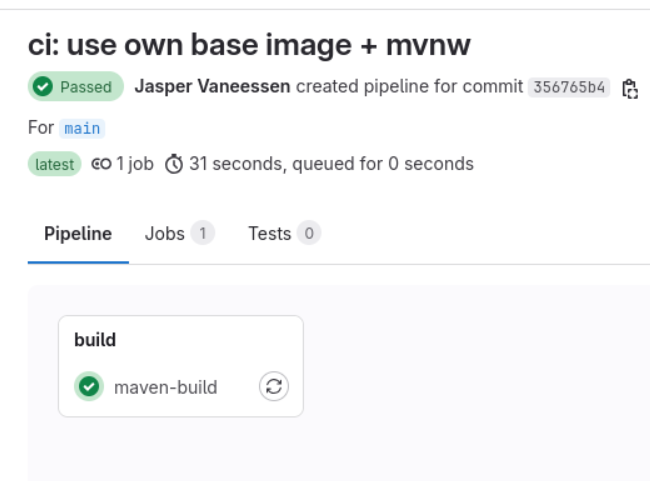
Commit and push the change (addition of the .gitlab-ci.yml file) and navigate to the CI/CD pipelines overview of your repository (tip: pin the Pipelines page for quick access):
You should see that GitLab automatically runs the configured pipeline:

Click on the pipeline id to get more information about this run (including a visual overview of the stages and jobs).
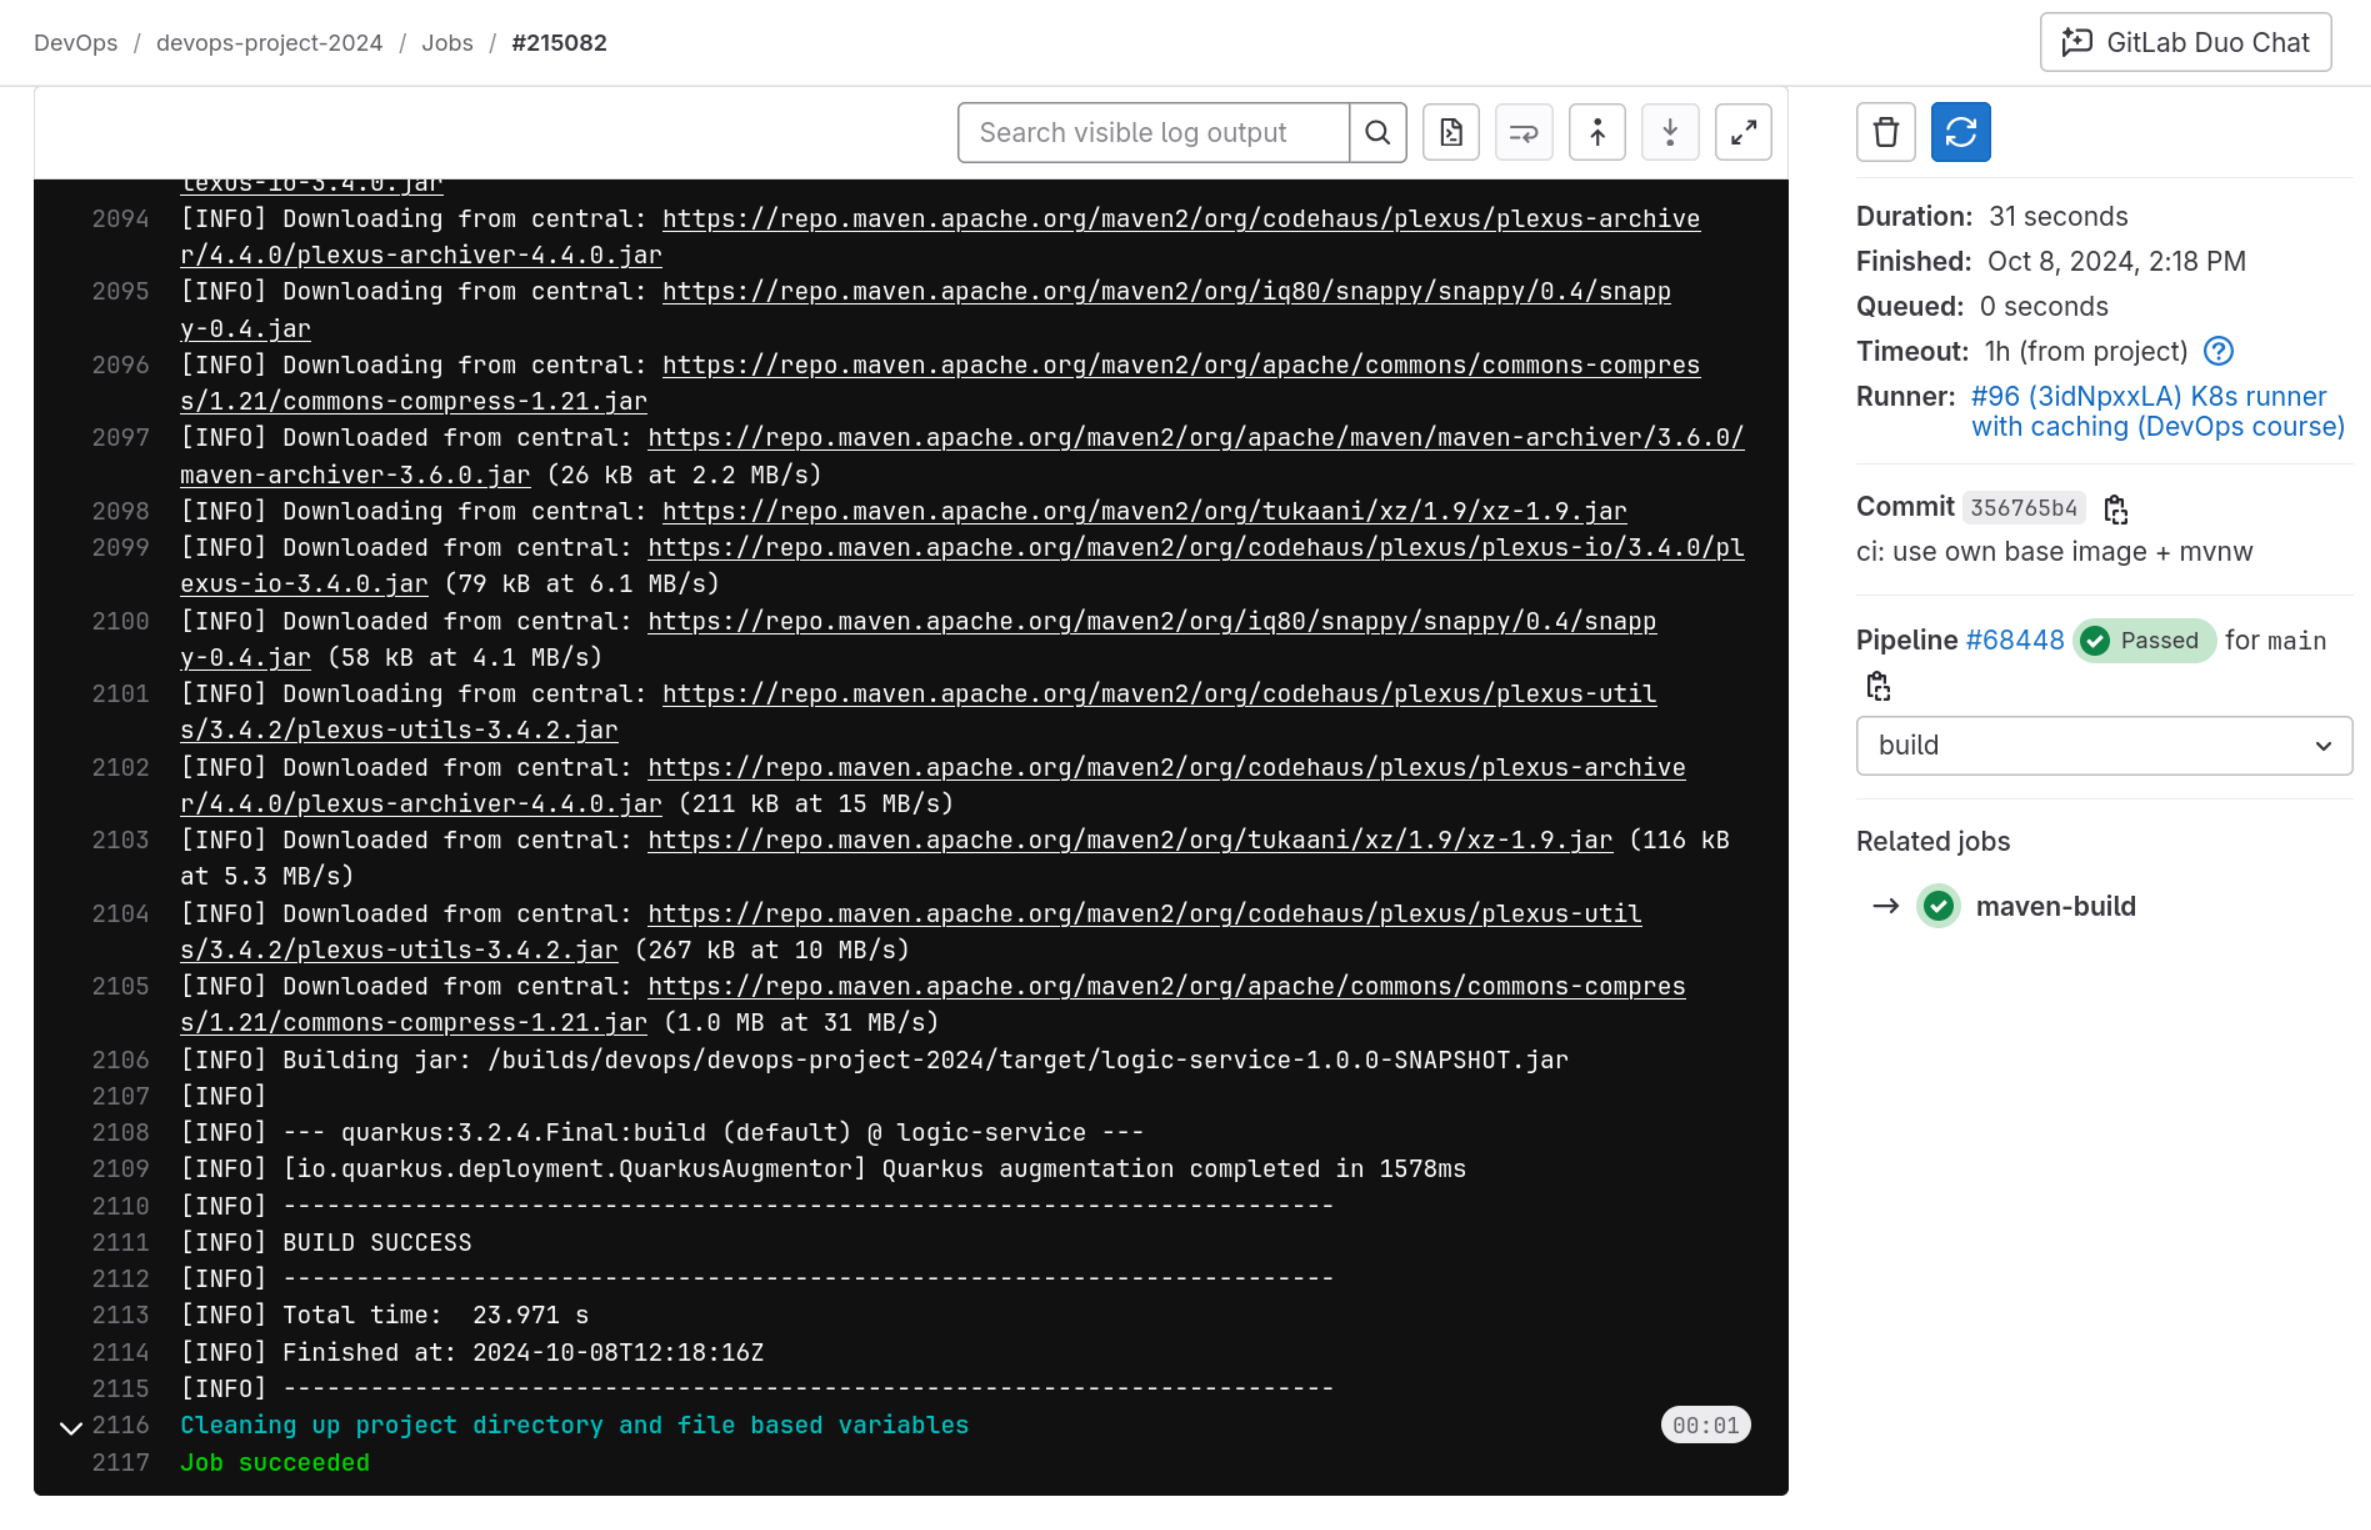
If you click on the job icon in the overview, you will be redirected to the job output log:
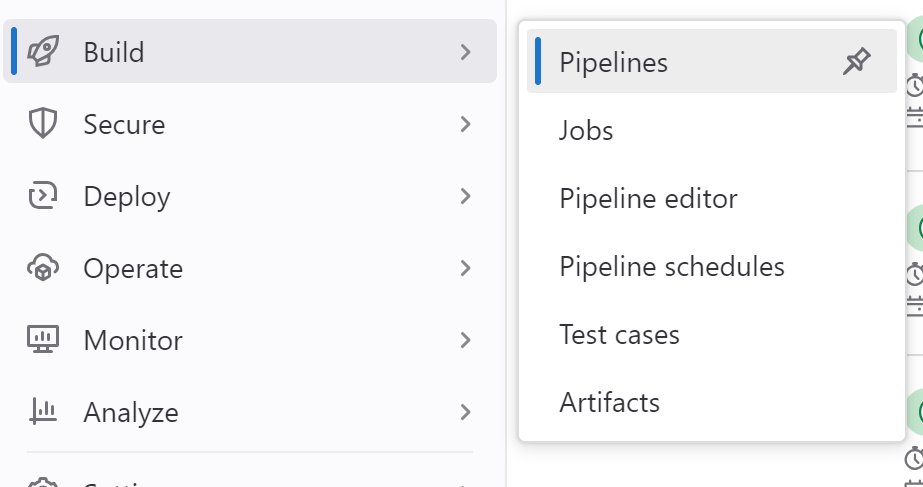
Note
Newer versions of GitLab introduced the Pipeline editor, accessible through Build > Pipeline Editor on your project page. This editor immediately checks your syntax and can also visualize your pipeline. It is a great tool to get started with GitLab CI/CD if you are not familiar with the syntax yet. Though some may still prefer the comfort of their own editor.
Automate container image generation
Next up, you can add an additional job (called maven-container-image-generation, linked to a new stage package) to also automate the generation of the container image. GitLab has an integrated Container Registry per repository that can be used to host your container images. We will have to set additional Quarkus configuration parameters to make sure the image is pushed to this registry with the correct authorization.
The customizing section of the Container Images documentation lists all these options and their defaults. As seen previously, we can either set these configuration values through an application.properties file or through the Maven command line using -D parameters. A third option is using environment variables, which is the most common way to set these values in a CI/CD pipeline. GitLab CI/CD has a feature to set environment variables for a job, which can be used to set these Quarkus configuration values.
Below we include the necessary environment variables to set in the GitLab CI/CD pipeline:
| Environment variable name | Value |
|---|---|
QUARKUS_CONTAINER_IMAGE_PUSH |
true |
QUARKUS_CONTAINER_IMAGE_USERNAME |
<insert-gitlab-environment-variable> |
QUARKUS_CONTAINER_IMAGE_PASSWORD |
<insert-gitlab-environment-variable> |
QUARKUS_CONTAINER_IMAGE_REGISTRY |
<insert-gitlab-environment-variable> |
QUARKUS_CONTAINER_IMAGE_GROUP |
<insert-gitlab-environment-variable> |
QUARKUS_CONTAINER_IMAGE_TAG |
latest |
Below is an example image URL and how the parts map to the expected Quarkus configuration values. The Git repository URL is gitlab.stud.atlantis.ugent.be/jveessen/devops-project:
gitlab.stud.atlantis.ugent.be:5050/jveessen/devops-project/logic-service
|------------REGISTRY-------------|-------GROUP-----------|---IMAGE----|
To debug your container URL and the GitLab variables, insert the code below at the start of your script section. This snippet prints all available environment variables and then prints the URL in the same way that Quarkus will interpret it:
printenv
echo $QUARKUS_CONTAINER_IMAGE_REGISTRY/$QUARKUS_CONTAINER_IMAGE_GROUP/logic-service:$QUARKUS_CONTAINER_IMAGE_TAG
Important: use GitLab's pre-defined environment variables where indicated (instead of filling in hardcoded values) and set these through the appropriate job configuration (not inside the script section).
Tip
You can investigate these variables by using printenv in the script of a job. This command will print out all environment variables, so you can look at them through the job console on GitLab.
Before continuing, check if your GitLab repository contains a Docker image when browsing to "Deploy" => "Container Registry".
Automate running a game
Finally, we want to automate running a game as a stage in the GitLab pipeline. This can be seen as a form of integration testing, checking whether our code can actually still run and function in a game. To facilitate this, a more advanced feature of GitLab CI/CD is used: Job Services.
A Job Service is a Docker image that is run during the execution of a job, with a network connection between that container instance and the one executing the job (an instance of the Docker image defined by the image attribute). This allows your job to interact with additional services like databases or, in this case, your Faction Logic service.
To run the game in the pipeline, add an additional job called run-game (linked to a new stage execute). For this job you need to override the default Maven image and instead specify gitlab.stud.atlantis.ugent.be:5050/utils/docker/devops-runner:latest:
run-game:
  image:
    name: gitlab.stud.atlantis.ugent.be:5050/utils/docker/devops-runner:latest
    entrypoint:
      - ""
The entrypoint of the container is set to empty, because we are going to start the runner from the script attribute:
script:
  - java -cp /app/resources:/app/classes:/app/libs/* be.ugent.devops.gamehost.services.runner.LauncherKt
The devops-runner can be configured to stop after a fixed set of turns, preventing the pipeline job from being blocked for a long time. You also need to reduce the turn interval and specify the URL at which your Faction Logic service can be reached. This can be done by adding environment variables to the job definition:
| Environment variable name | Value |
|---|---|
PLAYER_NAME |
CI/CD Player |
LOGIC_URL |
http://logic-service:8080 |
TURN_INTERVAL_MS |
25 |
TURN_LIMIT |
100 |
Now make sure that your logic-service image you've added to the Docker registry is set up as a Job Service and runs at the specified URL before the devops-runner is started, so your Faction Logic can participate in the game!
Example: Setting up a Job Service
The following snippet adds a PostgreSQL database (using the Docker image postgres:11.7) as a Job Service, which is started before executing the job. The PostgreSQL database becomes reachable at postgres:5432 (the image name as the host and the default PostgreSQL port number).
services:
  - postgres:11.7
Modify this example to set up your logic-service. Tip: Read https://docs.gitlab.com/ee/ci/services/#define-services-in-the-gitlab-ciyml-file on how you can customize the services configuration. Take care to make sure your service is reachable at http://logic-service:8080!
If everything is set up correctly, the job output should be similar to the following:
$ java -cp /app/resources:/app/classes:/app/libs/* be.ugent.devops.gamehost.services.runner.LauncherKt
13:44:47.989 [main] INFO  b.u.d.g.services.runner.Launcher - Waiting for player...
13:44:48.375 [main] INFO  b.u.d.g.services.runner.Launcher - Starting a new game session! Factions: CI/CD Player, Jessie Dancy (CPU 1), Alma Maynard (CPU 2), Brian Cederberg (CPU 3)
13:44:55.472 [DefaultDispatcher-worker-38] INFO  b.u.d.g.services.runner.Launcher - The game ended after 100 turns. Faction CI/CD Player won!
┌─────┬───────────────────────┬─────┬────┬──────────┬─────────┬────────┐
│Score│Faction                │Kills│Gold│Population│Territory│Defeated│
├─────┼───────────────────────┼─────┼────┼──────────┼─────────┼────────┤
│7350 │CI/CD Player           │0    │600 │15/20     │210      │        │
│5230 │Alma Maynard (CPU 2)   │0    │1630│10/18     │129      │        │
│4920 │Brian Cederberg (CPU 3)│0    │520 │8/19      │148      │        │
│3685 │Jessie Dancy (CPU 1)   │0    │400 │7/17      │109      │        │
└─────┴───────────────────────┴─────┴────┴──────────┴─────────┴────────┘
Cleaning up project directory and file based variables
00:00
Job succeeded
Caches and artifacts
When we use Maven locally, the dependencies are cached in our local Maven repository (typically in ~/.m2/repository) and the build files such as class files and JARs are located in the target/ folders of our modules. As Maven build phases are executed sequentially, we can reuse these artifacts between those phases. This way we don't have to download dependencies on every command or rebuild our project when we have already built it and just want to package it into a container.
When we use Maven in a CI/CD pipeline, subsequent calls of Maven are performed in isolated environments (in our case containers). This means that the dependencies are not cached between jobs and the built artifacts are not available in subsequent jobs by default. We can however use caches and artifacts to store these files explicitly. Doing this will speed up our pipeline execution and avoid wasting resources.
GitLab CI/CD provides two mechanisms for preserving files between jobs:
- Caches: Can be shared across pipelines and jobs. Which cache is used can be controlled through the use of a Cache Key. More info on caching can be found here: https://docs.gitlab.com/ee/ci/caching/index.html
- Artifacts: Stored on the GitLab server and available within a pipeline. Artifacts are stored for a configurable amount of time and can be downloaded from the pipeline view. More info on artifacts can be found here: https://docs.gitlab.com/ee/ci/jobs/job_artifacts.html
Use caches and artifacts to speed up your pipeline:
- Make sure that the Maven dependencies are available in subsequent jobs, so that you don't have to download them with every
mvncommand. - Make sure that the build files are available in subsequent jobs, so that you don't have to rebuild the project when building and pushing Docker containers.
Tip
Think carefully about which mechanism (cache or artifacts) is most appropriate for each type of file. Consider the lifecycle, scope, and purpose of both Maven dependencies and build outputs.
Practicalities
This Lab must be completed before Monday, 20 October 2025 at 23:59.
Warning
All support outside of the physical Lab session is handled via the GitLab Issue tracker. Learn more about the Issue tracker and how to request support here. Do not expect support outside of the normal office hours (Monday to Friday, from 9 AM until 5PM).
Questions
Answer the following questions at the end of your report:
- What is
./mvnwand what is the advantage of using it abovemvn? - Explain the key differences between GitLab's
cacheandartifactsmechanisms. For each of Maven dependencies and build files, explain which mechanism you chose and why. What are the trade-offs of your choices? - In this lab, we use a
25-jreimage as the base for our runtime container and a25-jdkimage for the CI/CD build jobs. Explain the reasoning behind this choice. What would be the impact (positive or negative) of using25-jdkfor both? What about using25-jrefor both?
Checklist
- Create the basic pipeline with 3 stages and 3 jobs:
maven-build,maven-container-image-generation, andrun-game. - Speed up your pipeline by using caches and artifacts.
- Use conventional commits and regularly commit your work.
- Set up a profile picture on GitLab.
- Create an issue on your repository with title Lab 1 Report, and label it with
ReportandLab 1, see Issue Tracker. Be sure to add the following:- Include a link to a successful run of the CI/CD job that executed the game.
- Report on the structure of your
.gitlab-ci.yml, detailing problems you encountered and how you solved them. - Answer the questions posed in the section above.
- Add an annotated tag1
Lab1(with a fitting message) to the commit you consider the final result of this lab session.
Your report can be brief!
Think of it as a way of giving us some additional context when evaluating your submission!
-
Tagging through GitLab UI: use the tab "Code" (left menu), click "Tags" , then "New Tag". You can also tag using git directly:
git tag -a Lab1 -m "Final commit for Lab 1.followed bygit push --follow-tags. More info on tags and the difference between lightweight and annotated, visit https://git-scm.com/docs/git-tag ↩