Lab 2: Project planning and testing
Goals
In this Lab session we will do the following:
- Project planning: Create Issues for features / code improvements you want to tackle in the future and label them appropriately
- Branching strategy: Decide on how you will use Git to work together (branching strategy, commit message conventions, merge requests, etc.)
- CONTRIBUTING.md: Document your complete development workflow, project planning approach, and branching strategy for new contributors
- Extend Faction Logic: Start extending the Faction Logic (e.g., add CLERIC, SAPPER, upkeep management)
- Unit tests: Add Unit tests for your Faction Logic implementation with adequate code coverage
- CI/CD testing: Add a
testsstage which executes both Unit and Integration tests in separate jobs - Build stage: Build an image with a shortened commit reference as tag and push it to the container registry in the
buildstage - Package stage: Build an image with the
latesttag and push it to the container registry in thepackagestage - Tag-based deployment: When pushing a tag to your repository, build an image with that tag and push it to the container registry in the
packagestage - Pipeline optimization: Reduce duplication in your
.gitlab-ci.ymlfile by using the appropriate GitLab CI/CD or YAML features - Image cleanup: Configure cleanup policies for your container registry
For full details on the deliverables of this lab, see the Practicalities section.
Introduction
The focus of this week is testing and project planning as we start to improve and extend the Faction Logic. Project planning will help you to stay on track and keep an overview of progress and remaining work. Good planning will improve collaboration and communication within your team and will help you to avoid duplicate work.
We will also introduce Unit and Integration testing and show you how to automate these tests in your CI pipeline. Without testing the chance of new additions or modifications working as intended is low. Testing is a crucial part of the development lifecycle and should be done as early as possible.
We will look at two testing approaches:
- Unit tests are employed to test very fine-grained aspects of your code, often at a per method level. These will be the main focus of our testing efforts in this course.
- Integration tests are used to evaluate the code in a context that is representative of the actual execution environment with the goal of detecting issues that can only occur when combining multiple components.
Lab teams
From this lab going forward, lab sessions are no longer individual, but in group! You should have joined a Ufora group by now (deadline was the 20th of October). If you are not part of a group, contact us immediately, so we can assign everybody to a repository! You might also have been randomly assigned to a group with availability. Check Ufora Groups to see if you are in a group.
Prerequisite: Group repository
If all has gone well, you should see that you are added to a private GitLab repository corresponding to your group. Navigate to your course’s GitLab group for the current year and locate your team repository. You should have access to this repository and be able to push to it.
Before continuing with this lab session, you will need to initialize this team repository, by picking one Lab 1 solution or by merging the contents of Lab 1 from different team members.
First you will have to remove any hidden traces of git history of the previous sessions, that you might have copied without noticing. They are stored in a (hidden) .git folder. To remove the history open a terminal in your root folder, where you copied all the files that you want to use and keep. In that terminal, run this command to remove the .git folder:
rm -rf .git
Now you are ready to init a new git repository in this folder.:
git init
Warning
If you get a complaint about user.email and user.name make sure you have set these globally, use your @ugent.be email!
```bash
git config --global user.email "you@ugent.be"
git config --global user.name "Your Name"
```
Next we add the online team repository as an upstream remote called origin (to push changes to and pull changes from):
Warning
Replace <team_repo_url> with the url found when clicking "Clone" at the top-right of your main team repository page.
Use the appropriate URL depending on whether you are using HTTPS or SSH.

git remote add origin <team_repo_url>
You can check if it worked by listing all remotes:
git remote -v
This should list two remotes called origin (one fetch, one push), both are the same. (similar to the example below, but a different url of course)
> git remote -v
origin  https://gitlab.stud.atlantis.ugent.be/devops-2023/devops-team0.git (fetch)
origin  https://gitlab.stud.atlantis.ugent.be/devops-2023/devops-team0.git (push)
Now we just need to commit the files and push that commit to the origin.
git add -A # Add all files to staged files for commit (tracked and untracked)
git commit -m "Initial commit" # Commit all staged files
git push -u origin main # Set the upstream remote to origin for the (local) main branch
Info
The other team members can now execute the instructions found in the Development environment documentation to checkout the team repository on their own laptops.
You should now all have the same files in your own local git repository, linked to the common origin upstream.
Info
For basic commands on how to work with git (commit, push, fetch, pull, rebase), we refer to external tutorials (like these ones). If you want you can also use a visual git client or use the built-in IntelliJ/VSCode source control tooling (or additional extensions), that is up to you.
Extending Faction Logic
While the provided Faction Logic code covers the basic functionality and technically allows you to participate in the devops game, some exercises will make more sense and be more engaging when you actively try to improve and extend the basic implementation.
Game Manual
Make sure everyone has read and understands the Game Manual.
Where to start?
The provided basic logic can be made much more intelligent (e.g. by tracking important locations such as resources or enemy bases, or by taking into account the gold budget before scheduling a move), but some game features are currently not even used and thus make a good starting point for extending the logic:
- The basic logic does not include logic for the unit types CLERIC and SAPPER. Try to add sensible behavior for these types of units!
- The basic logic will only receive income or build additional units as base moves. Additional BaseMove types supported by the game engine are:
- Relocating your current base to another base location in your territory. This can e.g. be useful to avoid defeat by an enemy invasion.
- Manufacturing bombs so these can be used by Sappers to rig specific map locations.
- Add logic to manage your unit upkeep. Prevent score penalties by making sure that your Faction can pay the upkeep cost each turn, e.g. by only creating new units when there is plenty of gold left, or by retiring other units (depending on the strategy).
Tip
When you start developing code for your Faction Logic, be sure to check the entries in the Extra section for general tips on the dev cycle, debugging and logging.
Project planning
Now is a good time to start thinking about next steps for your Faction Logic implementation. What features do you want to implement? What improvements do you want to make? What is the priority of these tasks? What is the estimated effort?
In this course we will use GitLab Issues to track features and improvements that you want to implement in your Faction Logic. This is a good way to keep track of what you want to do and to keep an overview of what has already been done. It also allows you to easily assign issues to team members and to track progress.
Read through the game manual and check out the logic service code while keeping the pointers from Where to start? in mind. Then start creating separate issues for each feature or improvement you want to implement. The issue description can be brief initially and can be updated later on with more details (e.g. when you start working on them). The issue tracker is also the place to discuss the implementation of a feature or improvement with your team members.
Tip
You can use labels to categorize issues, e.g. enhancement, bug, documentation, ci, help wanted, wontfix, etc. Or more specific labels to designate what piece of code: logic:cleric, logic:sapper, logic:general, etc. The choice is yours. You can also set Due Dates for issues, to keep track of deadlines and assign weights to issues to indicate their relative importance.
When you then later start developing a feature or improvement, you can assign the issue to yourself and start working on it. Multiple people can be assigned to an issue if needed. This allows you to keep track of who is working on what and to avoid duplicate work.
Tip
These issues shouldn't be limited to the software itself, you can create issues for all things related to your project (e.g. pipeline definitions, documentation, etc.). This small effort of organization will help you in the long run and ensure you don't forget about important tasks. Use your issue tracker as an advanced TODO list.
Explore the capabilities of GitLab when it comes to management (check the Plan tab on your repository). GitLab boards and Milestones can be used to keep track of progress and to visualize the status of your project.
Assignment: Project planning
Create issues for features and improvements you want to implement in your Faction Logic. Assign these issues to yourself or other team members. Use labels to categorize issues and set Due Dates and Weights where appropriate.
Git cooperation and branching strategy
Cooperating directly on the main branch of a project is a recipe for disaster. You will run into frequent merge conflicts during which previous changes might get overwritten and lost. You will also be hesitant to push and save your work frequently as your changes might break the pipeline. Therefore, it is important to agree on a branching strategy and to use GitLab features such as merge requests to collaborate on the same project. Merge Requests are equivalent to GitHub's Pull Requests with which some of you might be more familiar.
We suggest you adhere to the following simple branching strategy:
- Create a new branch for each feature or improvement you want to implement. Give the branch a descriptive name, prefaced by the type of issue it tackles (e.g.
feature/cleric-logicorbug/no-pioneers). Using this naming convention, you can easily filter branches in the GitLab UI and Git clients. - When you are done working on a feature or improvement, create a merge request to merge the branch into
main. This allows you to review the changes and to discuss them with your team members. If the merge request is approved, the branch can be merged intomainand deleted. If the merge request is not approved, you can make additional changes to the branch and push them to the remote branch. The merge request will automatically update with the new changes. - Sometimes you will have to update your branch with changes that were made to
mainin the meantime. You can do this by rebasing your branch onmain. This will apply your changes on top of the latest changes inmain. If there are conflicts, you will have to resolve them. Rebasing is a good practice to keep your branch up-to-date with the latest changes inmainand to avoid merge conflicts when merging your branch intomainlater on.
flowchart LR;
  A[Create new branch] ---|main| B[Merge];
  A -->|feature/XYZ| C[Add commits]
  C -->|Push to branch| E[Merge Request:<br> Review changes]
  E -->|Approved| B[Merge into main]
  E -->|Not approved| C[Add commits]
This branching strategy is commonly referred to as GitHub Flow, Git Flow and GitLab Flow are similar but more complicated / fitting for larger projects. GitKraken (a popular git client) has a nice overview of these 3 paradigms that can be found on their blog.
Assignment: Branching strategy
Use the GitHub Flow branching strategy when you start improving your Faction Logic. If you choose a different branching strategy, please elaborate on that choice in your CONTRIBUTING.md file.
Protect the main branch and require passing pipelines before merge. Explain your rationale or motivate any alternative safeguards you choose in your CONTRIBUTING.md.
We want to see at least one example of usage on your repository before the deadline. Include a link to a closed merge request in your report.
GitLab Merge Requests
There are plenty of resources online that go into great detail about using Merge Requests (MR), so here we'll keep it short and show you briefly how to create one.
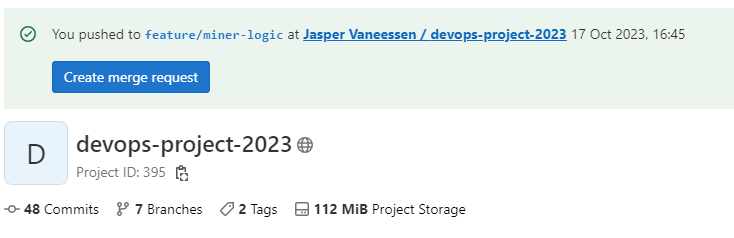
When you create a branch and push it to the remote, you will see a banner on the GitLab repository page with a button to create a merge request:
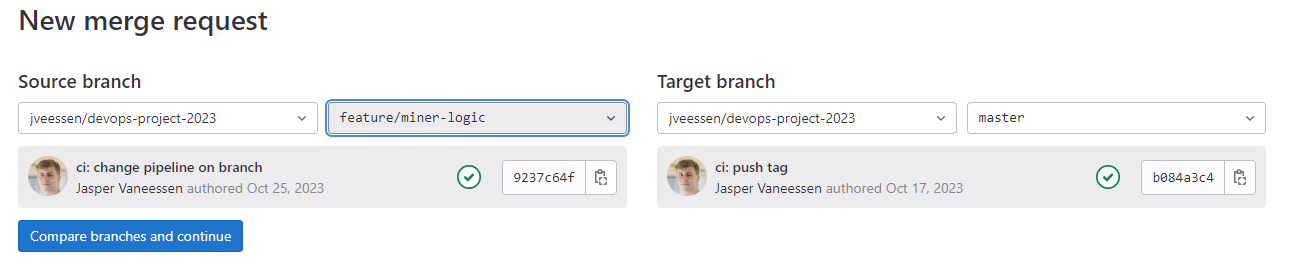
You can also create a merge request manually by clicking New merge request on the Merge Request page. This will let you select a source and target branch for the merge request:
Next you will be able to add a description, set assignees, reviewers, labels, etc. It's quite similar to how issues work. You can also set a MR in Draft mode, which will flag it as a work in progress and prevent it from being merged.
The result will be a page similar to this;
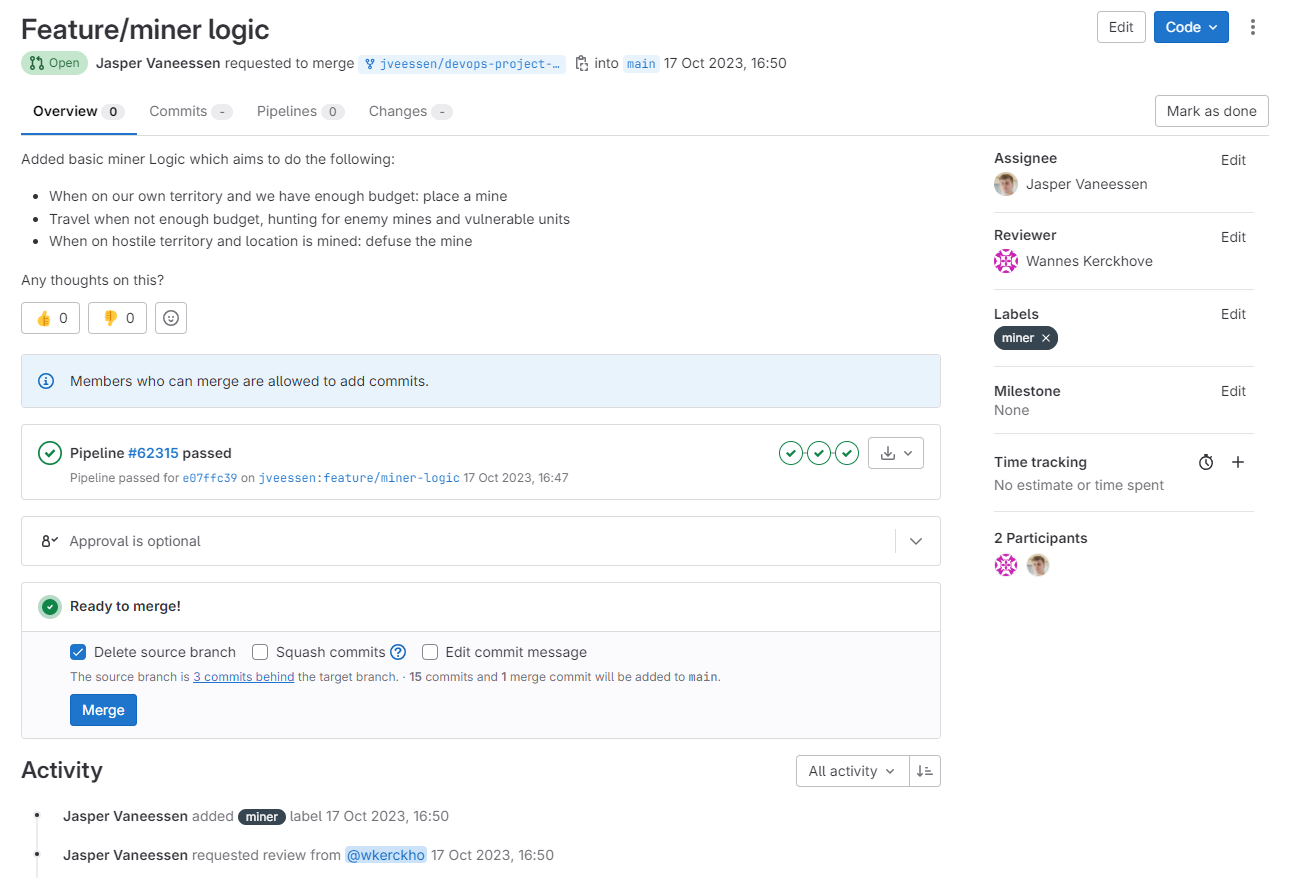
From here on out, changes to the branch will be reflected in the MR. You can also add comments to the MR, which can be linked to the specific lines of code. This is useful for discussing changes and issues with your team members. You can also use the Resolve discussion button to mark a discussion as resolved.
When you are ready to merge the MR, you can click the Merge button. This will merge the branch into the target branch and close the MR. You can also use the Squash option to squash all commits into a single commit. This is useful to keep your commit history clean and concise. The commit message can be edited before merging, this allows you to write a descriptive conventional commit message. Be mindful however that you are overwriting some of the development history. Only squash when all the changes in the MR are related to the same feature or bugfix.
CONTRIBUTING.md
A CONTRIBUTING.md file is a good way to inform contributors about how they can contribute to your project. It can contain information about how to report bugs, how to request features, how to set up the development environment, how to run tests, etc. It can also contain information about the coding style you use, the branching strategy you follow, the commit message conventions you use, etc.
This file serves as the central documentation for your project's development workflow and should be comprehensive enough that a new developer can read it and immediately start contributing.
A CONTRIBUTING.md file can be as simple or as complex as you want. Here we will keep things relatively focused but thorough. You should include at least the following sections:
- Issue tracking: Explain the labels you use and what they mean. Explain how you perform project planning (milestones, boards, weights, due dates, etc.). Do you assign yourself to issues? Do you assign weights to issues? Do you set due dates for issues? Provide examples of well-written issues.
- Branching strategy: Explain the branching strategy you use (e.g., GitHub Flow) and how to create branches and merge requests. What is your branch naming convention? What is your policy on code reviews? Do you include issue numbers in commit messages? When do you use squash commits?
- Development workflow: How does a developer go from picking an issue to getting code merged? Walk through the entire process step by step.
- Testing expectations: What kind of tests are expected? How do you run tests locally? What's the minimum coverage or quality bar?
After reading this file, a new developer should have a clear understanding of your project's workflow and standards. Should your workflow change during the course of the project, make sure to update this file accordingly.
Assignment: CONTRIBUTING.md
Create a CONTRIBUTING.md file in the root of your repository that documents your complete development workflow and project planning approach.
Include sections on: - Issue tracking (labels, planning features, assignment workflow) - Branching strategy and merge request process - Development workflow from issue to merge - Testing expectations and how to run tests locally
Explain what labels you've defined and their meanings, what GitLab features you're using (milestones, boards, etc.), and your complete workflow for issue creation, assignment, and merge request reviews.
A new developer should be able to read this file and immediately start contributing to your project effectively.
Unit Testing
JUnit 5
Most programming platforms have frameworks that can help you with writing Unit tests (e.g. to handle execution, test lifecycle management, reporting, etc...). For Java we recommend using JUnit 5. JUnit is probably the most used unit testing framework and integrates well with various IDEs. A popular alternative is TestNG.
It makes sense to add Unit testing for your Faction Logic implementation (and for any additional classes you introduce to implement the Faction Logic), e.g. to test if nextUnitMove returns the appropriate move in specific circumstances.
In the project pom.xml you will find a Quarkus module packaging the JUnit 5 library as a test dependency, declared as such:
<dependency>
    <groupId>io.quarkus</groupId>
    <artifactId>quarkus-junit5</artifactId>
    <scope>test</scope>
</dependency>
Notice the addition of the scope element. By setting the scope to test instead of the default compile, the JUnit library is only included for the classes in the test packages and will be omitted when compiling and packaging the actual code.
In your test source folder src/test/java you will find two test classes:
- A minimal
FactionLogicTestclass, that includes a simple test that checks ifnextBaseMovereturns a BaseMove with TypeSTART_BUILDING_UNITwhen the Faction has enough gold and the population limit has not been reached (and the Faction's building slot is empty). - A
SerdesTestclass, that tests if (de)serialization to/from JSON works as intended, for a few of the model classes.
Notice that when you open this class in your IDE, the editor shows Play button icons on the left side of the class and method declaration of this file:
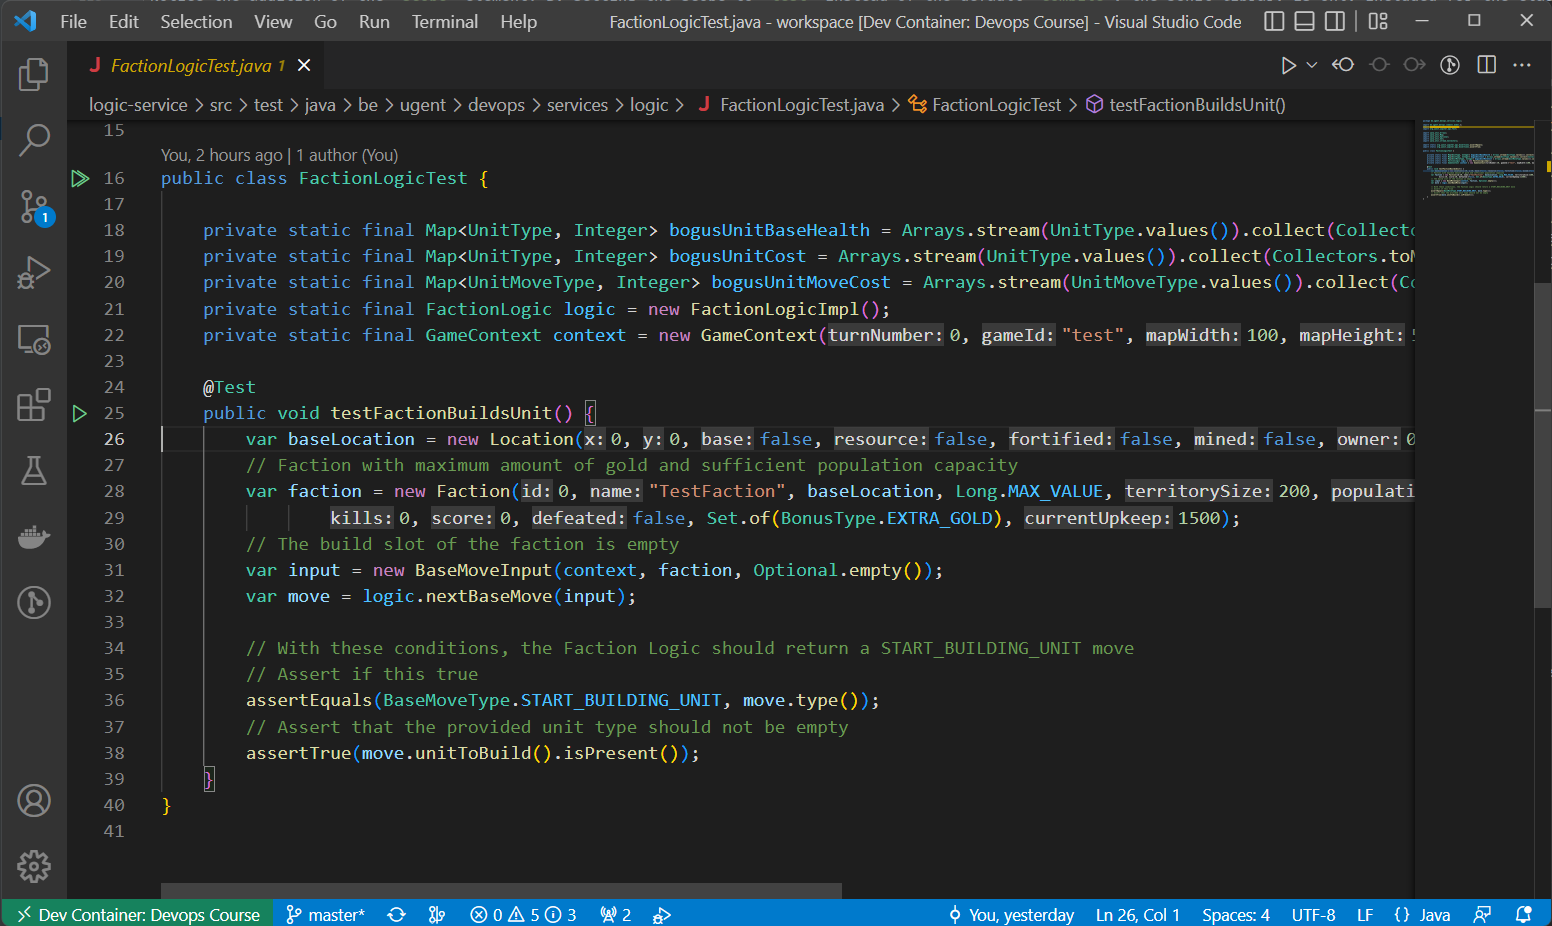
You can use these buttons to immediately execute the tests using JUnit. E.g. VSCode will then show the results of the tests in a report:
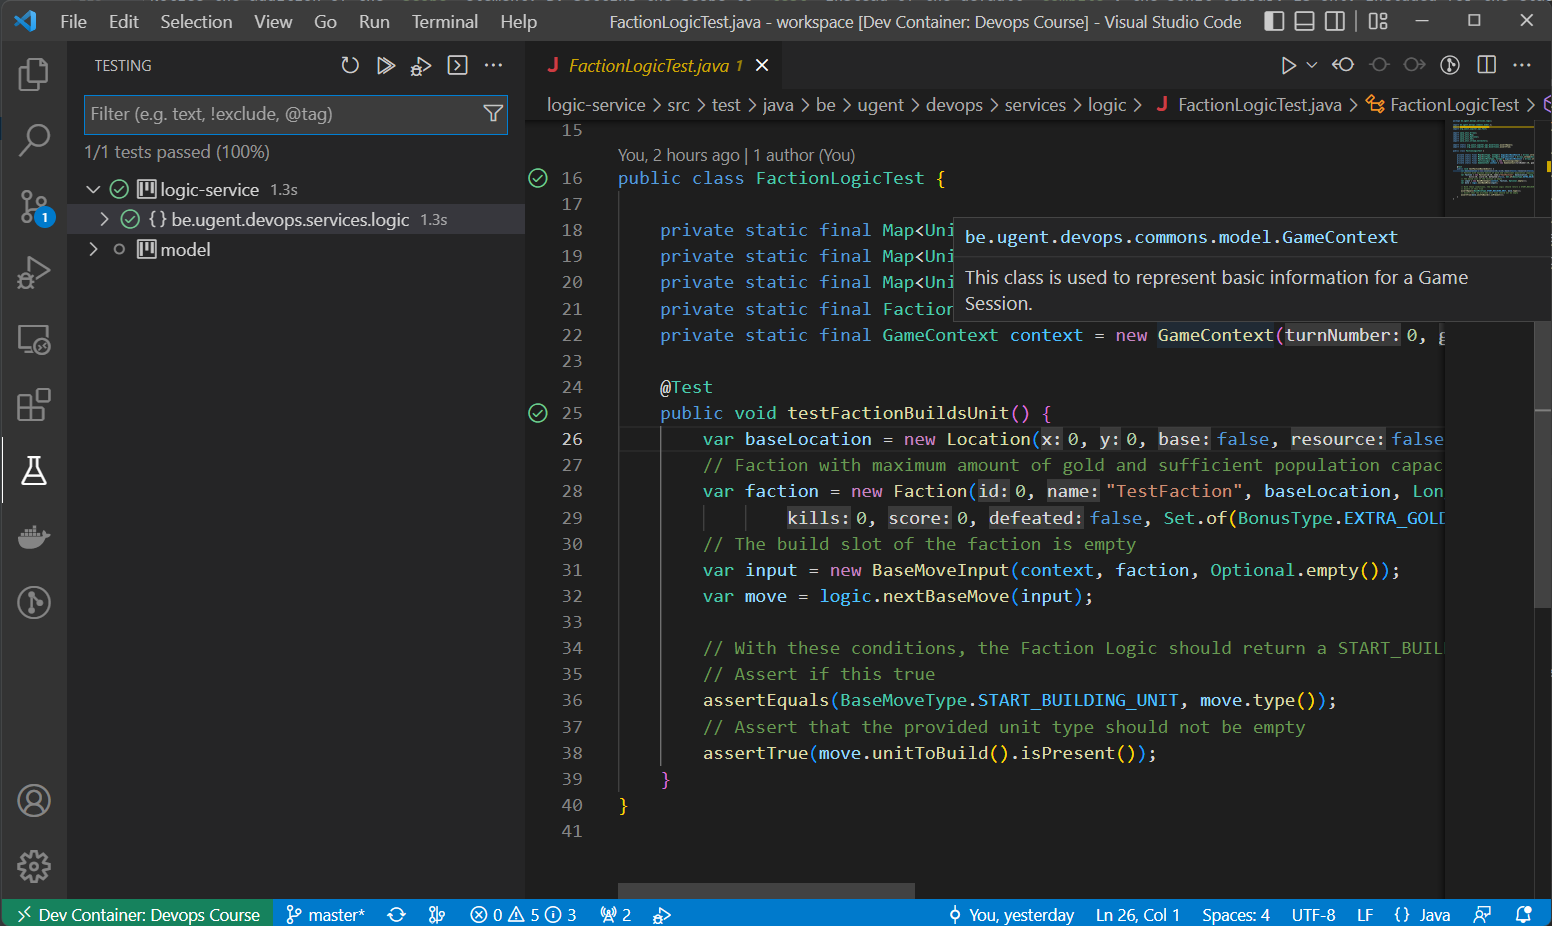
Use the provided example in FactionLogicTest as inspiration for adding basic Unit tests for checking your own Faction Logic implementation.
Create utility classes for common test code
Keep your testing code as clean as possible by moving common code to utility classes. Encapsulate common test code such as creating appropriate context instances (GameContext, Faction, move input instances, etc.).
Test data and fixtures
Consider creating test fixtures or builder classes for common test data. For example, a TestDataBuilder or FactionTestFixtures class can provide pre-configured GameContext, Faction, and Unit objects for your tests. This makes tests more readable, maintainable, and reduces duplication. Good tests often have well-organized, reusable test data setup.
Quarkus Dev mode and testing
Quarkus Dev mode allows continuous testing of your application. This is a very useful tool when writing Unit tests. When you start Quarkus in Dev mode, it will automatically recompile your code when you make changes and will also re-run your tests. Quarkus also detects which tests cover which code, and uses this information to only run the relevant tests when code is changed.
Read up on how to use it on the Quarkus docs.
Assertions
An assertion is a boolean expression at a specific point in a program which will be true unless there is a bug in the program.
Several modern programming languages include checked assertions – statements that are checked at runtime or sometimes statically. If an assertion evaluates to false at runtime, an assertion failure occurs, which typically causes execution to abort. This draws attention to the location at which the logical inconsistency is detected and can be preferable to the behavior that would otherwise occur.
The use of assertions helps the programmer design, develop, and reason about a program.
Because of these properties, assertions are often used in Unit tests to evaluate the post conditions of a test. The example above uses the class org.junit.jupiter.api.Assertions provided by the JUnit library to implement checked assertions. Assertion methods provided include:
// Checking if a value is equal to an expected value
Assertions.assertEquals(expectedVal, actualVal);
// Checking if a value is not null
Assertions.assertNotNull(val);
// Checking if a boolean expression or value holds true
Assertions.assertTrue(boolExpr);
Java (> JDK 8) supports static imports to gain direct access to accessible static methods in a class
By adding a static import for Assertions:
import static org.junit.jupiter.api.Assertions.*;
Assertions. in your code:
assertEquals(expectedVal, actualVal);
assertTrue(boolExpr);
(In this case all accessible static methods are available because of the wildcard *)
Assignment: Unit tests
Add Unit tests for your Faction Logic implementation. Use the provided example in FactionLogicTest as inspiration.
Going forward, when you extend your Faction Logic, make sure to add Unit tests for the new functionality. In upcoming labs we will strive for a good code coverage percentage, a metric that indicates how much of your code is covered by Unit tests.
GitLab CI/CD integration
Maven test execution
Maven automatically attaches a plugin that can execute JUnit tests in the test phase of the Maven lifecycle. The plugin is called Surefire, visit the website for more information.
Run all Unit tests in your project by entering ./mvnw test in your terminal.
Pipeline integration
Add a CI/CD stage called tests and a job called maven-unit-test to your .gitlab-ci.yml which runs the tests. Typically, testing is placed right after building / compilation in the pipeline. The pipeline should fail and stop if the tests are not completed successfully.
Tip
You can use caching to optimize the pipeline so the test job doesn't have to rebuild the project entirely (see Lab 1 - Caches and artifacts).
Assignment: Integrate unit tests in CI/CD
Add a tests stage with a maven-unit-test job that executes your unit tests. Use caching to optimize build times and ensure the pipeline fails if tests fail.
Integration Testing
Integration testing is an additional layer of testing employed to detect issues that can occur when separate pieces of code interact. These interactions can both be between modules of the same project or between a project module and external dependencies.
Usually, Integration testing comes right after Unit testing to ensure all components operate in harmony with each other. Oftentimes, a component will be seen as functional on its own but may cause issues when interacting with other components.
This is especially the case in larger projects, with multiple developers writing code for different modules and components. Integration testing lets you determine if software that different developers are writing is actually working together as intended.
Let us now focus on your project and the logic-service you're developing. It is rather straightforward to come up with a bunch of Unit tests for this service, but can you think of a strategy for Integration testing? What makes a good Integration test?
Note that the answer to this question can differ from project to project, but some good basic guidelines are:
- The Integration test should simulate real usage interactions of the software as closely as possible.
- When a project interacts with external systems such as a database or there is remote communication happening (e.g. via an HTTP interface, publish/subscribe or other messaging protocols), it is usually a good idea to setup a test environment where these interactions can take place in, with the goal of then implementing an Integration test in this environment. These interactions are critical for the correct operation of the software and cannot be tested in self-contained Unit tests.
- Integration tests should be easy to automate (including setup of the environment that is required to execute the test) so that they can be integrated in the CI/CD pipeline. You can have a really elaborate Integration test, but if it can only be triggered manually and the setup is overly complex, its usefulness will be severely limited from a practical point of view.
Setting up a true Integration test would require a lot of programming effort and knowledge of the game engine. For example: you would have to implement a test client that can connect to the game engine and send moves to your logic service, while also checking the output of your logic service. This is out of scope for this course. However, the run-game CI/CD job we've introduced in Lab 1 checks some of these boxes. The devops-runner places your logic-service in an environment that is representative and that can be tuned to trigger a variety of cases resulting in most of your logic being executed during the run. By adding logging to your service (see appendix) you can get insight in the logic behavior and debug information (stack traces) in case of errors.
The run-game job is not a true Integration test, because it does not check the output of your logic service. It is more of a smoke test, to check if your service can be started, can be reached over HTTP and responds with unit moves. However, it is a good starting point for implementing Integration tests.
Image versioning for testing
Our integration tests use a container image of our Logic Service that was built within the same CI/CD pipeline, but if our integration tests fails it indicates that the newly built image is actually faulty. Therefore, we are going to build a special version of our service earlier in the pipeline. We are going to give it a version tag which indicates it is temporary or at least not meant for use in a production environment.
We are going to use a shortened commit revision as the image tag. This tag binds the image explicitly to the commit responsible for generating the image and also ensures that every commit generates a different image (so we don't run into caching issues where we test old versions of our image). You can retrieve this reference locally with git.
git rev-parse --short HEAD
To build this image locally (not push it to the container registry) as a test you can use the command below:
./mvnw package -D"quarkus.container-image.build=true" -D"quarkus.container-image.tag=$(git rev-parse --short HEAD)"
The above instruction triggers building the container image and storing it locally, not pushing it to a remote registry. Run docker images {username}/logic-service to check that the image is built and available.
Note
Note that we use the package lifecycle here while we used install in the maven-container-image-generation job. Using either is OK since we aren't pushing maven dependencies to local or remote repositories. The package lifecycle is a bit faster since it doesn't have to install the dependencies. All we need to create our container images is the compiled .jar file, which the package lifecycle generates.
Now we can translate these steps to our CI/CD pipeline: update the maven-build job so it also builds and pushes a container image to the container registry. Instead of getting the commit revision from the git command we can use one of the GitLab environment variables and get it directly. Find the variable that reflects this short commit revision and use it to set the appropriate image tag.
Which CI variables?
Identify the predefined CI variables that best fit each requirement (short commit identifier, image registry/name, commit tag). Explain your selection in the report and show where you used them.
Assignment: Build test image with commit SHA
Update the maven-build job to build and push a container image tagged with the short commit SHA. Use GitLab predefined variables to construct the image tag.
Push your changes (with a fitting conventional commit message) and check your repository's CI/CD tab and Container Registry to check that all is working correctly.
Creating integration test jobs
Now we can add one or multiple Integration test jobs to the CI/CD pipeline based on the devops-runner image. We will start by refactoring the existing run-game job to be our first integration test. Change its name to test-integration-default and execute it in the tests stage.
Surfacing logs
Ensure runner output includes your service logs during tests. Describe the mechanism you chose and why it’s reliable in CI.
Important: adjust .gitlab-ci.yml
Make sure you change the image version of the Logic Service image used in the integration tests to the short commit reference, so you are testing the correct build.
Our tests stage now contains two jobs, test-unit and test-integration-default. When multiple jobs share a stage, they get executed in parallel, saving us some waiting time. When one job fails, all jobs in the next stage will not be run unless configured otherwise.
Now add a second integration test using your first as a template. The runner can be configured to simulate different scenarios. Interesting parameters of the devops-runner to consider tweaking are:
MAP_WIDTHandMAP_HEIGHT: a smaller world map can lead to faster enemy encounters, allowing you to quickly test combat-related parts of your logic.CPU_PLAYERS: decrease the number of variables by limiting the amount of opponents.TURN_INTERVAL_MSandTURN_LIMITallow you to tune how many turns are being played.LOGIC_REQUEST_TIMEOUT: set the request timeout (in milliseconds) to ensure your logic execution time stays within the specified boundary.
Test these different configurations locally before pushing them to GitLab by tweaking your docker-compose.yml file and executing using quarkus Dev mode.
In a full-fledged software project we would typically go much further into integration testing by mocking very specific scenarios. But as said before, this would require lots of effort and knowledge of the game engine code. Therefore, a couple variations of the test-integration-default job will do.
Tip
You may delete the execute stage as it is now obsolete. All variations of run-game should be refactored and moved to the tests stage.
Important: logic-service logs
The output of the Gitlab CI/CD Job only shows logs for the container instance of the image that is configured to execute the job: in this case the devops-runner. Your logic-service runs as an additional side-instance and its logs are not captured by Gitlab.
We've implemented a workaround for this issue by allowing the devops-runner to periodically download a log buffer (populated by a custom log appender) from the logic-service over HTTP. The downloaded logs are then printed to stdout of the Job container, so they become visible through Gitlab.
To enable this feature in your CI/CD pipeline, add the following (environment) variable: ENABLE_FETCH_LOGS: "true".
Surfacing integration test errors
If you followed the previous steps, you should now have one or more integration test Jobs that can execute a game with specific parameters and when something goes wrong with your logic service, debug statements and error stacktraces will be visible in the Job log output.
However, the goal of an integration test is to detect errors that can be difficult to trigger when writing unit tests (by testing the components within the context of a larger system). When an error is detected in this stage, the CI/CD pipeline should fail. This makes sense, because we don't want follow-up Jobs to run if the current release contains newly introduced bugs. For example: in your current pipeline, the maven-container-image-generation Job (which creates the latest image tag) should only be executed when all tests succeed.
For this purpose, the devops-runner supports an additional parameter ABORT_ON_LOGIC_ERROR. If this option is enabled (default is false), the game will immediately stop running whenever requesting a move from the logic-service results in an error. The process exits with code 1 to indicate an unsuccessful run.
Configure this parameter in your .gitlab-ci.yml file to make sure your pipeline fails when an error is detected in the integration test phase.
Assignment: Integration tests
Add two or more Integration test jobs to your CI/CD pipeline. Make sure they are executed in the tests stage. Use the devops-runner image to execute the tests. Use the test-integration-default job as a template and tweak the parameters to create different scenarios.
Make sure you use an image with the short commit reference as tag for the integration tests, so that you are sure that you are testing the correct build.
Your Logic Service logs should be visible in the Job output and errors of the Logic Service should result in Job failure.
Pipeline optimization
Skipping tests
You might have noticed that in your job logs of the build and package phase, there are test logs present. Because we have to use package in the first job to build our container image we are actually performing our unit tests too early, as the maven phases in order are: validate, compile, test and package.
We want our tests to be run separately in our tests stage when we call mvn test. Luckily, maven has a property we can set to skip our tests explicitly.
Assignment: skip tests
Find a way to skip the tests in all CI/CD stages except tests. There are some options available, choose the one that you find most appropriate and explain your choice in your report.
Reducing duplication in .gitlab-ci.yml
You should have two or more test-integration-* jobs in your pipeline. These jobs are very similar, but differ in the parameters they pass to the devops-runner. This is a good opportunity to reduce duplication in your .gitlab-ci.yml file.
We refer you to GitLab documentation for info on how to reduce duplication in your pipeline: https://docs.gitlab.com/ee/ci/yaml/yaml_optimization.html. There are two options discussed there, one is more appropriate than the other in this case. Elaborate on your choice and reasoning in your Lab 2 report.
Assignment: Reduce duplication
Reduce duplication in your .gitlab-ci.yml file by using the appropriate GitLab CI/CD or YAML features, especially for the test-integration-* jobs. Make sure your pipeline still works as expected.
Versioning and image tags
Right now we are building two images in our pipeline: one with the latest tag and one with the short commit reference as tag. The latest tag is a special tag that is used by default when no tag is specified. It is also the tag that is used when you pull an image without specifying a tag. This means that the latest tag is always pointing to the most recent image that was built for a specific image name.
In this course we will develop quite rapidly and we don't have actual customers or external users deploying our containers, so updating the latest tag this frequently to potentially unstable versions is not a problem. However, in a real-world scenario, you would typically only update the latest tag when you are sure that the image is stable and ready for production.
In addition to this latest version, it is common practice to tag specific versions of your software, most commonly SemVer is used to this end, version numbers like v1.2.4, 2.0.0 or v3.1.0-alpha.1 are common (the v prefix is optional).
Semantic Versioning
Given a version number MAJOR.MINOR.PATCH, we increment the:
MAJORversion for incompatible API changesMINORversion for added functionality in a backward compatible mannerPATCHversion for backward compatible bug fixes
Additional labels for pre-release and build metadata are available as extensions to the MAJOR.MINOR.PATCH format.
You can read more about SemVer on https://semver.org/.
Our maven-container-image-generation job can be tweaked quite easily to push an additional tag to the container registry, read up on the different Quarkus container image options and find the one that allows you to specify additional tags.
To define the version tag, we'll use the commit tag. By doing this, you can easily push any version tag you want by simply pushing a tag to the repository. This practice is commonly used in CI/CD pipelines.
In the list of GitLab environment variables you can find a variable that contains the commit tag. Use this variable to set the additional tag for the image.
We won't enforce you to tag SemVer versions of your logic service, but as we already tag the final version of your code with a Lab tag, we can use this tag as a version tag for our 'final' image. If you however want to use more named versions, you can use the commit tag and additional tags directive appropriately.
Assignment: push commit tag
Change the maven-container-image-generation job to push the image with an additional tag that is equal to the commit tag (e.g. Lab2).
Expected pipeline outcome
As a result of the above changes to the CI/CD pipeline, each time you push your changes to the repository:
buildstage: A new image tag will be built using the shortened commit sha as image tag (e.g.7677f323).testsstage: Thetest-unitjob will execute the Unit tests and two or moretest-integration-*jobs will execute the Integration tests.packagestage: The taglatestis pushed/updated, pointing to the same image. When a commit tag is pushed to the repository (e.g.Lab2) the image is also tagged with this commit tag.
Image cleanup policies
Generating additional image tags for each change (the shortened revision hash), will result in an ever-growing Container registry. This could potentially become a problem in the long run. Fortunately, Gitlab has a feature that allows you to configure automatic pruning of the Container registry.
On the Gitlab page of your project, go to Settings -> Packages & Registries, then click on Set cleanup rules. Here you can configure the automatic cleanup of your Container registry.
Assignment: set up image cleanup
Configure Cleanup policies to keep 5 tags per image name and keep tags such as Lab1 and Lab 5 (the latest tag is excluded by default). You can test your regex using a RegEx tool such as https://regex101.com. Then also set it up to remove tags older than 7 days.
Questions
Answer the questions below in your Lab 2 Report.
- Parallel vs Sequential Testing: Traditional CI/CD wisdom suggests running integration tests after unit tests pass (sequential stages). However, in this lab we run both test types in parallel within the same
testsstage. Analyze this design choice: What are the advantages and disadvantages? Under what circumstances would you choose parallel over sequential test execution, and vice versa?
- Image Tagging Philosophy: We build three different image tags in our pipeline: short commit SHA (build stage),
latest(package stage), and (potentially semantic) version tags likeLab2(package stage on tag push). Explain the purpose and use case for each tag type. Why do we build the commit-SHA image in the build stage but wait until the package stage forlatest? What would be the implications of tagging all three in the same stage?
- GitLab CI/CD branching behavior: When
.gitlab-ci.ymlis changed on a branch, will a pipeline be triggered and what version of the file will be used to define it (the one onmainor the one on the branch)? How could you use this mechanism to your advantage?
Practicalities
This Lab must be completed before Monday, 3 November at 23:59.
Warning
All support outside of the physical Lab session is handled via the Gitlab Issue tracker, not through emails or Teams chat! Do not expect support outside of the normal office hours (issues posted in the weekend will be answered on the next working day).
Checklist
- Create issues for features and improvements you want to implement in your Faction Logic. Use labels to categorize issues and set Due Dates and Weights where appropriate.
- Define and use a branching strategy (GitHub Flow recommended) with at least one merged Merge Request demonstrating the workflow.
- Create a
CONTRIBUTING.mdfile documenting your complete development workflow, including: issue tracking (labels and planning), branching strategy and merge request process, development workflow, and testing expectations. - Extend your Faction Logic (e.g., implement CLERIC, SAPPER logic, or upkeep management).
- Add Unit tests for your Faction Logic implementation with adequate coverage. Consider using test fixtures or builder classes for common test data.
- Integrate the execution of the Unit tests in your CI/CD pipeline (
testsstage,maven-unit-testjob). - Add logging to your Faction Logic implementation with the goal of having sufficient debug information when performing Integration tests.
- Build and push an image tagged with the short commit SHA in the
buildstage. - Integrate at least two Integration tests in your CI/CD pipeline in the
testsstage with different scenarios. - Ensure logic service logs are visible in CI job output during integration tests.
- Make sure your Unit Tests are only run in the
maven-unit-testjob of thetestsstage (skip tests in build/package stages). - Reduce duplication in your
.gitlab-ci.ymlfile using GitLab/YAML optimization techniques (especially for integration test jobs). - Update the
maven-container-image-generationjob to push images withlatesttag and commit tags (e.g.,Lab2). - Configure cleanup policies for your container registry (keep Lab tags, limit old tags).
- Go through Lab 1 Feedback and make sure your pipeline is up to par with the recommendations. Common mistakes addressed there should be fixed.
- Add a tag1
Lab2to the commit you consider the final result of this lab session. - Create an issue on your repository with title Lab 2 Report and add a concise and well-formatted report. Don't forget to label the issue with the appropriate labels (
Report,Lab 2)!- Add a link to the pipeline run for your
Lab2tag - Add a link to a merged Merge Request, showing the usage of your chosen branching strategy
- Add a changelog for your Faction Logic implementation: what was added, fixed, removed. Link to the corresponding issues.
- Highlight difficulties you encountered during this lab session and how you solved them
- Answer the questions posed in the section above
- Add a link to the pipeline run for your
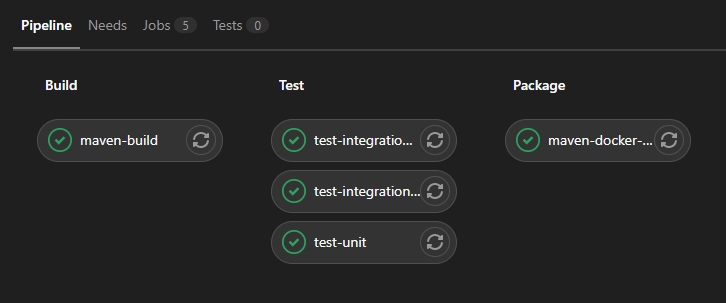
When finished, your pipeline overview should look something like this:
Extra
Development Lifecycle
It is a good practice to write a Unit test whenever you want to test something during development instead of actually running the application and manually reproducing the steps for a usage scenario.
This way it is easy to debug and fix very specific problem cases. As an added bonus you will start with a good amount of Unit tests, providing a decent percentage of code coverage.
Each time modifications or additions are made to the code, extra tests should be added to check if the new functionality works as expected, while the existing tests will be your first line of defense against potential bugs caused by any changes to the code.
Integration tests on the other hand are your safety net. Sometimes bugs will slip through the Unit tests (because a specific case was not covered yet or because the bug only occurs when interacting with an external component), but can still cause the Integration tests to fail, because they operate on a different scope.
Tip
When an Integration test fails, see if the error can be traced to a specific method or other part of your logic. You can then add additional Unit tests to reproduce this issue in isolation (along with a fix for the problem). As a result, there is a chance that in the future, similar or related issues will be exposed at the Unit test stage instead of the Integration test stage (reducing pipeline overhead, as Unit tests are usually faster to execute).
Within a CI/CD pipeline, both types of tests work in tandem to prevent faulty code from being deployed and/or distributed in an environment where it could cause harm (e.g. downtime for critical systems, unhappy customers, etc).
Debugging
In the previous lab session, we've used Maven to run the faction logic. However, when working on tests and fixing issues, being able to use a debugger is of crucial importance. IntelliJ comes with an excellent Java debugger by default. VSCode requires you to install the Extension pack for Java (vscjava.vscode-java-pack) or a similar plugin to enable debugging in Java.
You can set breakpoints anywhere in your code, by clicking to the left of a line number. A red circle will appear:

You can access additional breakpoint options by right-clicking on the breakpoint and then "Edit Breakpoint...", e.g. to add a condition, so execution is only stopped at the breakpoint when a certain expression holds true. This can be very useful to debug how the game logic behaves in very specific conditions.
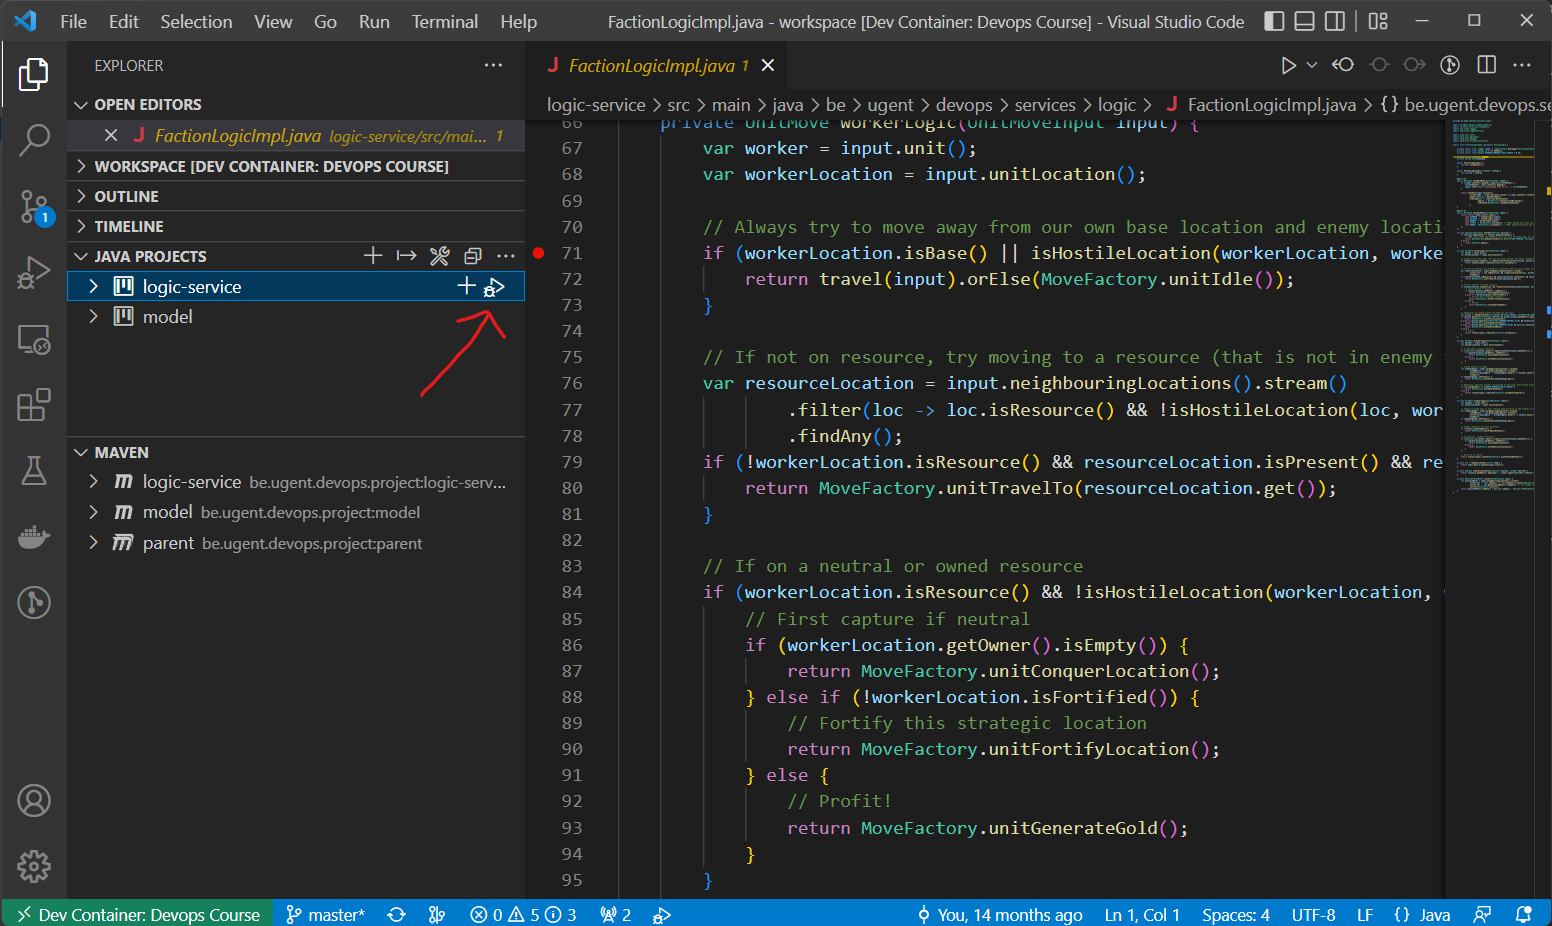
To execute your game logic in debug mode in VSCode, go to the "Java Projects" pane and click the play button (with the bug icon) next to the logic-service module.
In IntelliJ, go to the Main class in the package be.ugent.devops.services.logic, then click on the play button and then "Debug Main.main()".
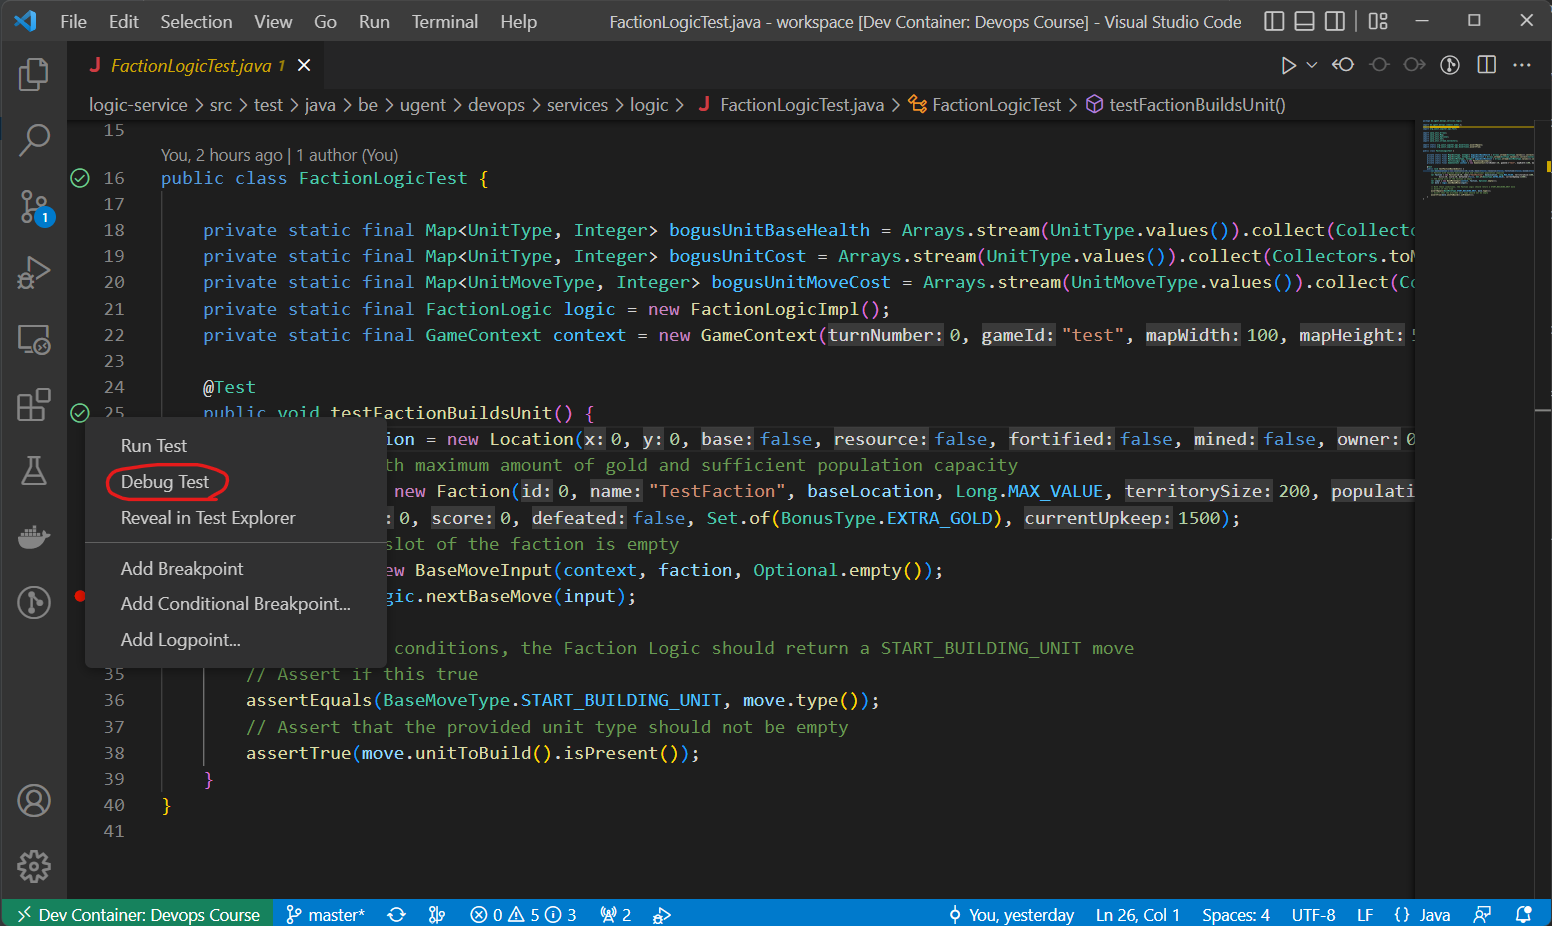
You can also debug individual tests in both VSCode and IntelliJ by right-clicking on the play button (to the left of the line numbers) and then "Debug Test":
Logging in Java
You are probably familiar with how you can print to standard output and error streams in Java:
System.out.println("Print a String to standard output and start a new line!");
System.err.println("Print a String to standard error and start a new line!");
When executing the Java program, these streams will be redirected to the console output by default. You could use the redirection operators of your operating system to redirect to a file (or to separate files).
For simple logging, these methods will suffice. But what if you want to introduce a debug flag, enabling your application to print additional debug info when running in debug mode?
You could use an environment variable or program argument to read a boolean debug variable and then test this variable when printing extra info:
1 2 3 4 5 6 7 8 9 10 11 12 13 14 15 16 17 18 19 20 21 22 23 24 25 26 | |
Example output:
Start checking temperatures... (DEBUG mode is ON)
Reading temperature successful (operation took 800 ms). Current value: 44.0
Reading temperature successful (operation took 726 ms). Current value: 54.0
Reading temperature successful (operation took 777 ms). Current value: 80.0
Reading temperature successful (operation took 761 ms). Current value: 102.0
WARNING: an unsafe temperature of 102.0 degrees Celsius was detected. Take immediate action!
Current fan speed (RPM): 331.0
However, even in this simple example you can see that the logging code starts to obfuscate the actual code. The code should stay readable, even with lots of logging statements and different logging levels.
This is why over time, various libraries were developed that can help programmers with logging. A typical logging framework will have a Logger class that contains context information about the logging environment and has methods for outputting different levels of logging statements (with support for embedding potential exceptions). It will provide a configuration mechanism, allowing you to easily modify various properties of the logging output without changing the code. Such properties include:
- The output format of the logging statements (Should the logs include the date? The thread running the code? Should they be in plain text, or e.g. in JSON?)
- The output target of the logging statements (Redirect the logs to stdout and stderr? Or redirect the logs to a file? A database? etc)
Popular logging frameworks for Java are: Log4J, Java Logging API, tinylog and Logback.
The rise of multiple widely used frameworks created a new problem: integration. Imagine depending on a dozen external libraries, each using a different logging framework. From a logical perspective everything seems ok: logs would appear in your output of course. However, configuring the appropriate log output for your application can quickly turn into a nightmare (setting up all the individual configuration files and system properties).
In response, a number of so-called logging APIs were developed, of which the most wide-spread is probably SLF4J. However, we will focus on the logging API that comes shipped with Quarkus: the JBoss Logging API, which features a pluggable architecture, enabling loose coupling between the logging API, configuration and the supported underlying logging frameworks. We refer to the Quarkus guide on Logging for more information on this subject.
Now let us rewrite the above example (temperature checker) using the Quarkus utility class io.quarkus.logging.Log for simplified logging:
1 2 3 4 5 6 7 8 9 10 11 12 13 14 15 16 17 18 | |
Example output:
11:37:52.444 [main] INFO be.ugent.devops.LogDemo - Start checking temperatures...
11:37:53.095 [main] DEBUG be.ugent.devops.LogDemo - Reading temperature successful (operation took 647 ms). Current value: 53.0
11:37:53.629 [main] DEBUG be.ugent.devops.LogDemo - Reading temperature successful (operation took 533 ms). Current value: 30.0
11:37:54.088 [main] DEBUG be.ugent.devops.LogDemo - Reading temperature successful (operation took 459 ms). Current value: 67.0
11:37:54.715 [main] DEBUG be.ugent.devops.LogDemo - Reading temperature successful (operation took 627 ms). Current value: 97.0
11:38:00.688 [main] DEBUG be.ugent.devops.LogDemo - Reading temperature successful (operation took 306 ms). Current value: 101.0
11:38:00.688 [main] WARN be.ugent.devops.LogDemo - An unsafe temperature of 101.0 degrees Celsius was detected. Take immediate action!
11:38:00.688 [main] DEBUG be.ugent.devops.LogDemo - Current fan speed (RPM): 71.0
Notice how this version of the code snippet is much more concise and easier to read!
Logging can be configured using Quarkus properties, see this section in the documentation. By default, Quarkus will output log statements up to INFO level, but not statements with DEBUG or TRACE level (see Log levels for an overview of the available levels and their relation). We could set the global level to WARN (to prevent cluttering the console with useless information), but set the level to DEBUG for all code in the package be.ugent.devops to get fine-grained log statements for what is going on in our own code:
quarkus.log.level=WARN
quarkus.log.category."be.ugent.devops".level=DEBUG
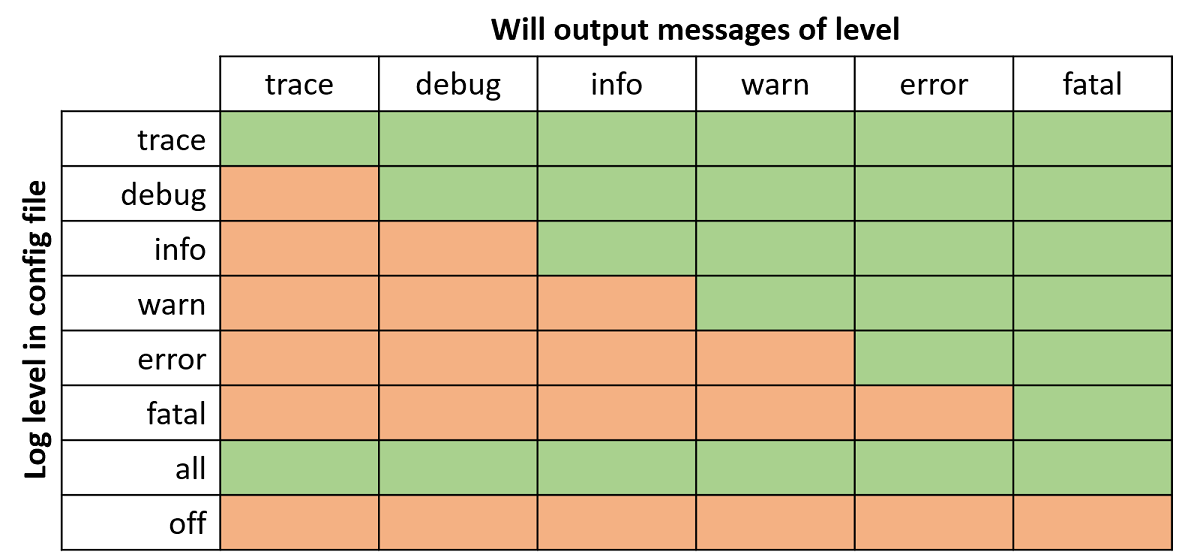
Log levels
-
You can tag on Gitlab: use the tab "Code" (left menu), click "Tags" , then "New Tag". You can also tag using git directly: https://git-scm.com/docs/git-tag. ↩