Lab 3: Deploying to Kubernetes
Goals
In this Lab session we will do the following:
- Install and configure
kubectl - Create Kubernetes manifests to deploy our application
- Deploy using
kubectland Kubernetes manifest files - Extend our CI/CD pipeline to deploy our application to Kubernetes automatically
- Secure our Logic Service endpoint with a symmetric key
Introduction
In this lab session you will learn about Kubernetes and some of its tooling, with the goal of extending your CI/CD pipeline, so you can deploy your Faction Logic service to our Kubernetes infrastructure. This lab session also marks the start of the 'multiplayer experience'.
Kubernetes
Kubernetes is a portable, extensible, open-source platform for managing containerized workloads and services, that facilitates both declarative configuration and automation. It has a large, rapidly growing ecosystem. Kubernetes services, support, and tools are widely available. Read more about Kubernetes on their homepage.
Kubernetes (also referred to as k8s) is typically installed on large server clusters. In this lab you will eventually use our infrastructure at IDLab to interact with our Kubernetes cluster. You will see companies use k8s clusters that are pre-configured on commercial cloud environments like Amazon's Elastic Kubernetes Service (EKS), Microsoft's Azure Kubernetes Service (AKS) or Google Kubernetes Engine (GKE).
Info
Kubernetes is a complex and broad topic and can take some time to become familiar with. Don't worry if you don't get it all at once! Practice makes perfect! Read the provided documentation and watch the tutorials before getting hands-on experience by continuing with the rest of the Lab session. This will take some effort, but you can gain a very useful addition to your skill set that has real demand and value in the market right now.
The easiest way to get some basic knowledge about Kubernetes is by checking out some tutorials. Watch/read at least these online tutorials before proceeding:
- https://kubernetes.io/docs/concepts/overview/what-is-kubernetes/
- https://www.youtube.com/watch?v=cC46cg5FFAM
- https://www.youtube.com/watch?v=R-3dfURb2hA
kubectl
To interact with a Kubernetes cluster you will need the Kubernetes command line tool kubectl.
Install Kubectl: instructions can be found on the Kubernetes documentation.
Test your installation with kubectl version, this should return some client version text output.
Connecting to the IDLab Kubernetes cluster
All the required configuration such as the Kubernetes cluster name, location, credentials, etc. are bundled in a kubeconfig file (YAML). By default, 'kubectl' will look for this file by using the path ~/.kube/config (the ~ directory is short for "your home directory"), but this location can be overridden using an environment variable.
Your team's kubeconfig has been pre-set in your CI/CD environment variable section on your team's GitLab page. Go to your team's repository on GitLab and navigate to Settings > CI/CD. Expand the Variables section and look for the KUBECONFIG_B64 variable. Click on the edit button to see the content of this variable. Copy and paste that content into a new file, in our example we will save it to ~/.kube/config-b64.
In the following we will decode the kubeconfig file and set it as the default configuration for kubectl:
Execute the following commands from your projects root directory:
# Decode the base64 encoded kubeconfig file and save it
cat ~/.kube/config-b64 | base64 -d > ~/.kube/config.yml

# Set the KUBECONFIG variable in our current shell
export KUBECONFIG=$HOME/.kube/config.yml

# Test your kubeconfig setting, it should return the saved kubeconfig file
kubectl config view

# Next we persist the setting in our bashrc file so it is set on every new shell session
echo "export KUBECONFIG=$HOME/.kube/config.yml" >> $HOME/.bashrc
For zsh, fish, etc. you just change the .bashrc of the last command to the appropriate file.
Open up an Administrator PowerShell and navigate to your project directory, then run the following commands:
# Decode base64 encoded kubeconfig file and save it
[System.IO.File]::WriteAllBytes("$HOME\.kube\config.yml", [System.Convert]::FromBase64String([System.IO.File]::ReadAllText("$HOME\.kube\config-b64")))

# Set the KUBECONFIG variable in our current shell
$Env:KUBECONFIG="$HOME\.kube\config.yml"

# Test your kubeconfig setting, it should return the saved kubeconfig file
kubectl config view

# Next we persist the setting so it is set on every new powershell session
[System.Environment]::SetEnvironmentVariable('KUBECONFIG',"$HOME\.kube\config.yml",'User')
After this, close the administrator PowerShell session and open a User session. Test your kubeconfig again with the same kubectl commands.
When you run into issues with the base64 decoding, you can use an online tool such as
base64decode.org to manually decode the content of the KUBECONFIG_B64 variable.
Then just create the needed file and follow the steps above to set the KUBECONFIG variable.
Check your connection to the DevOps cluster with the following commands:
$ kubectl version
Client Version: v1.33.3
Kustomize Version: v5.6.0
Server Version: v1.33.3
$ kubectl cluster-info
Kubernetes control plane is running at https://k8s.stud.atlantis.ugent.be:6443
CoreDNS is running at https://k8s.stud.atlantis.ugent.be:6443/api/v1/namespaces/kube-system/services/kube-dns:dns/proxy

To further debug and diagnose cluster problems, use 'kubectl cluster-info dump'.
Exploring some Kubernetes concepts
If you want to get the full details on Kubernetes, we recommend reading the documentation they provide. While it is a lot, generally if you start reading, within a few sections you'll get the most important parts.
In this section we briefly go over a few key concepts with links to more information that you can read into if something is unclear or you just want a more thorough explanation.
Nodes
A Kubernetes (short: k8s) cluster is made up of a master machine and a few worker machines, they are called nodes. When you deploy applications/services/etc to the k8s cluster, it will intelligently pick on which nodes it will deploy your application, based on your configured requirements and the available resources.
Namespaces
Each cluster is composed of different virtual namespaces. You can think of this as virtual clusters backed by the same phycial cluster. They are useful for hard isolation (access denied to other namespaces) or logical isolation (grouping of common deployments). A fresh k8s cluster comes with a number of default namespaces that are home to some of the services that k8s itself relies on to operate. You will have read access to one of these: kube-system. The other namespace you can access is your team's namespace. Only your group has read/write access to that scope.
To list all our cluster's namespaces:
kubectl get namespaces
Many of the kubectl commands are scoped per namespace. Never forget to specify the namespace you are operating in with the correct flag (-n namespace), otherwise they are executed using the default namespace, which in our case is your team's namespace.
Deployments
Deployments describe how you want to deploy a Kubernetes object. It describes your desired state: the image needed, arguments, what to do on failure, how many instances, health check parameters etc. If anything happens to the running instances, the deployment still persists and tells k8s what to do to auto-restore (as good as it can).
Info
The kube-system namespace contains a lot of k8s objects required for Kubernetes itself to run. This makes the namespace ideal to have a look at some of them.
To list all deployments in kube-system:
kubectl get -n kube-system deployments
Request some details about a specific deployment:
kubectl describe -n kube-system deployment <name_of_deployment>
Pods
Pods are the smallest deployable unit of computing in Kubernetes. A pod contains one or more containers with shared storage/network resources. A pod's content is always in the same location and moved/spun up/spun down at the same time.
To list all pods in kube-system:
kubectl get -n kube-system pods
Request some details about a specific pod:
kubectl describe -n kube-system pod <name_of_pod>
Services
Services provide an (abstract) way to expose an application that might be running on multiple pods as a network service available within Kubernetes. They can act as an effective handle to connect pods (that can come and go, get destroyed or updated) to one another (e.g. a backend with a database).
To list all services in kube-system:
kubectl get -n kube-system services
Request some details about a specific service:
kubectl describe -n kube-system service <name_of_service>
Ingress
Ingress objects provide a way to expose services to the outside world, typically over HTTP. They describe how to connect incoming (external) requests to services, so they can reach the actual pods that are listening for those requests and are able to answer.
graph LR;
  client([client])-. Ingress-managed <br> load balancer .->ingress[Ingress];
  ingress-->|routing rule|service[Service];
  subgraph cluster
  ingress;
  service-->pod1[Pod];
  service-->pod2[Pod];
  end
  classDef plain fill:#ddd,stroke:#fff,stroke-width:4px,color:#000;
  classDef k8s fill:#326ce5,stroke:#fff,stroke-width:4px,color:#fff;
  classDef cluster fill:#fff,stroke:#bbb,stroke-width:2px,color:#326ce5;
  class ingress,service,pod1,pod2 k8s;
  class client plain;
class cluster cluster;Configmaps
ConfigMaps are the mechanism k8s uses to store non-confidential data in key-value pairs. Pods can consume ConfigMaps as environment variables, command-line arguments, or as configuration files in a volume.
To list all configMaps in kube-system:
kubectl get -n kube-system configmaps
To view one specific configmap:
kubectl describe -n kube-system configmap <name_of_configmap>
Secrets
Secrets are the mechanism k8s uses to store and manage sensitive information. Examples are passwords, OAuth tokens, ssh keys, etc. There are currently no secrets in the kube-system namespace, but the commands to list and view secrets follows the same pattern:
To list all secrets in kube-system:
kubectl get -n kube-system secrets
To view one specific secret:
kubectl describe -n kube-system secret <secret>
There are many more k8s objects, but these are the ones we will be interfacing with throughout the course.
Manual setup of your service
Info
Your kubeconfig file limits the operations you can perform on the cluster. Although you can list and view details of resources in the different namespaces, you will only be able to create, modify and delete resources in your own namespace (devops-teamX).
Deployment preparation
We will now manually set up your logic service on the k8s cluster. To do that, we will write a deployment yaml file, which we will call deployment.yml (but it can have any name really).
Create a folder named k8s in your project root directory. This is where we will store all our Kubernetes configuration files.
Info
K8s is a common abbreviation for Kubernetes, the 8 is the number of letters between the K and the S.
Create a file deployment.yml in the k8s folder with the following content:
apiVersion: apps/v1
kind: Deployment
metadata:
  name: logic-deployment
  labels:
    app: logic
spec:
  selector:
    matchLabels:
      app: logic
  template:
    metadata:
      labels:
        app: logic
    spec:
      containers:
        - name: logic-service
          #CHANGE THIS NEXT URI TO YOUR OWN IMAGE URI!!
          image: gitlab.stud.atlantis.ugent.be:5050/devops-2025/devops-team<your-team-number>/logic-service:latest
          ports:
            - containerPort: 8080
      # More on this later:
      imagePullSecrets:
        - name: gitlab-credentials
Do note that we are adding a label app: logic in the deployment and pod template metadata. We will be using this label later.
Don't worry, you are not meant to know this deployment template by heart. When working with k8s, you just look it up and copy and adapt the template. It can even differ depending on the API version your cluster requires.
The value for the container image should be replaced with your actual logic-service image URI. You can copy the full URI of your image by going to the left menu in GitLab (on your team repository page): Deploy > Container Registry and then clicking the copy button on your image.
Use your image's full URL and paste it as the value for image.
Warning
Please, carefully check for spelling or indentation errors in the deployment.yml file! Make sure your IDE supports
YAML formatting or it might reformat your files with incorrect indentations.
You might have noticed there is an imagePullSecrets section. This is referring to a k8s Secret. That Secret will contain GitLab credentials to make sure the image can be pulled from your GitLab container repository, which is behind authentication.
We will not be using your personal credentials for this step, as this is considered bad practice! Instead we will create a Deploy Token for our project repository.
Go to your GitLab repository in the browser and navigate to Settings > Repository. Then expand Deploy Tokens and set up an access token with the following properties:
- Name:
deploy-token - Expiration date:
2025-12-31 - Scopes:
read_registry
You can leave the Username entry blank.
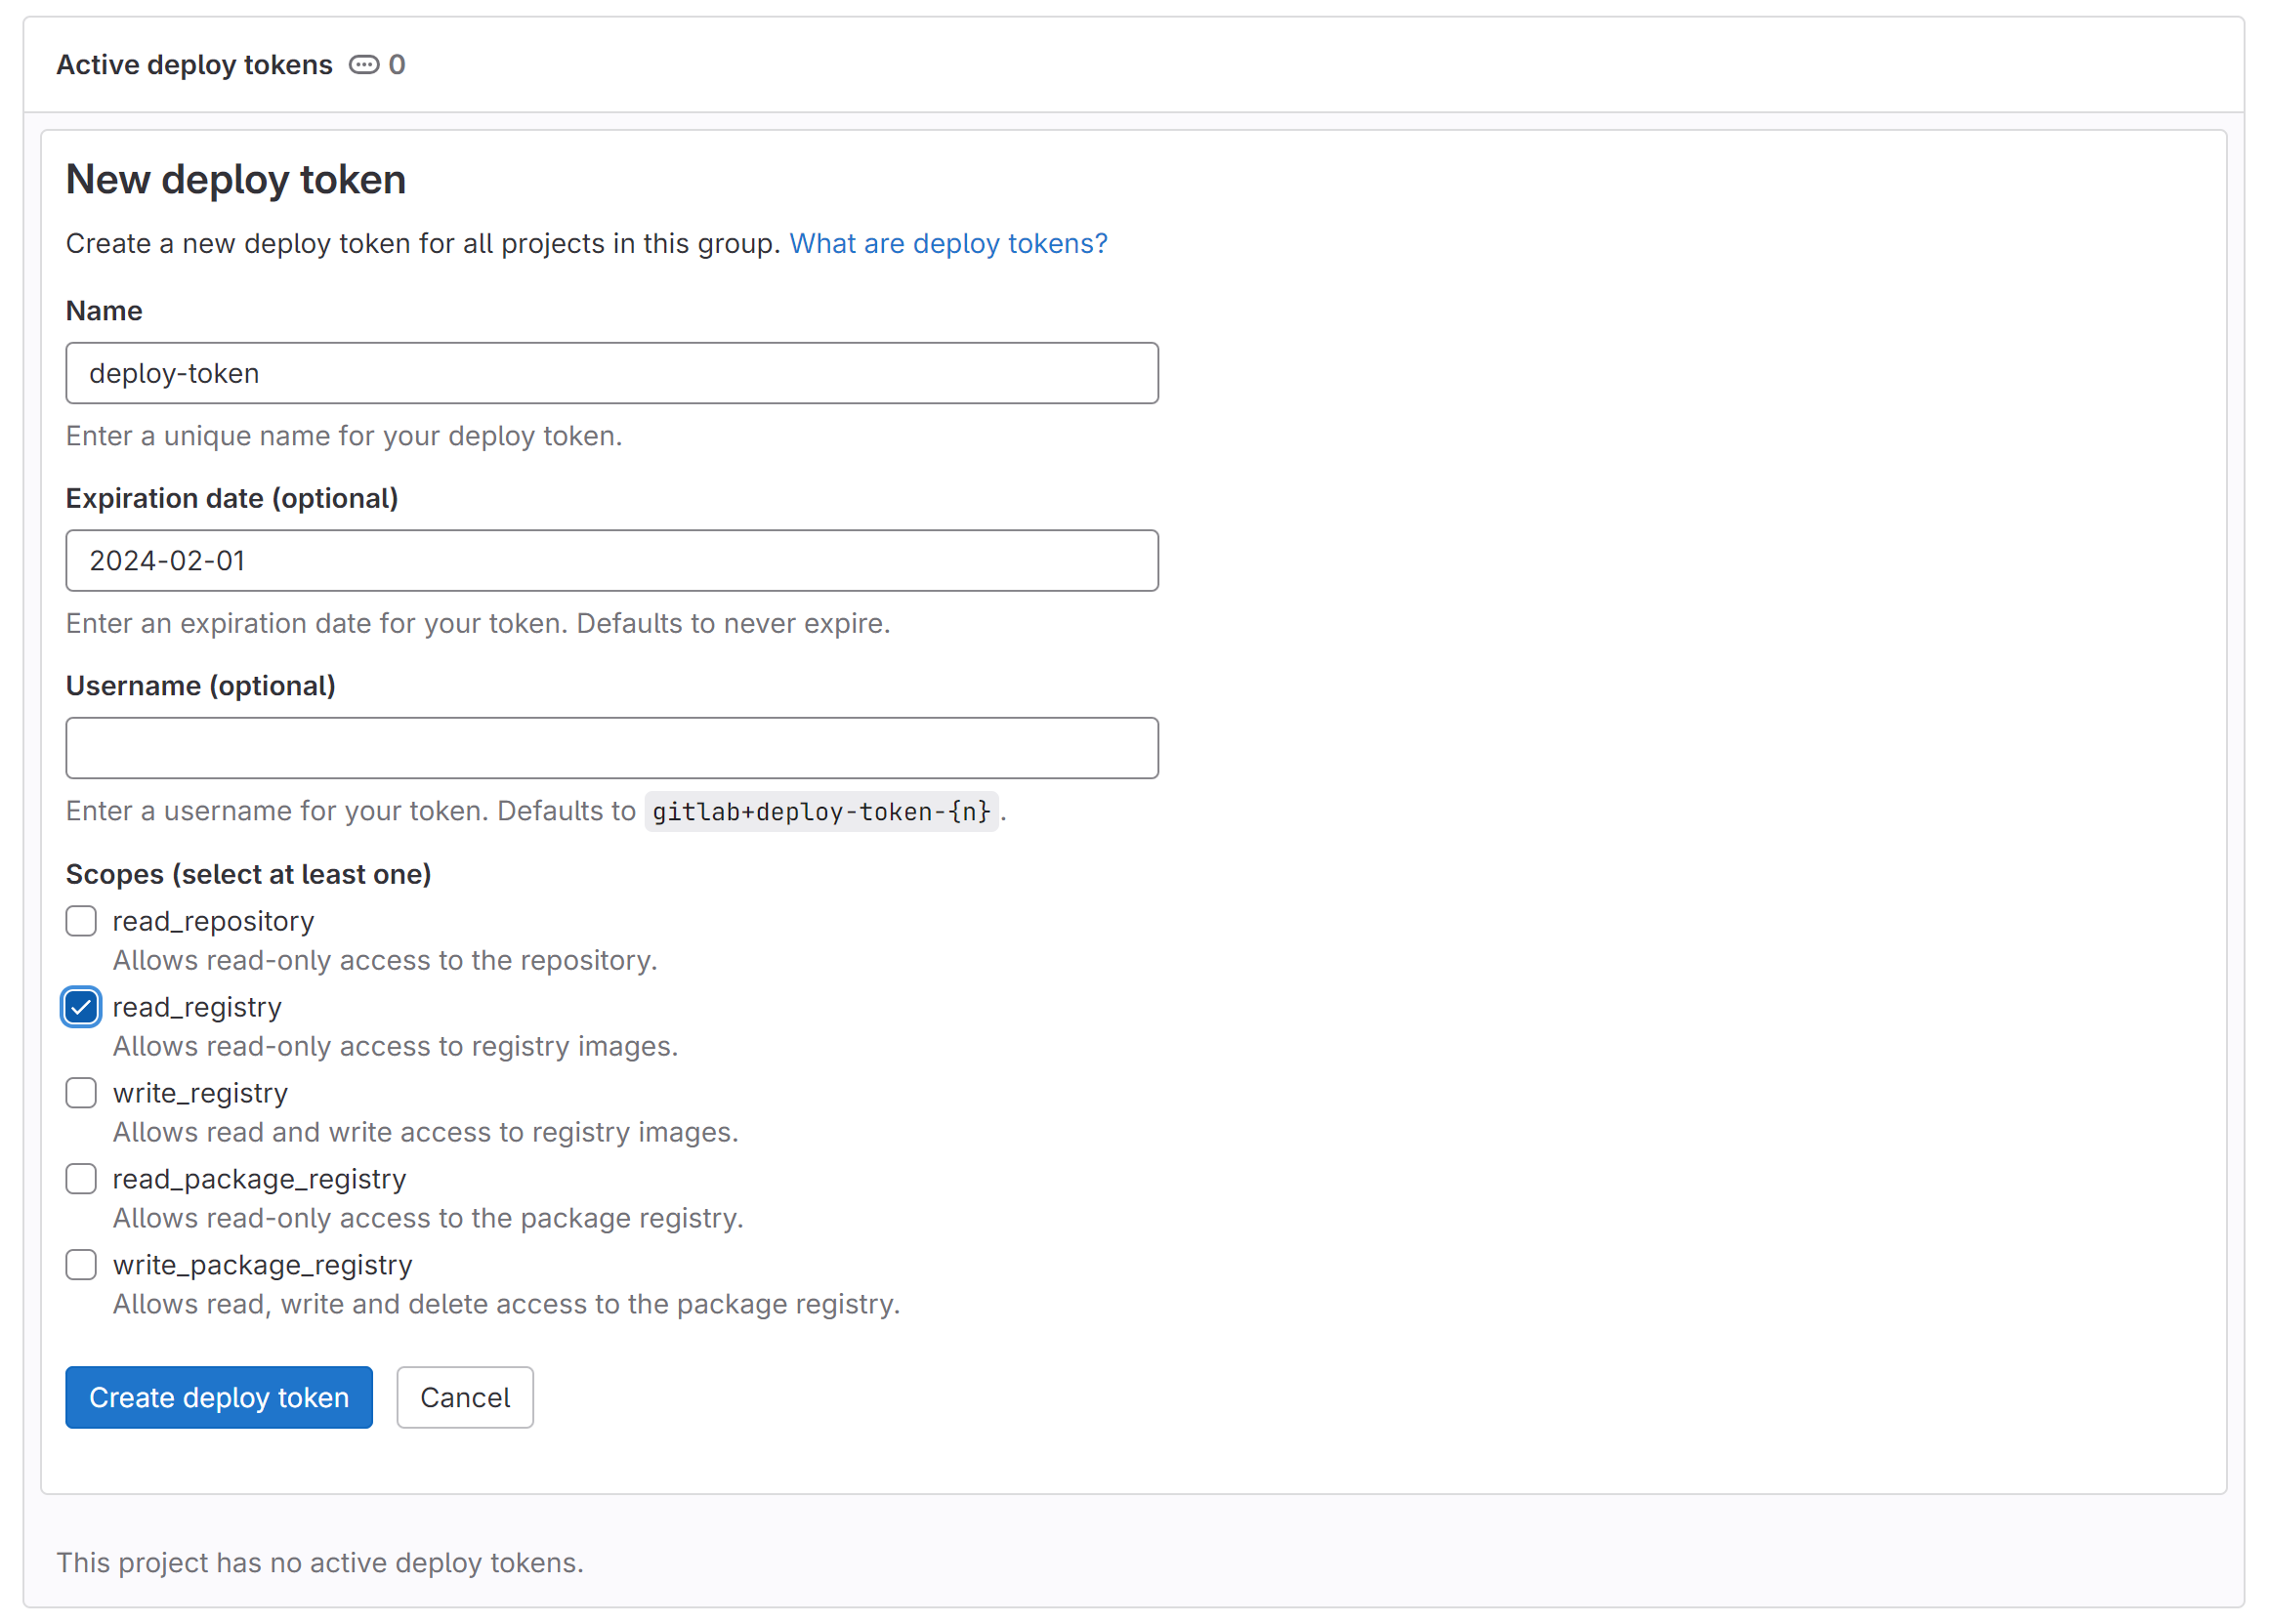
Click on Create Deploy Token, a view will pop up and show you your Deploy Token Username and Deploy Token Password. Keep this window open until you have completed and tested your GitLab credential setup! You can't recover the password of this deploy token later
Next we will create a secret in your team namespace that houses your deploy token credentials.
- First try to login to the registry manually to make sure the credentials are correct:
docker login gitlab.stud.atlantis.ugent.be:5050Use your deploy token credentials! -
Run the following command, using the credentials that just worked in the previous step to replace DEPLOY_TOKEN_USER, DEPLOY_TOKEN_PASSWORD This command will create a special docker-registry secret:
kubectl create secret docker-registry gitlab-credentials \ --docker-server=gitlab.stud.atlantis.ugent.be:5050 \ --docker-username="DEPLOY_TOKEN_USER" \ --docker-password="DEPLOY_TOKEN_PASSWORD" -
Check to see if the secret was created:
kubectl describe secret gitlab-credentialsName: gitlab-credentials Namespace: devops-team0 Labels: <none> Annotations: <none> Type: Kubernetes.io/dockerconfigjson Data ==== .dockerconfigjson: 178 bytes
Tip
In the following you will be using the kubectl CLI. It may be worthwile to set up completion for this tool. This will allow you to use the tab key to autocomplete commands and arguments. This is especially useful when you are not sure about the exact name of a resource or command. You can find instructions on how to set this up on official k8s documentation:
Deploying deployment.yml
For the actual deployment, we will watch what happens by opening multiple terminals at once and watching the Deployment and Pod come up.
We are going to open up 2 terminals, the first one will be used to see a stream of events, the second one will be our controlling terminal from which we will issue our setup commands.
-
In the first terminal enter:
kubectl get events -w # The -w flag keeps watching the status, to exit: Ctrl+CThis command will output all Kubernetes events that get triggered while we issue other commands, so we can follow along how the cluster handles our instructions and get some insights. Keep this terminal running while you go through the other
kubectlcommands from your second terminal.Your terminal will appear to be stuck, but it is just waiting to report any changes.
-
Now it is time to issue the correct command to send this Deployment file that we've created to the k8s cluster, into your namespace. In the second terminal, first make sure you are operating in the
k8sfolder:cd k8sThen apply your deployment file:
kubectl apply -f deployment.yml
-
Now watch the first terminal, you will see a stream of events which set up our Logic Service deployment and its resulting resources:
$ kubectl get events -w
0s          Normal   ScalingReplicaSet   deployment/logic-deployment              Scaled up replica set logic-deployment-748c75c6f8 to 1
0s          Normal   SuccessfulCreate    replicaset/logic-deployment-748c75c6f8   Created pod: logic-deployment-748c75c6f8-754l5
0s          Normal   Scheduled           pod/logic-deployment-748c75c6f8-754l5    Successfully assigned devops-team0/logic-deployment-748c75c6f8-754l5 to node3
0s          Normal   Pulling             pod/logic-deployment-748c75c6f8-754l5    Pulling image "gitlab.stud.atlantis.ugent.be:5050/devops-2025/devops-team0/logic-service:latest"
0s          Normal   Pulled              pod/logic-deployment-748c75c6f8-754l5    Successfully pulled image "gitlab.stud.atlantis.ugent.be:5050/devops-2025/devops-team0/logic-service:latest" in 102.283671ms
0s          Normal   Created             pod/logic-deployment-748c75c6f8-754l5    Created container logic-service
0s          Normal   Started             pod/logic-deployment-748c75c6f8-754l5    Started container logic-service
You also see references to something called a ReplicaSet, this is a lower level construct that backs the Deployments and other types of application resources such as StatefulSets. The ReplicaSet is responsible for keeping X amount of Pods up and running (X being 1 by default).
In the events, we see our Deployment gets created, which results in the creation of a ReplicaSet. This then causes a Pod to be created. The scheduler decides on which node that Pod has to run. After pulling the image, the Pod resource creates and starts the container. After this our application is set up and running.
Verify your deployment and pod with kubectl statements!
$ kubectl get pods
NAME                                READY   STATUS    RESTARTS   AGE
logic-deployment-748c75c6f8-lvd59   1/1     Running   0          6m49s
$ kubectl get deployments
NAME               READY   UP-TO-DATE   AVAILABLE   AGE
logic-deployment   1/1     1            1           6m49s
- As we explained, a Deployment describes what the state of k8s objects should be like. In our case it states that our logic-service should be up. To demonstrate that, we will now delete the pod and you will see that k8s automatically spins up a new one (since the desired state asks for 1 pod to be up and running).
-
To do this execute:
kubectl delete pod <your-logic-service-name>(find the name by listing the pods), now watch the events terminal.0s Normal Killing pod/logic-deployment-748c75c6f8-754l5 Stopping container logic-service 0s Normal SuccessfulCreate replicaset/logic-deployment-748c75c6f8 Created pod: logic-deployment-748c75c6f8-lvd59 0s Normal Scheduled pod/logic-deployment-748c75c6f8-lvd59 Successfully assigned devops-team0/logic-deployment-748c75c6f8-lvd59 to node2 0s Normal Pulling pod/logic-deployment-748c75c6f8-lvd59 Pulling image "gitlab.stud.atlantis.ugent.be:5050/devops-2023/devops-team0/logic-service:latest" 0s Normal Pulled pod/logic-deployment-748c75c6f8-lvd59 Successfully pulled image "gitlab.stud.atlantis.ugent.be:5050/devops-2023/devops-team0/logic-service:latest" in 1.119721s 0s Normal Created pod/logic-deployment-748c75c6f8-lvd59 Created container logic-service 0s Normal Started pod/logic-deployment-748c75c6f8-lvd59 Started container logic-serviceAs you see, after the Pod gets killed the ReplicaSet immediately jumps into action to make sure that the 1 instance is back up and running as soon as possible. A new pod gets created, assigned a node and then the container starts.
Note that here we actively deleted the Pod but when an application crashes and terminates because of that, we also get the same behavior! As the container terminates, the deployment/replicaset kicks in and spins up a new instance.
We now have a deployment that makes sure our logic is available as a pod on Kubernetes inside our team's namespace. If you want to see some log output you can view it like this:
$ kubectl logs <pod-name>
__  ____  __  _____   ___  __ ____  ______
 --/ __ \/ / / / _ | / _ \/ //_/ / / / __/
 -/ /_/ / /_/ / __ |/ , _/ ,< / /_/ /\ \
--\___\_\____/_/ |_/_/|_/_/|_|\____/___/
2023-11-08 14:31:48,962 INFO  [io.quarkus] (main) logic-service 1.0.0-SNAPSHOT on JVM (powered by Quarkus 3.2.4.Final) started in 0.982s. Listening on: http://0.0.0.0:8080
2023-11-08 14:31:48,968 INFO  [io.quarkus] (main) Profile prod activated.
2023-11-08 14:31:48,968 INFO  [io.quarkus] (main) Installed features: [cdi, resteasy-reactive, resteasy-reactive-jackson, smallrye-context-propagation, smallrye-openapi, vertx]
If you want to stream the log (ctrl+c to exit):
kubectl logs <pod-name> -f
Also make sure to use kubectl describe on both your pod and deployment and go through its elements. When debugging your application in the future, these get, logs and describe commands give you valuable information to work with, so familiarize yourself with their contents and operation.
Tip
You can also use kubectl get all to get a list of all resources in your namespace. This is a good way to get an overview of what is running in your namespace.
Kubernetes curates a kubectl quick reference with commonly used commands and flags. It is a good idea to bookmark this page and use it as a reference. It shows both basic and advanced commands.
Also, if you want to learn more about a specific resource, you can use kubectl explain <resource>. This will give you a detailed description of the resource and its fields. Try out kubectl explain deployment for example.
Service preparation
As you may have noticed, your logic is still not showing up on https://devops-proxy.atlantis.ugent.be as a player. Why is this?
A pod on its own is not reachable by the gamehost running in its own namespace yet. To expose our pod, we will have to deploy a service. That is exactly what we'll do next.
We will now create a k8s service. This gives us a handle to connect to the deployed pod(s) that will spawn as a result of the Deployment described in the above deployment.yml file. Create a new file called service.yml with this content in the k8s folder:
apiVersion: v1
kind: Service
metadata:
  name: logic-service
spec:
  selector:
    app: logic
  ports:
    - protocol: TCP
      port: 80
      targetPort: 8080
The selector part says it will act as an abstraction, exposing all pods that have the label app: logic, which is exactly what we wrote in our deployment.yml as label for the spawning pods (this is part of the Service Discovery mechanism Kubernetes provides via the Service abstraction).
The service makes sure we can contact the pods with our logic on the (namespace-)internal DNS name logic-service on port 80. Outside of our namespace, it will be available at http://logic-service.devops-team<teamNr> (our namespace is appended after a .). This is exactly the logic url that will be called by the Devops Gamehost.
Traffic to this service will be mapped to targetPort 8080 of our pod, which is the port on which it is listening.
Deploying service.yml
We will watch the actual deployment of the service again:
kubectl apply -f service.yml
Now check the created service:
kubectl get services
NAME            TYPE        CLUSTER-IP       EXTERNAL-IP   PORT(S)   AGE
logic-service   ClusterIP   10.102.130.144   <none>        80/TCP    102s
Also check its details with describe
kubectl describe service logic-service
Name:              logic-service
Namespace:         devops-team0
Labels:            <none>
Annotations:       <none>
Selector:          app=logic
Type:              ClusterIP
IP Family Policy:  SingleStack
IP Families:       IPv4
IP:                10.102.130.144
IPs:               10.102.130.144
Port:              <unset>  80/TCP
TargetPort:        8080/TCP
Endpoints:         192.168.135.5:8080
Session Affinity:  None
Events:            <none>
Note the Endpoints: line and the Selector: line. The ip and port listed there, is the (internal) ip and port of our pod. To verify this you can run: kubectl describe pod <pod_name>. You will get a large output with details of the pod. Near the top you will see a line stating IP:. There you'll see the same ip as the Endpoints line of your service was stating. The Port: is a few lines down.
The Endpoint for the service was created purely based on the Selector app=logic that we also wrote in the service.yml. In the pod description you can see one of the labels is indeed app=logic, as we also wrote in the deployment.yml.
We now have a service that makes sure our logic is exposed as logic-service inside and outside our team's namespace. Since the gamehost also runs inside Kubernetes it can now reach your logic service. This means you should be able to see your team's name come up in the scoreboard of an active game on https://devops-proxy.atlantis.ugent.be.
Automating the deployment
We will now add a new job to the pipeline which will take care of the deployment of your logic-service to the Kubernetes cluster. This job will be responsible for deploying the service and the deployment we just created.
It is good practice to not expose literal secrets like passwords or usernames in your .gitlab-ci.yml file. To still be able to use these, but hide them in the repository and execution logs of your CI/CD pipeline we can define variables from the repo settings. They will be interpolated with the actual value, but still be masked in the log output.
In the left GitLab menu: go to Settings > CI/CD, then expand the Variables section. As you can see, your kubeconfig file is already here as a base64 encoded string. You can click Add Variable to add your own variables. (Check Masked to not show them in the logs, useful for secrets and passwords).
Adding a new job to your pipeline
By now you are quite familiar with this. We'll add a new job to our .gitlab-ci.yml to automate this deployment. The goal is being able to just improve the logic-service, push the code change, let the pipeline do its magic and deploy your compiled and packaged code on the cluster.
We'll call this job deploy-kubernetes. We will be using a specific image that has kubectl preinstalled: gitlab.stud.atlantis.ugent.be:5050/utils/docker/kubectl:1.34.1. We will tie this job to the deploy stage, our new final stage (executed after package).
Just like we had to configure our kubeconfig earlier it will have to be configured every time this pipeline runs too. To do this we will use a before_script, which executes commands before the actual script commands.
We will create the ~/.kube directory and copy our kubeconfig in there as a config file. We do this using the CI/CD Variable that has been set for your team. The base64 content of the variable is decoded into a config file (this avoids having issues with whitespace or escape characters when running the commands). The first line in the script will then print it to the screen, so it will show up in the pipeline logs and we can check it. The second line will show us if kubectl can read the config file and is properly configured.
Our new job so far:
deploy-kubernetes:
  image:
    name: gitlab.stud.atlantis.ugent.be:5050/utils/docker/kubectl:1.34.1
  stage: deploy
  before_script:
    - echo $KUBECONFIG_B64 | base64 -d > kubeconfig
    - export KUBECONFIG=$PWD/kubeconfig
  script:
    - cat $KUBECONFIG
    - kubectl config view
    - kubectl version
All this does is set up the kubeconfig for the pipeline. Now go ahead and add the commands to apply your kubernetes
resources to the cluster.
HINT: you can apply an entire folder of resources by using kubectl apply -f k8s/.
If this all worked out fine, you should see your logic-service is now participating in the Devops Game on https://devops-proxy.atlantis.ugent.be.
Once you've got this part working, you can delete the cat, kubectl version and kubectl config view commands.
These were just there to verify the kubeconfig was set up correctly.
Success
If you got here, congratulations! Your team now has a full pipeline running. You can now improve the Devops Game Logic, and it will automatically get deployed by your pipeline!
Restarting your deployment and ensuring the latest version is running
When you push a new version of your logic-service to your GitLab repository, the pipeline will automatically build and
deploy the latest image. However, this will not always result in the new version being deployed to your cluster.
Often you will get the following output:
$ kubectl apply -f k8s
service/logic-service unchanged
deployment.apps/logic-deployment unchanged
Because none of the values of your yaml files have been altered, from a Kubernetes point of view nothing has changed.
But our pipeline will have created a new latest image, which we want to deploy.
We can instruct Kubernetes to restart the deployment by using kubectl rollout.
TASK
Go through the rollout docs and/or
kubectl rollout --help.
Add a command to your pipeline that will restart the deployment after applying the yaml files. Test this command
with kubectl on your local machine first before committing it to your pipeline.
Deployment strategy
Adding this job as is to your pipeline will cause it to trigger it on every push to any branch and every MR. This is not ideal, as you don't want to deploy every change to your logic-service to the cluster. You only want to deploy the changes that are ready and have been tested and reviewed.
TASK
Decide on a strategy for deployment of your logic service and implement it in your pipeline
(eg. only from main, only certain branches, etc.). Add GitLab CI/CD rules [syntax] to the deploy-kubernetes job so this
strategy is enforced.
Elaborate on your chosen strategy in your report.
Devops Game
By deploying your logic-service to Kubernetes on the IDLab infrastructure, you are now officially participating in the Devops Game! Make sure you have read the Game Manual to understand the basic concepts and rules of the Game.
You can gather some bonus points by deploying the most impressive and smart logic-service implementation!
How does it work?
The controller for the Devops Game is a Java-based server application that we are also hosting on the Kubernetes cluster. The Faction Logic endpoint URLs (http://logic-service.devops-team<teamNr>) of all students (made available via a Kubernetes Service), have been registered with this server application. It will be running new game sessions with a predefined turn limit (3600 turns initially) in a continuous loop. If a Faction wins a game session, or the turn limit has been reached, a new game session will be automatically scheduled to run after a small pause. After each game session, the score and stats of all Factions are stored in a database, so that these are retrievable as the 'history' of the Devops Game.
An individual game session can be thought of as an instance of the devops-runner that you are already familiar with, but instead of using CPU Players, the moves for each Faction will be retrieved using the Faction Logic endpoint URLs that were registered for each Faction. To make sure that the game session does not stall, a maximum timeout of 1 second is in place for each request to the Logic Services of the Factions. When a Faction cannot adhere to this time limit, or produces an error or faulty response, a penalty of -100 points is applied to the score of the Faction.
Visit https://devops-proxy.atlantis.ugent.be/ to view the frontend of our server application (controlling the Game). If a game session is currently running, the main page will show the world map (similar to the devops-gui setup via Docker Compose on your PC) with a score and statistics panel, showing the realtime Faction ranking (on the right side). Otherwise, you'll see a text indicating when the next game will start.
There are three additional tabs that you can click on:
Teams
This tab lists all teams registered with the game.
Leaderboard
The Leaderboard tab shows the total score and averaged stats, based on all the game sessions that have been played up to now. This page will be empty until the first game has been completed. Note that the leaderboard will be reset on Monday 17 November 2025. This gives you the chance to experiment with the system without negatively impacting your final ranking. The top five Teams in this final ranking will receive bonus points 1.
| Rank | Points |
|---|---|
| 1st place | +2.5 |
| 2nd place | +2 |
| 3rd place | +1.5 |
| 4th place | +1 |
| 5th place | +0.5 |
These points will be added to your final score of all Lab Sessions, which is scored on 20 points.
History
The History tab shows a listing of all the games that have been played up to now. You can click on a history entry to view additional stats (e.g. the ranking of that specific game session). The history will also be reset on Monday 17 November 2025, so all teams have a chance to experiment with the system while finishing Lab 3, without this negatively impacting their final ranking.
Secure your logic-service
A simple security mechanism based on a symmetric key can be used to ensure that the move requests your logic-service is receiving, are coming from the server application hosted by us and not from a malicious source (of other student teams).
You have been granted a pre-configured secure key in the CI/CD variables of your repository (cfr. where you found your kubeconfig). Your logic-service can be extended with a HTTP filter to check if incoming requests have a HTTP header that equals this key (cfr. an API key mechanism). Add the following class to the be.ugent.devops.services.logic.http package:
package be.ugent.devops.services.logic.http;

import jakarta.ws.rs.ForbiddenException;
import jakarta.ws.rs.container.ContainerRequestContext;
import org.eclipse.microprofile.config.inject.ConfigProperty;
import org.jboss.resteasy.reactive.server.ServerRequestFilter;

public class AuthCheckerFilter {

    private static final String KEY_HEADER = "X-SECURE-KEY";

    @ConfigProperty(name = "secure.endpoints", defaultValue="false")
    boolean secureEndpointsEnabled;

    @ConfigProperty(name = "secure.key", defaultValue = "default-key")
    String secureKey;

    @ServerRequestFilter(preMatching = true)
    public void allowFilter(ContainerRequestContext requestContext) {
        if (secureEndpointsEnabled && !secureKey.equals(requestContext.getHeaderString(KEY_HEADER))) {
            throw new ForbiddenException();
        }
    }

}
You can now use environment variables to control the behavior of this simple security layer:
SECURE_ENDPOINTS: When set to "true", the HttpBinding class will validate all incoming requests using theSECURE_KEYbefore they are forwarded to yourFactionLogicImpl. (The default is "false")SECURE_KEY: The symmetric key that should be used to validate all incoming requests.
Adding environment variables to your Deployment
To enable the feature and configure it, we have to add these environment variables to the deployment of the Logic service.
TASK
Configure your deployment.yaml so the environment variables are set. Go through Kubernetes documentation
to figure this out on your own.
Requirements:
- Secure Endpoints: should be set to 'true' to enable the security mechanism.
- Secure Key: should be set to the value of the secure key you have been granted. You can retrieve this key from the CI/CD variables of your repository.
- Secure Key: for full credit, this should be set through a Kubernetes secret. This is a more secure way of handling sensitive information. Create the secret manually, then refer to it in your deployment.
Relevant docs:
Beware
The use of a secure key to protect the logic-service is a simple solution to protect your Factions against basic cheating. Be aware that we will be monitoring the Kubernetes cluster, the HTTP traffic logs and your logic-service code for any traces of malicious behavior. Teams that try to gather additional data on the active game session (i.e. not triggered by calls to nextBaseMove and nextUnitMove) or try to mess with services of other Teams, will be immediately disqualified, resulting in no grading for Lab 3 - 5!
Logging
As a reminder: you can view the logs of your logic-service running on Kubernetes using kubectl:
kubectl logs deployment/logic-service -f
This will stream the logs, meaning all logs will be printed since the start of the service and any new ones coming in. If you want to limit from which point in time the logs start printing, you can use the --since flag, for example:
kubectl logs deployment/logic-service -f --since=5m
Sometimes it can be interesting to view the logs from the previous pod (e.g. when your logic-service crashed and was restarted). To do this, you can use the -p flag:
kubectl logs deployment/logic-service -p
Info
It is good practice, to always read up on your command line tools like kubectl using the --help argument. For example you can get help for your log command using kubectl logs --help. There are many options to explore.
Questions
- While we only talk of Deployments and Pods, there actually is a third resource in between them: a ReplicaSet. Explain the role of the ReplicaSet and its behavior during an upgrade of a Deployment, e.g. when the image version gets updated (hint: use
kubectl get events). - Explain how the game server is able to reach your logic server. What Kubernetes concepts are used to achieve this? Provide a diagram to illustrate the flow of requests between the different Kubernetes resources. You can create a diagram through draw.io or any other tool of your choice.
Practicalities
This lab must be completed before Monday, 17 November 2025 at 23:59.
Warning
All support outside of the physical Lab session is handled via the GitLab Issue tracker! Do not expect support outside of the normal office hours.
Checklist
- Create deployment and service YAML definitions in the
k8sfolder - Update your
.gitlab-ci.ymlto deploy your logic-service to Kubernetes, ensuring it restarts and uses the latest version - Make sure your pipeline definition is clean and readable, reduce duplication where possible.
- Enable secure endpoints and include your secure key in the deployment to protect your
logic-service - Start participating in the live DevOps game
- Process feedback for Lab 2 and make sure your code is up to standard
- Add a tag2
Lab3to the commit you consider the final result of this lab session. - Create an issue
Lab 3 Report, labeled withReport&Lab 3, and add a concise report containing:- Link to the pipeline run for your
Lab3tag - Add a changelog for your Faction Logic implementation: what was added, fixed, removed. Link to the corresponding issues.
- Answer the questions posed in the section above.
- Link to the pipeline run for your
-
Bonus points are filler points. If you've lost a point on one of the labs, they can be filled in with bonus points, but you can never have more than a 100% for your lab grades. ↩
-
You can tag on Gitlab: use the tab "Code" (left menu), click "Tags" , then "New Tag". You can also tag using git directly: https://git-scm.com/docs/git-tag. ↩