Lab 1: Getting started
Introduction
The objective of this first Lab session is to get you started working on the DevOps project. You will:
- Initialize a Spring Boot application to host your colony logic (logic-service).
- Implement the basic functionality of your logic-service (HTTP API, game session management, simple movement logic).
- Set up team collaboration through Git.
- Learn how to build and execute your code via Maven.
- Connect your application to a local game server (deployed via Docker Compose) to test its core functions.
A note on AI
Using an AI coding assistant while working on this lab? See Using AI for our stance on this course, and a template AGENTS.md you can drop into your repository to keep it in teaching-assistant mode rather than solving the lab for you.
Project setup
Overview
The following figure provides an overview of the setup you will be working towards during this session:
The game server is provided in the form of a Container Image (colonyops-mission-runner), which consist of a backend component that provides the logic for running a mission and a bundled Web UI for visualising the game.
The backend relies on a Kafka broker for having a consistent log of events that occur in the game world. Both the mission-runner and Kafka are executed in a Docker environment.
To get the moves your colony decides to perform each turn, the backend sends HTTP requests to the Mission API of the logic-service you will be implementing in the form of a Spring Boot application.
Getting started with Spring Boot
Spring Boot is an opinionated layer on top of the Spring Framework. Spring Framework requires you to manually configure big XML-files or extensive Java-configuration classes. With Spring Boot, it allows you to build a runnable web service without having to wire up the infrastructure yourself. Four concepts are enough to get you going:
- 'Starter'-dependencies bundle a coherent set of libraries. Adding a single 'starter'-artifact to
your
pom.xmlpulls in everything needed for that use case (e.g. a web layer, JSON serialization, an embedded web server). - Auto-configuration inspects which libraries are on the classpath and configures sensible defaults for them. You only configure what you want to deviate from.
- An embedded web server is part of the application itself. There is no separate server to install or deploy to: the build produces a self-contained JAR that you simply run.
- Component scanning and dependency injection relieve you from instantiating and connecting
your own classes. The
@SpringBootApplicationannotation on the main class makes Spring scan that class' package (and all sub-packages) for annotated classes, instantiate them (as beans) and inject them wherever they are needed, typically through a constructor parameter. This lab session uses two role-specific annotations built on top of@Component:@RestControllerfor classes that expose HTTP endpoints (see Step 1 below), and@Servicefor classes that hold business logic.
Spring Boot itself is covered in depth during the theory lectures; this section only contains what you need to get your project up and running. When looking up anything beyond that, use the Spring Boot documentation — don't get stuck trying to implement something with the Spring Framework directly, there is almost always an easier path with Spring Boot.
Generate the starter project
Tip
Only one team member generates the project — the rest clone the team repository once it's pushed (see Collaborating via Git).
You will not write the project skeleton by hand: Spring provides a generator that produces a ready-to-build Maven project.
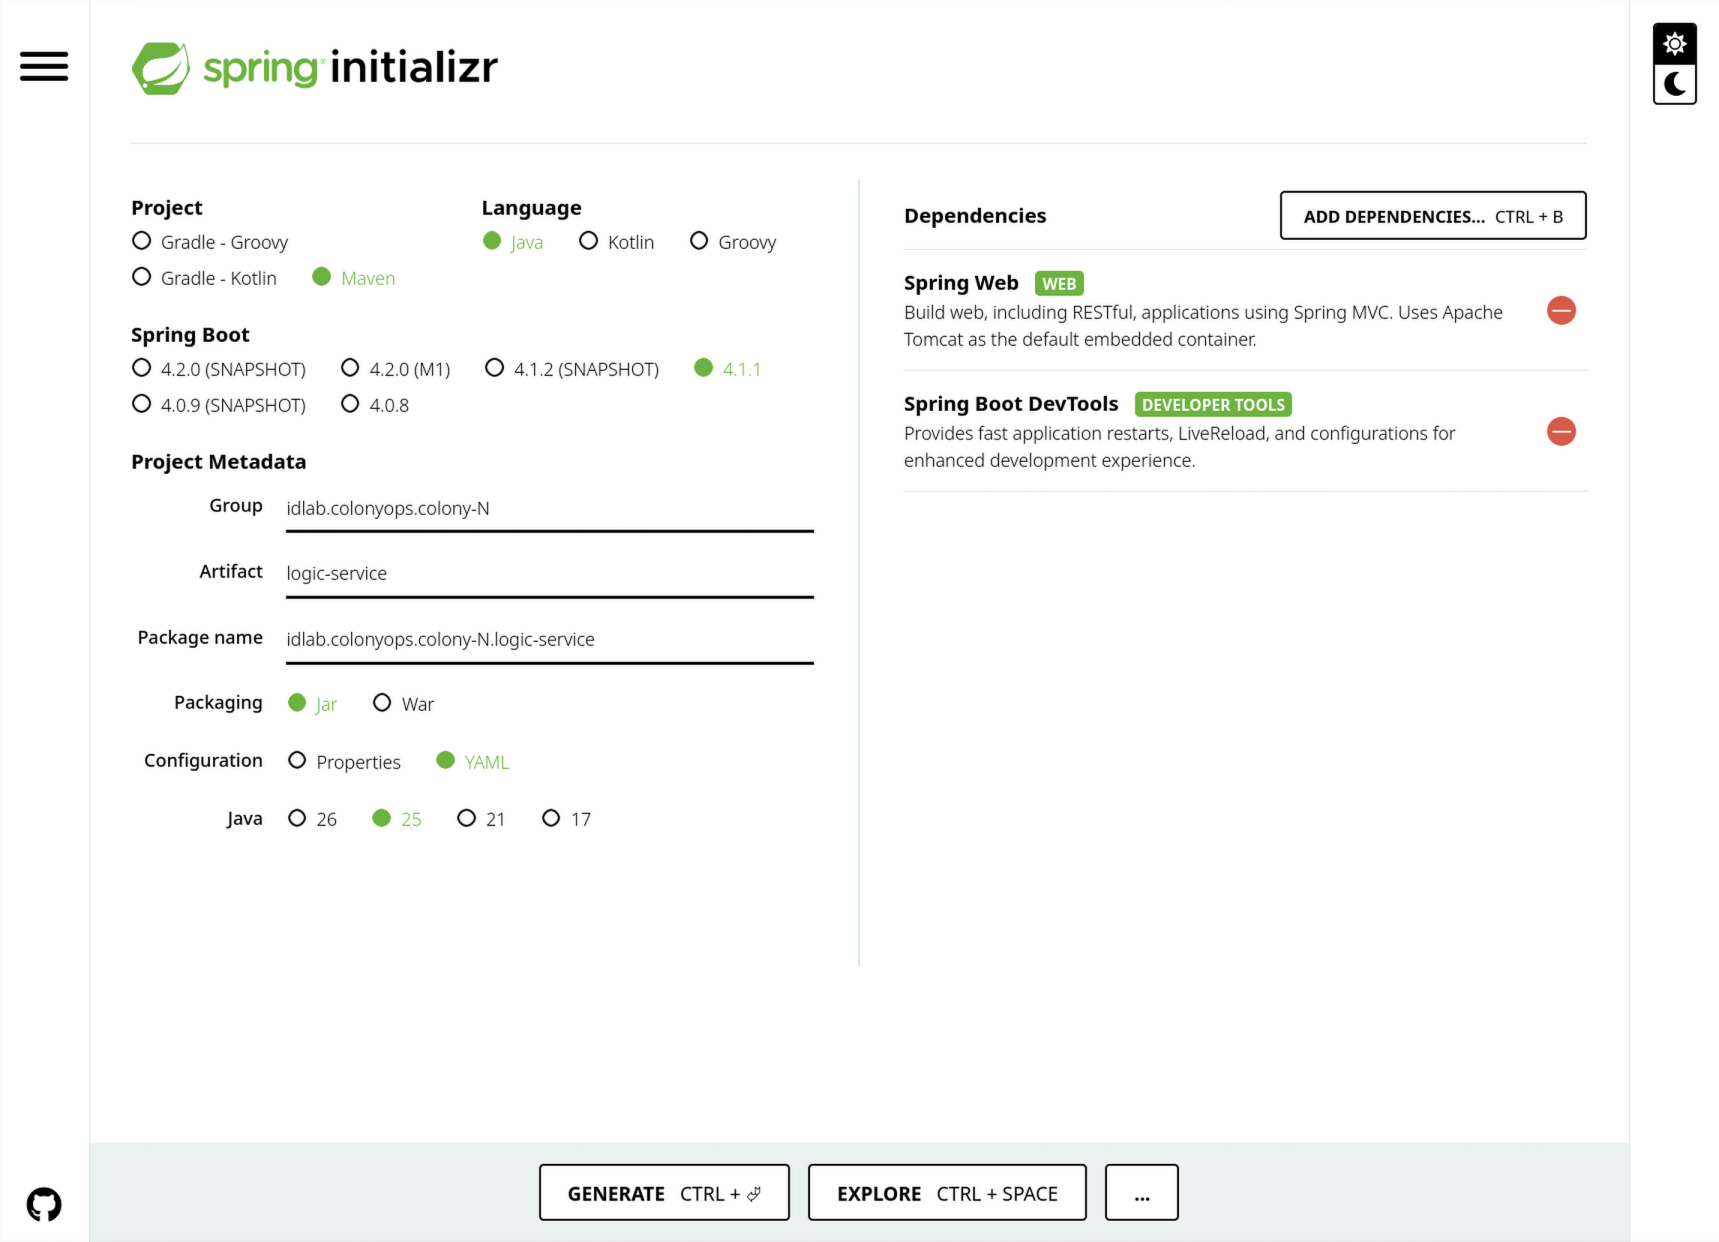
Go to start.spring.io, fill in the form using the settings from the
table below, and click Generate to download a ZIP archive. Extract it to the location where
you want to keep the project.
IDEA has the same generator built in: File → New → Project → Spring Boot. Fill in the same settings. (This generator is only available in the Ultimate edition — free for students via the JetBrains Student Pack, which is worth setting up for its other tools too. Without it, use Spring Initializr (Web) instead; the result is identical.)
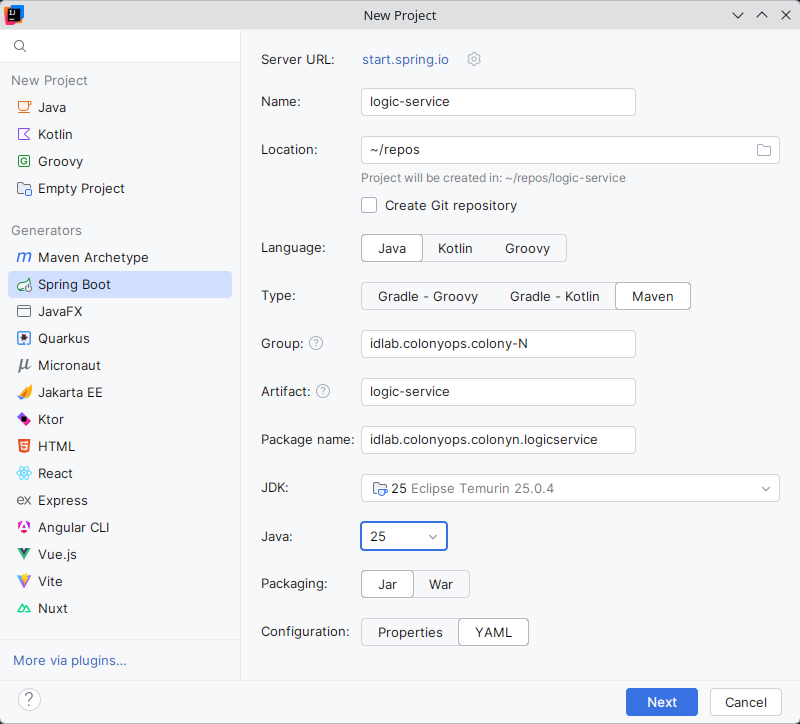
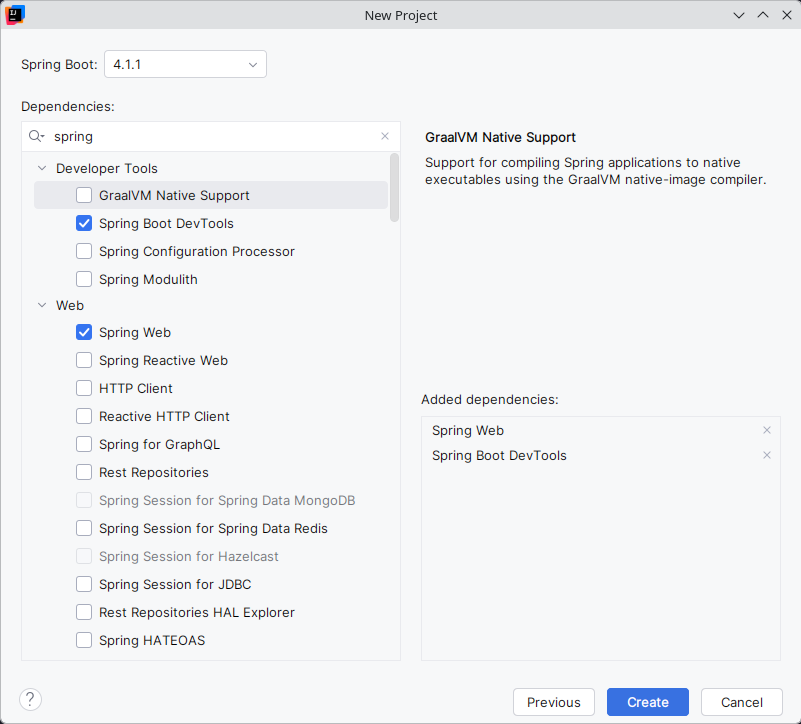
Use exactly the following settings:
| Setting | Value |
|---|---|
| Project (build tool) | Maven |
| Language | Java |
| Spring Boot | 4.1.1 |
| Group | idlab.colonyops.colonyN |
| Artifact | logic-service |
| Packaging | Jar |
| Java (JDK) | 25 |
| Configuration format | YAML |
| Dependencies | Spring Web and Spring Boot DevTools |
Replace N with your group number
Every team receives a group number before the first lab session. A team with group number 7
therefore uses the group id idlab.colonyops.colony7.
Because you chose YAML as the configuration format, your application configuration lives in
src/main/resources/application.yaml. This is where you set properties such as the HTTP port the
service listens on.
Build & dependencies
The Spring Boot template you started from is configured to use Maven as its build tool.
Apache Maven is a build automation tool for Java projects, built around
a pom.xml metadata file at the project root that declares dependencies and describes how the
project is built and packaged; a popular alternative is Gradle. For a basic
introduction to Maven's project model, dependency declarations and lifecycle phases, work through
https://www.baeldung.com/maven, the rest of this lab assumes you have.
Two elements of the generated pom.xml you'll touch directly this lab session:
dependencies (declaring the libraries you depend on) and, shortly, a repositories element
for a dependency hosted outside Maven Central.
Compile and run
Navigate to your repository folder and enter the following command:
Notice the use of ./mvnw or mvnw.cmd instead of plain mvn. The former refers to a Maven wrapper script that comes with the project. This wrapper downloads a project-compatible version of Maven that will only be used within the context of this project. Using Maven wrapper makes it easier for developers to collaborate and prevents you from having to install Maven on your system.
At the end of the process you should see output similar to:
[INFO] Scanning for projects...
[INFO]
[INFO] ---------------< idlab.colonyops.colony7:logic-service >---------------
[INFO] Building  0.0.1-SNAPSHOT
[INFO]   from pom.xml
[INFO] --------------------------------[ jar ]---------------------------------
[INFO]
[INFO] --- resources:3.5.0:resources (default-resources) @ logic-service ---
[INFO] Copying 1 resource from src\main\resources to target\classes
[INFO] Copying 0 resource from src\main\resources to target\classes
[INFO]
[INFO] --- compiler:3.15.0:compile (default-compile) @ logic-service ---
[INFO] Nothing to compile - all classes are up to date.
[INFO] ------------------------------------------------------------------------
[INFO] BUILD SUCCESS
[INFO] ------------------------------------------------------------------------
[INFO] Total time:  1.231 s
[INFO] Finished at: 2026-08-21T14:45:51+02:00
[INFO] ------------------------------------------------------------------------
To run the application using Maven, enter the following command:
If no other process is using the configured HTTP port (8080 by default), you should see an ASCII Spring logo and a log line similar to:
2026-09-16T14:03:16.144+02:00 INFO 802380 --- [logic-service] [ restartedMain] o.s.boot.tomcat.TomcatWebServer : Tomcat started on port 8080 (http) with context path '/'
This informs you that the embedded Tomcat web server was started successfully at the designated port.
Port 8080 was already in use
If the application fails to start with APPLICATION FAILED TO START / Web server failed to
start. Port 8080 was already in use, something else on your machine is already listening on
that port, commonly a previous spring-boot:run that did not shut down cleanly, or another
service/container. Find out what with ss -ltnp | grep 8080 or lsof -i:8080 (Linux/macOS), or
netstat -ano | findstr :8080 (Windows), and stop it, or change server.port in
application.yaml for now.
Add the model-lib dependency
The game backend and your logic-service exchange JSON documents that describe missions, squad
members, the planet and the actions you want to perform. Rather than letting every team write its
own Java classes for these documents, we publish them as a Maven library: model-lib. It
contains the exact same classes the game backend uses to produce and consume that JSON, which means
you can accept and return them directly in your endpoints: Spring takes care of the JSON
conversion.
The library also carries the Jackson annotations that
implement the type discriminator described in the game manual. Because
of this, an Action you return or an Entity you receive is serialized and deserialized to the
correct subtype without any configuration on your part.
Just adding model-lib as a dependency in your pom.xml is not going to work. The library is not
published on Maven Central but in the package registry of our own hosted GitLab instance.
Maven only searches Maven Central by default, so you have to tell it about this additional
repository. Add the following repositories element to your pom.xml, as a direct child of the
project element:
<repositories>
    <repository>
        <id>gitlab-maven</id>
        <url>https://gitlab.stud.atlantis.ugent.be/api/v4/projects/895/packages/maven</url>
    </repository>
</repositories>
Then declare the dependency itself inside the existing dependencies element:
<dependency>
    <groupId>idlab.colonyops</groupId>
    <artifactId>model-lib</artifactId>
    <version>1.1.0</version>
</dependency>
The repository is publicly readable, so no credentials are required. Trigger a Maven reload in your IDE to have Maven download the library and add it to your classpath.
Tip: Trigger a Maven reload with IntelliJ
IntelliJ does not automatically pick up changes you make to pom.xml (a new
dependency, a new plugin, ...). You need to explicitly trigger a Maven reload
using one of the methods below.
After editing and saving pom.xml, a small blue circular icon appears near
the editor tab (or in a notification banner at the top of the file). Click
it to reload the Maven project and download any new dependencies.
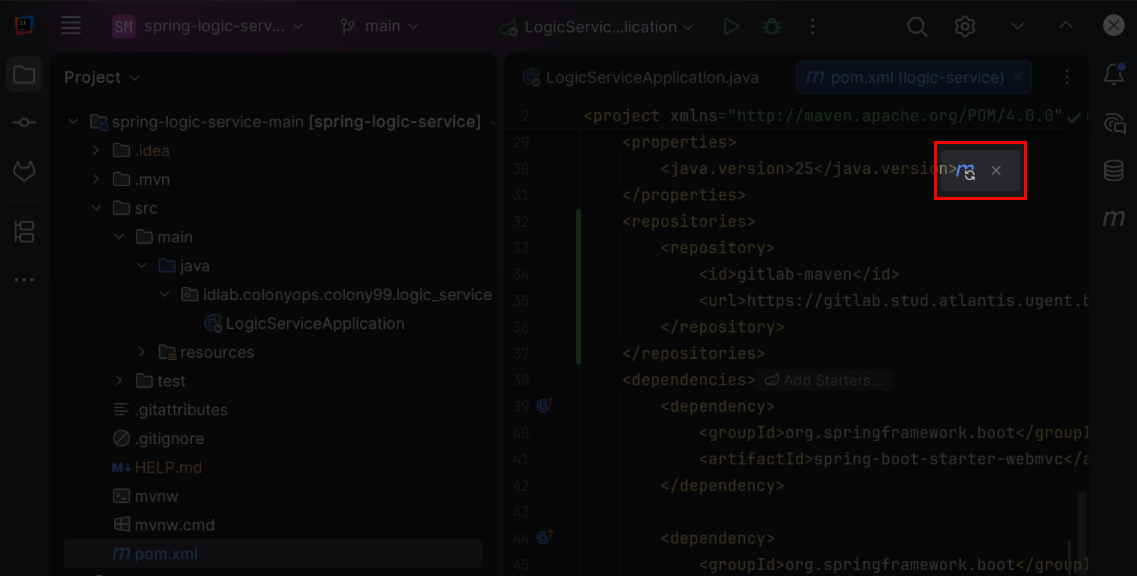
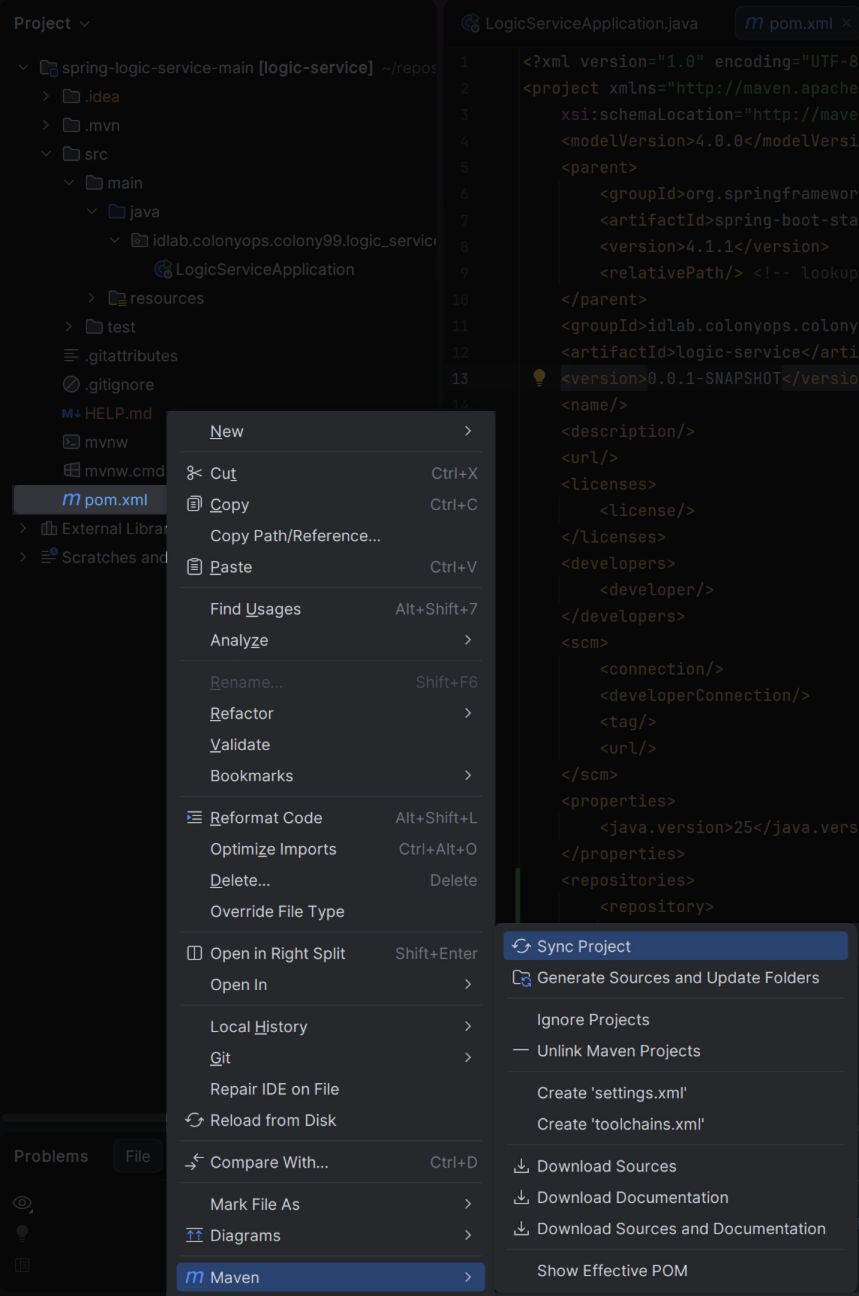
In the Project view, right-click on pom.xml, then choose
Maven > Reload project from the context menu. This works even if the
reload icon doesn't appear.
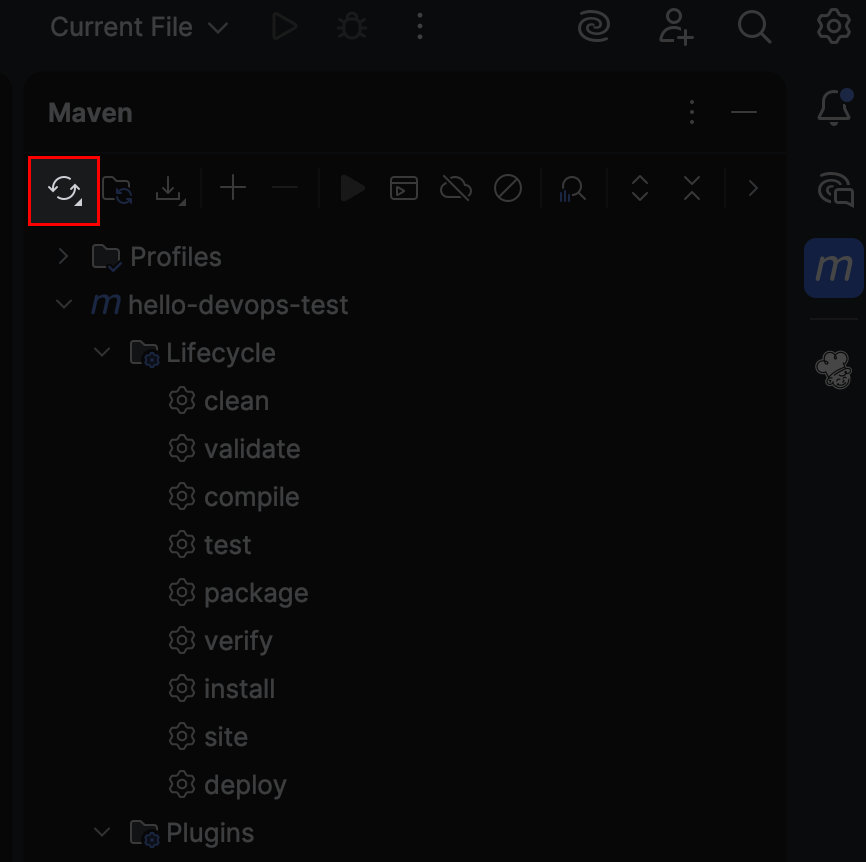
Open the Maven tool window on the right-hand sidebar (look for the "m"
icon). Click the circular reload arrows at the top of the panel to reload
all Maven projects; the tool window also lets you browse and run lifecycle
phases such as compile, test, and install directly.
Tip: Explore the library
The fastest way to find out which fields a class actually has is the hosted model-lib Javadoc. The sources are also available at devops/model-lib, if you want to browse the implementation itself; in IntelliJ IDEA you can press Ctrl+B or Ctrl+Left Click on any class name to jump to its declaration, and use Download Sources when prompted.
The classes are organised in the following packages:
| Package | Contents |
|---|---|
idlab.colonyops.model |
Mission, Planet, Location, MissionControl, EntitiesAtLocation, DepositFoundEvent |
idlab.colonyops.model.actions |
ActionRequest and the Action hierarchy (MoveAction, AttackAction, ExtractResourceAction, ...) |
idlab.colonyops.model.entities |
Entity and its implementations (SquadMember, ResourceDeposit, Turret, LandingCraft, ...) |
idlab.colonyops.model.entities.inventory |
Weapon, Consumable, ResourceCrate, ResourceType |
idlab.colonyops.model.strategy |
GrowthSettings, ResearchTargets (the colony's strategic settings — decided by making edits in the game backend itself, not something you implement in the logic-service) |
idlab.colonyops.model.techtree |
The TechEffect hierarchy, describing which research effects are currently active |
Projects and modules in IntelliJ IDEA: Browse the library sources alongside your own code
IntelliJ calls your Spring Boot application a module; a project is a collection of modules you work on together (by default, one project with one identically-named module, which is why the distinction is easy to miss).
You can add a second module to the same project to browse and edit its code alongside your own
— model-lib is a good candidate. Clone its repository, then:
- File → New → Module from Existing Sources..., navigate to the cloned
model-libfolder and click OK. - Select Import module from external model → Maven (it's a Maven project too), then Create.
- To remove it again: File → Project Structure... → Modules, select
model-lib, click "−" (Remove Module) — this only detaches it from the project; the cloned files stay on disk.
This changes nothing about your build: Maven still resolves model-lib as the published
dependency declared in your pom.xml. If IntelliJ's Maven panel (the Maven icon in the
right-hand editor toolbar) doesn't pick up the new module automatically, right-click your
Spring Boot module and choose Maven → Sync Project.
Library versions
The library evolves along with the game. New versions will be announced in the lab
sessions, and you will have to
update the version element in your pom.xml to pick them up.
Collaborating via Git
If all has gone well, you should see that you are added to a private GitLab subgroup (at https://gitlab.stud.atlantis.ugent.be/devops/2026) that corresponds with your group. Here you should be able to create a new project (repository) for your logic-service. This is where you will push your code to, and where your team members can clone it from.
Create a new blank project and call it logic-service. Leave Initialize repository with a README unchecked, so GitLab does not create a competing first commit.
Only one team member bootstraps the project
Only one team member generates the project, creates the GitLab project and pushes the initial commit — independently generated projects won't be identical, and pushing to an empty repository from multiple machines at the same time invites a merge conflict before any application code exists. Once that commit is pushed, the rest of the team clones the repository.
The empty project page GitLab shows afterwards lists the exact commands to turn your local Spring
Boot project (the root of the Maven project you generated earlier) into a Git repository and push
it, under Push an existing folder. Select HTTPS and follow those on-screen instructions. If
you want a step-by-step walkthrough of the same commands (git init, adding a remote, committing
and pushing), see the Push the sanity-check project to
GitLab section of the development
environment guide, which covers it in more detail.
Writing commit messages: Conventional Commits
From this commit onwards, write your commit messages according to the Conventional Commits specification. A commit message follows this structure:
The type tells a reader what kind of change the commit contains, without them having to read the
diff. The most common types are:
| Type | Use for |
|---|---|
feat |
A new feature |
fix |
A bug fix |
refactor |
A code change that neither fixes a bug nor adds a feature |
test |
Adding or correcting tests |
docs |
Documentation-only changes |
chore |
Build process, tooling or dependency changes |
A scope in parentheses narrows down where the change applies, e.g. feat(controller): add DELETE
/missions/{missionId} endpoint. Some examples for this lab session:
feat(logic): move squad member to random adjacent tile
fix(controller): return 404 for unknown missionId
test(logic): add unit test for torus wraparound
docs: document local docker compose setup
Aim for commits small enough to describe in one line, describing what changed rather than how
you felt about it — squashing a whole working session into one vague "stuff" or "wip" commit
hides what actually happened and makes it hard to find where something broke later. Consistent,
structured commit messages also make it possible to later generate a changelog automatically from
your git history; more on that in a later lab.
Other team members: clone the repository
Once, and only once, the team member who bootstrapped the project has pushed the initial commit, the rest of the team can start working on the project by checking out the repository. To do this: visit the repository on GitLab. You should see a Clone button on the landing page:

Clone directly with IntelliJ or copy the Clone with HTTPS URL and execute the following command in the folder where you want to store the project:
Remember to set up the glab command line tool and authenticate with your
GitLab account, as described in the
development environment guide.
Verify: the project builds and runs for everyone
Before moving on, every team member should confirm the cloned project works on their own
machine: run ./mvnw compile and ./mvnw spring-boot:run (see Compile and run
above) and check that it starts up the same way it did for the team member who generated it.
Finding out now that it only builds on one laptop is a lot cheaper than finding out during the
next lab session.
Implementing the Mission API
Time to make the service do something. Your goal for this lab session is a logic-service that the game backend can talk to for a full mission, with a deliberately naive decision logic behind it. You will grow that logic into something competitive over the coming lab sessions, so it pays off to structure the code well from the start.
Scope of this lab session
Only the Mission API (game manual) is required. The colony's strategic settings (growth, research) are decided by the game backend itself, set through the Colony Control Center — not something you implement in the logic-service.
Work in three steps: first make the endpoints reachable, then keep track of the missions you are playing, and finally decide on an action. A possible layout that separates these concerns:
src/main/java/idlab/colonyops/colonyN/logic_service/
├── LogicServiceApplication.java   # generated main class
├── controllers/                   # HTTP layer: @RestController classes
└── logic/                         # mission state and decision logic: @Service / @Component classes
Warning
Keep extra  packages "within" the package of the generated main class ( logic_service). The generated main class will be LogicServiceApplication available in the idlab.colonyops.colonyN.logic_service, when you used the same naming as described in Generate the starter project. The component scanning starts
from the package that holds the
packages "within" the package of the generated main class ( logic_service). The generated main class will be LogicServiceApplication available in the idlab.colonyops.colonyN.logic_service, when you used the same naming as described in Generate the starter project. The component scanning starts
from the package that holds the @SpringBootApplication class, so a bean in a sibling package of the logic_service
will not be discovered.
Step 1: expose the Mission API endpoints
The Mission API defines five HTTP endpoints that the game
backend calls on your service. Spring Web MVC lets you implement each one as a plain method on a
@RestController
class, annotated to declare the HTTP method and path, and how the request and response bodies are
converted to and from JSON.
Put all five in one controller class. A class-level
@RequestMapping("/missions")
prefixes every method mapping with /missions, so the individual mappings only need to add what
comes after that. Here is a complete implementation of the first endpoint, POST /missions:
@RestController // (1)!
@RequestMapping("/missions") // (2)!
public class MissionController {

    @PostMapping // (3)!
    public ResponseEntity<Void> startMission(@RequestBody Mission mission) { // (4)!
        // TODO: remember this mission so the endpoints below can find it again (see step 2)
        return ResponseEntity.status(HttpStatus.CREATED).build(); // (5)!
    }
}
- Marks the class as a bean whose methods handle HTTP requests. Method return values are written straight to the response body as JSON, rather than resolved to a view template.
- Applied at the class level, this path applies to every method mapping in the class, so the
@PostMappingbelow really mapsPOST /missions. - Shorthand for
@RequestMapping(method = RequestMethod.POST).@PutMappingand@DeleteMappingwork the same way for the other HTTP methods the Mission API uses. @RequestBodytells Spring to deserialize the JSON request body into the given type using Jackson: here, theMissionclass thatmodel-libalready provides.ResponseEntitygives you control over the exact status code and body returned. The manual specifies201 Createdfor this call.
The remaining endpoints operate on a specific mission and need the missionId from the
path, for example:
@PutMapping("/{missionId}") // (1)!
public ResponseEntity<Void> updateMission(
        @PathVariable String missionId, // (2)!
        @RequestBody Mission mission) {
    // ...
}
{missionId}is a URI template variable: a placeholder that matches whatever segment the backend puts in that position of the path.@PathVariablebinds the matched segment to the method parameter of the same name.
Read the Mission API section of the manual carefully and
implement the remaining four endpoints the same way, matching the HTTP method, path, request body
and expected response listed there. It also documents when the backend expects a 404 Not Found,
and what it does when it receives one. A handler method can also return a model-lib object
directly instead of wrapping it in a ResponseEntity: Spring converts it to JSON using
Jackson,
so returning a MoveAction from the request-action endpoint produces exactly the JSON document
the backend expects, type field included.
/scan-completed: not needed for this lab's goal
This lab session focuses on a small, simple implementation: as mentioned above, moving every
squad member to a random adjacent tile is enough to reach this lab's goal. That means the
/missions/{missionId}/scan-completed endpoint doesn't need any real logic behind it yet — add
it to your controller so the route exists, and simply return 501 Not Implemented. Motivated students who want to look ahead and start thinking about
a smarter implementation already can, and will have a head start in the next lab session.
Important REST concepts
Getting the status code right is not a minor detail here: it is one of the core concepts of REST APIs, so make sure you actually understand why each one applies before you write the code. The same goes for the response body and headers each endpoint is expected to produce, don't just copy a pattern that happens to work: think through what the manual actually requires for each case. These are exactly the kind of details that come back on the test/exam.
Step 2: keep track of the missions you are playing
The backend addresses every call after the first one with a missionId, which means your service
has to remember which missions it has been told about. Introduce a component that owns this
bookkeeping, a @Service is the natural fit, and let your controller delegate to it. Keeping the
state out of the controller will make it far easier to test (the subject of
Lab 2) and to swap in a smarter implementation later.
Important points to think about
- Setup. Use Constructor Based Dependency Injection. This is also covered in the theory lectures around REST Webservices. Let your controller depend on a singular logic manager interface, which manages the logic of multiple missions.
- Lifecycle.
POST /missionscreates the state for a mission,DELETE /missions/{missionId}destroys it. Everything in between operates on existing state. - Unknown missions. If a
missionIdis unknown to you, respond with404 Not Found. The backend interprets that as "this service has forgotten the mission" and re-sends the mission start event, which is how your service recovers after a restart. Silently accepting an unknown mission breaks that recovery mechanism. - Concurrency. The backend requests an action for every living squad member each turn, and it
does not necessarily wait for one response before sending the next request. Multiple threads can
therefore be inside your logic at the same time. A plain
HashMapis not safe under those conditions: what would you use instead? - Turn state.
PUT /missions/{missionId}hands you an updatedMissionbefore each turn. Storing the most recent one gives your logic access to the current turn number, the planet dimensions and the mission control state (MissionControl) when it has to decide on an action. - Structure. Put the decision logic behind an interface with a small number of methods (one per event the backend notifies you of). You then have a clean seam to plug in alternative implementations, which is convenient for testing and for experimenting with different strategies.
Hint: what to use instead of a plain HashMap
ConcurrentHashMap
is the standard choice here: it gives you the same Map interface, but its reads and writes are
safe under concurrent access without you having to add your own locking. A HashMap guarded by
synchronized would also be correct, just coarser-grained and slower under contention: fine for
this lab's traffic, but worth knowing the trade-off exists. Either way, this keeps your mission
state in memory and therefore tied to a single running instance — a deliberate simplification
for now, revisited once Kubernetes and multi-replica deployments enter the picture in a later
lab.
Step 3: decide on an action
For this lab session a single behaviour suffices: move each squad member to a random adjacent tile. Extracting resources, combat and pathfinding are the subject of Lab 2 and beyond.
You will need the following, all of which are available from the ActionRequest and the Mission
you stored in step 2:
- The current position of the squad member:
ActionRequestcarries the fullSquadMember, whose location is aLocationrecord with anxandycoordinate. - The dimensions of the map, which are part of the
Planetin theMission.
Two properties of the game world from the manual matter here:
- Movement uses Chebyshev distance, so all eight surrounding tiles (including the diagonal ones) are one step away.
- The planet is a torus: it wraps around on both axes. Moving off the right edge puts you on the
left edge. The modulo operator is your friend: mind that in Java the result of
%can be negative for a negative left operand —Math.floorMod(a, b)handles that wraparound correctly without a manual sign fix-up.
Return the chosen tile as a MoveAction. Never return null from the handler: if you cannot decide
on anything, return a NoAction instead.
Step 4: verify
Run the application from your IDE and confirm that it comes up on the port that the game server will
call (8080 by default; see the logic-url in the game server configuration in the next section).
Before wiring up the full game server, it is worth exercising the endpoints on their own: send a
POST /missions with a sample Mission body (the game manual
shows what each request/response looks like) and confirm you get a 201 Created back, then send a
POST /missions/{missionId}/request-action with a sample ActionRequest and check that it returns a
MoveAction. Any HTTP client works for this: a curl one-liner, Postman/Insomnia, or the HTTP
client built into IntelliJ IDEA (a .http file). This is also the fastest way to find out whether the
JSON your service produces actually matches what the manual describes, before a whole running game is
in the way.
Once individual endpoints behave, the game server is the most convenient way to exercise the full flow: it will drive your service turn after turn without you having to script that yourself. Automated tests for this code follow in Lab 2.
Assignment: implement the Mission API
Implement the five Mission API endpoints, a component that tracks the state of the missions you are playing, and a decision logic that moves every squad member to a random adjacent tile. Commit your work in meaningful steps and push it to your team's GitLab repository.
Running against a local game server
The ultimate goal is to have a feature-complete logic-service implementation that can participate in the ColonyOps game, competing against other teams, with all components running on IDLab infrastructure. You will gradually build up towards this situation during the course of the semester.
In the meantime, we provide a simplified game server build to allow for easy local development and testing. We will use Docker Compose to run the game server and its Apache Kafka dependency, as shown in the overview diagram at the top of this page.
Configure the game server
Copy the following Docker Compose definition into a docker-compose.yml file in the root of your project directory:
services:
  mission-runner:
    image: gitlab.stud.atlantis.ugent.be:5050/devops/images/colonyops-mission-runner:latest
    environment:
      KAFKA_BOOTSTRAP_SERVERS: kafka:9092
      KAFKA_ADVERTISED_HOSTNAME: kafka
    volumes:
      - "./game-config:/home/jboss/config${SELINUX_SUFFIX:-}"
    ports:
      - "8090:8090"
    extra_hosts:
      # Makes host.docker.internal resolve on native Docker Engine (Linux); a no-op on Docker Desktop.
      - "host.docker.internal:host-gateway"
    depends_on:
      kafka:
        condition: service_healthy
  kafka:
    image: docker.io/apache/kafka:4.2.0
    hostname: kafka
    environment:
      # Cluster ID for KRaft mode
      CLUSTER_ID: "5L6g3nShT-eMCtK--X86sw"
      # KRaft mode configuration
      KAFKA_NODE_ID: 1
      KAFKA_PROCESS_ROLES: broker,controller
      KAFKA_LISTENERS: PLAINTEXT://:9092,CONTROLLER://:9093
      KAFKA_ADVERTISED_LISTENERS: PLAINTEXT://kafka:9092
      KAFKA_CONTROLLER_LISTENER_NAMES: CONTROLLER
      KAFKA_LISTENER_SECURITY_PROTOCOL_MAP: CONTROLLER:PLAINTEXT,PLAINTEXT:PLAINTEXT
      KAFKA_CONTROLLER_QUORUM_VOTERS: 1@kafka:9093
      # Dev-friendly settings
      KAFKA_OFFSETS_TOPIC_REPLICATION_FACTOR: 1
      KAFKA_TRANSACTION_STATE_LOG_REPLICATION_FACTOR: 1
      KAFKA_TRANSACTION_STATE_LOG_MIN_ISR: 1
      KAFKA_GROUP_INITIAL_REBALANCE_DELAY_MS: 0
      KAFKA_NUM_PARTITIONS: 1
      KAFKA_AUTO_CREATE_TOPICS_ENABLE: "true"
      KAFKA_LOG_FLUSH_INTERVAL_MS: 5000
    ports:
      - "9092:9092"
    healthcheck:
      test:
        [
          "CMD-SHELL",
          "/opt/kafka/bin/kafka-broker-api-versions.sh --bootstrap-server localhost:9092 || exit 1",
        ]
      interval: 30s
      timeout: 10s
      retries: 5
      start_period: 40s
Note that mission-runner now waits for Kafka's healthcheck to report healthy, not just for the
container to have started: KRaft-mode Kafka takes a moment after starting before it's actually ready
to accept connections on 9092, and a bare depends_on: [kafka] would let mission-runner start
before that point.
This setup uses a Docker volume to mount a config file that can be edited to tweak the game's
behaviour. Make sure the expected config file exists by creating a sub directory game-config in
the root of your project, then create a new file application.yaml inside it with the following
content. The commented-out values show what else can be tuned (map size, resource rarity, tech
levels, turn pacing and more) — worth a skim now so you don't have to search for it later:
game:
  # Configure parameters for how the game world is generated
  planet-parameters:
    # The width of the map in tiles. A single value is used as-is; two values pick a random width
    # between them for each game instance.
    map-width: [80]
    # The height of the map in tiles (same single-value/range rule as above).
    map-height: [50, 75]
    chance-of-encountering-life: [0.008]
    chance-of-encountering-water: [0.05]
    chance-of-encountering-metal: [0.01]
    chance-of-encountering-alien-artifact: [0.001]
    number-of-findable-large-resource-deposits: [20]
  # Configure the colonies that will be present in the game world.
  colonies:
    - id: colony-1
      # (Optional) Configure the squad present in the colony.
      squad:
        size: 4
        respawn-delay-turns: 10
      # (Optional) Configure the military and economic tech levels for the colony.
      military-tech-level:
        target-leaf-id: assault-leaf-ion-mastery
        depth-unlocked: 5
      economic-tech-level:
        target-leaf-id: colony-leaf-crate-mastery
        depth-unlocked: 5
      # (Optional) Logic URL for the colony; without one, the server falls back to its own internal
      # default logic.
      logic-url: http://host.docker.internal:8080
    - id: colony-2
    - id: colony-3
    - id: colony-4
      # (Optional) Delay, in turns, before this colony spawns.
      initial-spawn-delay: 10
  # (Optional) Maximum number of turns before the game ends.
  turn-limit: 1200
  # (Optional) Interval between turns, in milliseconds.
  turn-interval-ms: 3000
  # (Optional) Whether the game shuts down when a mission completes (default: false, a new mission
  # starts instead).
  shutdown-on-mission-complete: false
  # (Optional) Whether the game aborts when a logic error is encountered.
  abort-on-logic-error: false
  # (Optional) Seconds to wait between games when shutdown-on-mission-complete is false.
  time-between-games-seconds: 3
Notice that only colony-1 has a logic-url: that is where your running logic-service is reachable
from inside the Docker network. The other colonies are left without one, so the game server falls
back to its own internal (default) logic for them. That gives you three colonies to compare your
implementation against once the game is running. The extra_hosts entry on mission-runner in the
compose file above is what makes host.docker.internal resolve to your machine: this is required
on native Docker Engine (the common case on a Linux dev machine), and harmless on Docker Desktop
(macOS/Windows), where it already resolves.
Start the game server and verify
Start both services by executing:
The game server will run standalone missions in a continuous loop. It will try to contact your logic-service via the Mission API to create or remove missions, request the next move for Squad Members, etc., so make sure your Spring Boot application is running first (see Step 4 above).
Confirm the setup is working before troubleshooting anything on the logic-service side:
docker compose logs -f mission-runnershows whether the backend is reaching your service, or failing to (connection refused, timeouts, ...).- Visit http://localhost:8090/_ui in a browser: this is the Web UI
bundled with the mission-runner (see the overview diagram). It visualises the running
mission, so you can watch
colony-1's squad members move around the planet under your logic and compare them to the other, default-logic colonies.
Practicalities
We strongly advise you to finish this lab before the start of Lab 2 on 7 October 2026.
This lab is evaluated together with Lab 2 after its deadline of 13 October 2026.
The evaluation will be based on the code you have pushed to your GitLab repository, so make sure you commit and push your work regularly.
Warning
All support outside of the physical Lab session is handled via the GitLab Issue tracker. Learn more about the Issue tracker and how to request support here. Do not expect support outside of the normal office hours (Monday to Friday, from 9 AM until 5PM).
Checklist
- Make sure you have a Spring Boot application that implements the logic-service for your team. It should compile, be executable via Maven and host Mission API HTTP endpoints according to the specification in the game manual.
- Provide a mission logic implementation, with the following minimal requirement: it should at least return a "Move to a random adjacent tile"-action for each Squad Member move request.
- Make sure you push your changes to your team's gitlab repository.
- Add an annotated tag1
Lab1(with a fitting message) to the commit you consider the final result of this lab session.
-
Tagging through GitLab UI: use the tab "Code" (left menu), click "Tags" , then "New Tag". You can also tag using git directly:
git tag -a Lab1 -m "Final commit for Lab 1."followed bygit push --follow-tags. More info on tags and the difference between lightweight and annotated, visit https://git-scm.com/docs/git-tag ↩