Development environment
To start the lab assignments you will need the following tools installed on your system:
- Git: version control
- mise: dev tool version manager (used to install the JDK and, later on,
tools like
kubectlandhelm) - JDK 25 (Temurin): installed via mise
- IntelliJ IDEA Community or Ultimate edition
- Docker: see the Docker tutorial for installation instructions
The rest of this page walks you through installing each of these and finishes with a small end-to-end check: create a Java project, open and run it in IntelliJ IDEA, commit it locally, and push it to GitLab. Docker is required for Lab 1, but is not used by this check.
Install Git
Git has become the industry standard for version control. It is a distributed version control system, meaning your local copy of code is a complete version control repository. These fully-functional local repositories make it easy to work offline or remotely: you commit your work locally, and then sync your copy of the repository with the copy on the server.
If you don't have Git installed yet, install it with your operating system's package manager:
You can use Git via its CLI, via a third-party UI application (e.g. Sourcetree), or via the built-in Git tooling in IDEs such as IntelliJ IDEA and VS Code.
Tip
If you have no previous experience with Git, a basic overview can be found here. Git commands will be used heavily throughout the lab sessions, so it is important to get familiar with the basics.
Tip
If you prefer a gamified approach to learning Git, check out Oh My Git!. It is a highly interactive game that introduces players to Git and builds intuition for operations such as merging and rebasing.
Do not use Git Bash on Windows
If you have Git already installed on Windows you may have access to a Git Bash terminal. Do not use it. Git Bash is bundled with Git for Windows, but it is not a proper terminal emulator and has many quirks. Use a proper terminal emulator and shell instead:
Terminals:
- Windows Terminal (Microsoft Store link)
- Linux/macOS: GNOME Terminal, Konsole, Alacritty, Kitty, …
Shells:
- PowerShell (Windows, see the next section; PowerShell Core 7+ required)
- Bash (Linux, macOS, Windows Subsystem for Linux)
- Alternative shells such as zsh and fish are also fine.
Install PowerShell (Windows only)
The pre-installed Windows PowerShell (blue shell icon) is not powerful enough for what we need. Install the modern cross-platform PowerShell with:
Install mise
mise (pronounced "meez") is a polyglot dev tool version manager: think of it as asdf, nvm and pyenv rolled into one. Throughout this course we use mise as the single way to install and pin development tools:
- One command per tool, identical on Windows, macOS and Linux.
- Per-project pinning via a
mise.tomlfile, so everyone on a team runs the exact same versions. - Automatically manages
JAVA_HOMEandPATHfor you.
Right now we only need it to install the JDK, but later labs will use it for
kubectl, helm and friends.
Install the mise CLI
Verify the installation:
Activate mise in your shell
Activation makes mise inject the right tool versions into your PATH and
environment automatically whenever you open a terminal.
Add mise activation to your PowerShell profile:
Restart your terminal and confirm everything is healthy:
Install the JDK (via mise)
A JDK (Java Development Kit) allows you to compile and execute Java applications. We use JDK 25 (Temurin, the Eclipse Adoptium build).
mise supports two flavours of use:
mise use java@temurin-25: pins the JDK in the current directory by writing to (or creating) amise.tomlthere. This is the preferred approach for real projects, because the pinned version travels with the code, so anyone cloning the repo gets the same JDK.mise use --global java@temurin-25: pins the JDK as your global default (in~/.config/mise/config.toml), for use outside any project.
For now, install JDK 25 as your global default so that a fresh terminal anywhere on your machine has Java available:
Once you start working on a project, it can additionally pin its own JDK in a
mise.toml. A project setting takes precedence over your global default, so
all contributors use the version declared by the project. A minimal
project-level mise.toml looks like:
mise sets JAVA_HOME automatically in shells where it is activated (see the
previous section). Verify the installation in a new terminal:
You should see version 25 reported by both commands.
Where does mise put the JDK?
Run mise where java to see the installation directory. IntelliJ IDEA
normally does not need this, but it comes in handy for troubleshooting.
Create and run a scratch Spring Boot project
Before using an IDE, create and run a small project from the terminal. This verifies that mise, JDK 25, and Maven work independently of IDEA. The project is disposable; in Lab 1, you will create the real project for your team.
The following command runs the Spring Boot CLI on demand through mise. It does not install the CLI permanently.
This creates a hello-devops directory containing a Maven project and its
Maven Wrapper. Enter the directory, check which Java version Maven uses,
compile it, and then start the application:
mvnw is the Maven Wrapper: a script included with the
project that downloads a project-compatible Maven version on first use. It
means you do not have to install Maven separately.
permission denied: ./mvnw on Linux/macOS
Make the wrapper executable, then repeat the command:
In the output of the version command, confirm that Java version is 25. A
successful start shows the Spring banner and a line saying the web server
started on port 8080. Stop the process with Ctrl+C. Keep the terminal
open and the hello-devops directory: you will open this same project in IDEA
next.
Install IntelliJ IDEA
An Integrated Development Environment (IDE) is an application that supports a developer in writing applications: code completion, debugging, project navigation, refactoring, and so on.
Which IDE to use is up to you: the project is built with Maven and works across IDEs and from the command line. We recommend IntelliJ IDEA since it is the most-used Java IDE and has excellent Maven support. VS Code is a fine alternative if you are already comfortable with it, though its IntelliSense for Java is not quite on par with IDEA's.
Download IntelliJ IDEA. The Community edition is free and sufficient for this course. UGent students can also get the Ultimate edition at no cost through the JetBrains student program.
Open a Maven project from your computer
You now have a hello-devops project folder on your computer. Do not create a
new project in IDEA: open its existing Maven configuration instead.
- In IDEA's welcome screen, select Open. With another project open, use File → Open instead.
- Browse to the project's root directory and select its
pom.xmlfile. - Select Open as Project if IDEA asks.
- If IDEA asks whether you trust the project, inspect the path and select Trust Project only when it is your project or a course repository.
- Wait for Maven to finish importing dependencies and for indexing to finish. The Maven tool window then lists your project and its lifecycle goals.
The Project tool window shows the files in the repository. Open it via View → Tool Windows → Project. The Maven tool window exposes Maven goals; open it via View → Tool Windows → Maven.
Use the JDK managed by mise
IDEA is a graphical application, so it does not reliably inherit the tool versions active in a terminal. Check that it uses the same JDK as mise:
- In a terminal at the project root, run
mise where javaand copy the path. - In IDEA, open File → Project Structure → Project.
- Confirm that Project SDK is JDK 25. If it is not listed, choose
SDK → Add JDK from disk and select the exact directory printed by
mise where java. - Open Settings → Build, Execution, Deployment → Build Tools → Maven → Runner and set JRE to the project JDK or JDK 25.
Optional mise integration
The community Mise plugin can configure IDE tools supplied by mise automatically. Install it via Settings → Plugins then restart IDEA.
Build and run with Maven in IDEA
The project Maven Wrapper (mvnw or mvnw.cmd) remains the authoritative way
to build from a terminal. In IDEA, configure Maven to use it via
Settings → Build, Execution, Deployment → Build Tools → Maven → Maven home
path → Use Maven wrapper.
You can then use the Maven tool window instead of typing common commands:
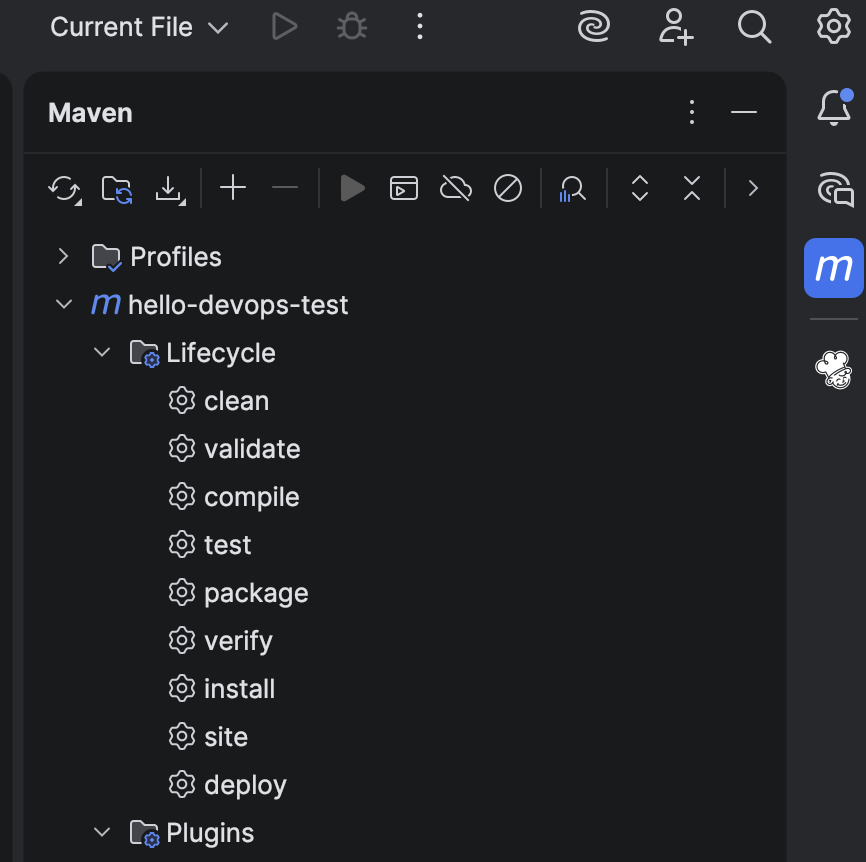
| Goal | Maven tool window action | Terminal equivalent |
|---|---|---|
Re-import after changing pom.xml |
Click Reload All Maven Projects | N/A |
| Compile | Expand Lifecycle and double-click compile | ./mvnw compile |
| Run tests | Expand Lifecycle and double-click test | ./mvnw test |
| Build the application | Expand Lifecycle and double-click package | ./mvnw package |
| Start Spring Boot | Expand Plugins → spring-boot and double-click spring-boot:run |
./mvnw spring-boot:run |
On Windows, replace ./mvnw with mvnw.cmd in terminal commands.
Run configurations
You can also run a Spring Boot application using the green ▶ icon next
to its @SpringBootApplication class. IDEA creates a run configuration
automatically. This is convenient for development, but use the Maven
Wrapper or the Maven tool window when you need to verify the Maven build
used by the course and CI.
Register on GitLab
For this course we use GitLab as the platform for teaching the practical aspects of DevOps:
- GitLab is a web application with a user-friendly interface.
- It has a powerful, extensible CI/CD system driven by declarative pipelines.
- It has integrated issue trackers and wiki pages to help organise projects.
- Every project gets its own Docker image registry, which you will use later for automated deployments.
The GitLab instance you will use is hosted at IDLab (our research group) and provides a responsive experience without the rate limits imposed by public services such as GitHub or Bitbucket.
Steps:
- Go to the course GitLab instance and click Register now.
- Use your UGent email address and username to register. This lets us find you in the system, grant the right permissions, and sync your grades to Ufora.
- Set a recognisable profile picture (preferably the same as your UGent account) in your GitLab profile settings.
Configure glab and Git for HTTPS authentication
We authenticate to GitLab over HTTPS (not SSH) throughout this course.
The glab CLI handles the login flow
and can act as Git's credential helper, avoiding repeated token prompts when
you push or pull.
Install glab via mise:
1. Point glab at our GitLab instance
The course GitLab instance has a pre-provisioned OAuth application for glab.
Register its public client ID to enable browser-based login:
glab config set client_id 74b7a482f33ab0fd15a6f37bb4e789c18199d36152143b0ef55f38a3db3d1789 \
  -g --host gitlab.stud.atlantis.ugent.be
2. Log in
When prompted, select Web login and HTTPS as the Git protocol. Complete the browser login, then return to the terminal.
Example output:
❯ glab auth login --hostname gitlab.stud.atlantis.ugent.be
┃ API hostname:
┃ For instances with a different hostname for the API endpoint.
┃ SSH hostname:
┃ For instances with a different hostname for SSH git operations.
- Signing into gitlab.stud.atlantis.ugent.be
┃ How would you like to sign in?
┃   Web
┃ What domains does this host use for the container registry and image dependency proxy?
┃ Choose default Git protocol:
┃   SSH
┃ > HTTPS
┃ Authenticate Git with your GitLab credentials?
┃
┃ Choose host API protocol:
┃ > HTTPS
- glab config set -h gitlab.stud.atlantis.ugent.be git_protocol https
✓ Configured Git protocol.
- glab config set -h gitlab.stud.atlantis.ugent.be api_protocol https
✓ Configured API protocol.
✓ Logged in as student_username
✓ Stored your credentials in the operating system keyring.
✓ Configuration saved to /Users/idlabugent/Library/Application Support/glab-cli/config.yml
  - Host: gitlab.stud.atlantis.ugent.be
If the browser does not open
Copy the URL printed by glab into a browser yourself. If that is not
possible, ask a teaching assistant before creating a Personal Access Token;
token scopes and course-instance settings can change.
3. Wire Git up to use glab as its credential helper
As your credentials get stored to the default system keyring, it might be that you are already able
to authenticate to git and pull/push internal or private projects. However
to cover our grounds we will explicitly instruct git to use the glab CLI as
a credential helper for the Student GitLab instance.
Configure Git to delegate credentials for our GitLab instance to glab:
git config --global credential."https://gitlab.stud.atlantis.ugent.be".helper ""
git config --global --add credential."https://gitlab.stud.atlantis.ugent.be".helper '!glab auth git-credential'
Why the empty credential helper?
Git credential-helper settings are cumulative. The first command clears the
helpers configured for this GitLab URL at the global level. The second adds
glab for that URL, avoiding conflicts with another global helper.
Also set your name and email so your commits are properly attributed (use the same email as your GitLab account):
Verify with:
You should see that you are logged in and that Git operations are available.
glab manages the OAuth login rather than requiring your GitLab password for
Git commands. Its credential storage depends on your operating system and
glab configuration; never commit or share credentials or access tokens.
Push the sanity-check project to GitLab
As a final end-to-end check, turn the hello-devops project into a local Git
repository and push it to your own GitLab namespace.
1. Create the GitLab project (browser)
In the browser, create a new GitLab project:
choose a blank private project called hello-devops under your own
namespace. Disable Initialize repository with a README so GitLab does not
create a competing first commit.
The empty project page will list instructions for your git config and how to push an existing repository. Make sure to select HTTPS and follow the Push an existing folder instructions in the next step.
2. Push the project (terminal)
In a terminal at the hello-devops project root:
git init --initial-branch=main --object-format=sha1
git remote add origin https://gitlab.stud.atlantis.ugent.be/student_username/hello-devops.git
git add .
git commit -m "Initial commit"
git push --set-upstream origin main
If Git asks for credentials, first run glab auth status --hostname
gitlab.stud.atlantis.ugent.be again. Do not enter your GitLab password in a
Git prompt.
Refresh the project page in your browser and verify that the files are there.
If the push succeeds, your Git, GitLab, and authentication chain is working. In Lab 1, use the course team repository rather than this disposable project.